Showing posts with label kids. Show all posts

Tuesday, July 03, 2012

Stenciled Plate

A week and a half ago, I took one of my 4 year old twins on a mommy-daughter date.  She had been feeling left out of things for a while...her twin sister and her older brother have both been going to occupational therapy for a few months now (for their Sensory Processing Disorder), and while it truly is *work* for them, to her...well, it just looks like she's missing out on all the fun!  She peers through the glass on the door at the O.T. office, and sees the big gym, with the giant therapy balls, the multiple types of therapy swings, the rope ladder, the tunnel slides, the ball pit, the mats everywhere, all the bright colors...and she just thinks she is somehow getting the short end of the deal.


Thus her special day was born.  I love that my daughter shares my love of art, and so our first and longest stop of the day was at a local "paint your own pottery" place.  She had never done this before, and I wasn't sure how she would do.  True to her personality, she struggled with taking direction from the store owner...she is fiercely independent and wanted to do it her OWN way.  She chose to paint a 2-part cupcake - one with a top and a bottom, which she can hide her tiny treasures in.

I had a hard time choosing my own piece, but finally settled on a large plate.  I had some ideas about what I might want to do - but the owner looked at me a little bit strangely when I set my things down on the table and pulled out about 30 stencils (mostly from The Crafter's Workshop!) and started rifling through them trying to decide which to use.  She acted as if she'd never seen a stencil before!  I finally decided on my stencil, and picked my colors of paint.  Then when I told her I thought I would use a make-up sponge to apply the paint, she REALLY disagreed vehemently...practically said it just wasn't going to work.  She kept telling me how "different" this was than other kinds of painting.  And she just didn't see how I was going to manage the stencil with the plate.  She also wanted me to apply the paint to the sponge with the paint brush, rather than dipping the sponge in the paint and tapping it off, which is what I wanted to do.  Because I try to be cooperative, I gave that a try...and it did NOT work...so I went straight to the way I learned from Julie Fei-Fan Balzer...dip the sponge into the paint, then dab it off on a paper, then apply the paint to the stencil.  It worked just fine!  I thought it was so funny how she kept being so discouraging and seemed so rigid about how things had to be done!

Anyway, today I went and picked up my plate...and I just LOVE how it turned out!  When the owner asked which projects I was picking up, I told her "a plate and a cupcake."  She asked which plate it was, and I said, "The one with the peacock feathers."  There was another lady there who said, "OH, the beautiful one!"  The owner, however, said nothing...just brought it to me.  Ha ha...I think she's still holding a grudge against me for using a stencil and a makeup sponge!


The stencil I used is Peacock Feathers, a Balzer Designs stencil made by The Crafter's Workshop.  It is available in both 6"x6" and 12"x12" (which is what I used).  If you've never checked out the stencils from TCW, you MUST - they have TONS of fabulous designs...I can't stop collecting them!  Seriously, though, I used their stencils several times a week in my art journals, or on canvases, on scrapbook pages, on tags...on plates...LOL.  And they have some incredible new ones coming out really soon - check out their blog! 

{My daughter loved her cupcake too...so much so that the minute we got home, she rushed it up to her room before I could even get a picture of it, and now the girls are sleeping...and I'm not about to wake them up!  So hopefully I can add a pic of her cupcake later!}

Tuesday, October 25, 2011

Catching Up With Fall

Grab a cup of coffee - this may be a long one!  We've been quite busy around here, soaking up as much "fall" as possible...even if it hasn't really felt much like fall outside (at least not until TODAY - yay for cloudy, cool weather).  We've taken trips to two different pumpkin patches, taken time to paint some pumpkins, decorated the house, collected quite an assortment of twigs and pine cones and nuts for a nature tray...and had more than our fair share of pumpkin pancakes!  Man I love this time of year!

So this is my painted pumpkin.  I have to tell you...I used to HATE my "doodling" type drawing and painting...but I recently took Stephanie Ackerman's online Random Creative Scrapple Doodle class, and I just love her!  Highly recommend her classes!  (And her blog - she's so encouraging and uplifting!)


The girls had fun painting their pumpkins too.  Like their easy-clean-up outfits?  LOL


Jeremiah really enjoyed the second pumpkin patch we went to (yeah, the pics are all out of order...sigh...I'm too lazy to fix them!).  The ground was all covered in straw, and I let him have free reign.  He had to taste it, of course!  


And if the straw tasted good, surely the pumpkin would too, right?


I am amazed when I look at pictures of the kids - they always look so much older than when I look at them every day.  They're growing up so fast.


We had actually met a couple other moms from our homeschooling group at this pumpkin patch and had lunch together.  The kids had a great time playing together (and running from the swarms of bees!).  No one got stung, thankfully.  And they all had a great time on the tire swing.


The other pumpkin patch we went to was much larger - and though I hate that they end up making you spend a bunch of money on rides and jumpers and such for the kiddos, I do love the eye candy they have in their vast array of pumpkins, gourds, indian corn, etc.  Tables and tables and tables of gorgeous fall colors!! And what a difference a year makes - last year, all three kids fit in this wagon!


The kids were enthralled with the animals - from afar.  They had no desire to go into the petting zoo.  Ha ha.


Climbing on the hay castle is always fun - and free.


We splurged on a pulled quad ride.  The kids thoroughly enjoyed it.  It was a bit bumpy for my suiting.  LOL


Ahh...these tables just make my heart go pitter patter!!


Even the girls were enthralled with the freshly picked and washed gourds that were being brought in from the field.  


And we all took our first trip into and out of a corn maze.  There were 4 hidden boxes in the maze which we had to locate and do crayon rubbings on to form a completed picture...we thought we were NEVER going to find them all!  (And it didn't help that there weren't crayons at some of the stations, so we had to use pieces of corn stalks and rocks to do parts of the rubbings!)  Glad to have experienced it once...but I left feeling all scratchy on my arms, with flashbacks of detassling corn in high school during the summer, and don't think I'll ever need to repeat the corn maze experience!  


So there you have it.  Our fall activities thus far.  What about you?  We'll continue this weekend with a trip to DisneyLand on Friday, to celebrate Jeremiah's first birthday (which is actually on Monday)...and then attend our church's Hallelujah Night on Halloween.  I've got a couple of cute Halloween projects to show you on Halloween, too, so stay tuned!

Tuesday, April 05, 2011

Easy No-Sew Tutu With Butterflies


With Easter fast-approaching, I know many moms who are looking for non-candy Easter basket goodies for their little ones.  This super sweet - and sugar free - butterfly tutu definitely fits the bill.  What little girl wouldn't LOVE to find this in her basket on Easter morning?!  To find out how to make this sweet fairy-tale tutu, at very little cost (both time and money-wise), head over to Crafts Unleashed today for a step-by-step tutorial.


And this doesn't have to be limited to Easter, either!  Dress-up trunks, birthday parties, tea parties...these are so easy and affordable to make, your little girl will probably want one in every color, for every occasion!

Wednesday, January 12, 2011

Snow Day Project - Foamies Snowflakes

Anyone who has children knows that while the words “SNOW DAY” bring shouts of excitement from the mouths of any young children in the household, those same words may NOT bring the same level of excitement for the parents of those same small children!  For that matter, “sick day,” “holiday,” or “parent-teacher conferences” may also have the same effect.  The kids are home, mom and/or dad are off work and have things to do, and in spite of the dozens of “I just *have* to have THAT!” toys and activities received mere weeks ago during the holidays, suddenly…the kids are “soooo bored!”
Enter the wonderful line of Foamies Activity Buckets!  For these particular snowflakes, you’ll need:
I opened up both containers of these Foamies and literally just dumped them on the kitchen table, and let my three older children, along with a couple of my friend’s children, just go at it.  The larger Activity Bucket contains 24 circle bases, with holes punched in the top (so they can be hung from the included pre-cut fishing line), a large assortment of shapes and sizes of snowflakes (self-adhesive), several jewel-rhinestones, a small tube of white glue, a small tube of silver glitter glue, and a small package of white/iridescent glitter. All of the foam items and “jewels” in the Activity Bucket are in white or blue tones.   The smaller Baby Bucket contains a wonderful assortment of glittered snowflakes in smaller sizes, plus circles in two different sizes – all self adhesive as well.  There were two shades of pink, two shades of blue, and a beautiful glittery white.
Spread on table for kids to easily choose from pieces
The children were all quite creative in how they assembled their snowflakes, each taking different approaches.  I watched as one child even tore the balls off the tips of one snowflake to suit his liking, before sticking it down onto another snowflake.  One of my three-year old twins was content to just tear snowflakes apart – which is par for the course – she enjoys tearing almost anything apart…yet, it DID keep her occupied!  My 5-year old most enjoyed two different aspects – one, the silver glitter glue, and two, stacking as many layers as he possibly could – proudly telling me exactly how many layers he was able to add to each snowflake.
Kit includes rhinestones and glue to adhere them!
Layer upon layer upon layer!!
Even I couldn’t help but make a few snowflakes myself – the glitter just called out to me!  I tried removing the backing from one of the self-adhesive snowflakes, and dipping it in the glitter (much easier than spreading wet glue around and applying glitter that way).  My son watched and then had to try it himself, of course!
Dip adhesive side in provided glitter for alternative effect
I say you can’t go wrong with the Foamies Activity Buckets – and I’d definitely encourage you to stock up on a few to keep on hand for those days when you just may have some “bored” children at home!  For a great selection of Foamies Activity Buckets, other Foamies kids' crafts, and other kids' crafts in general, check out Consumer Crafts!!

Monday, October 04, 2010

Random weekend crafty fun


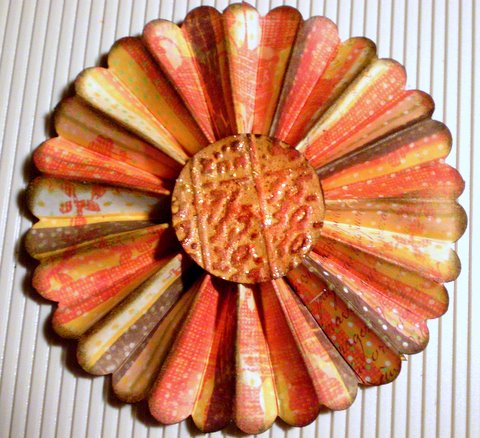
How completely GORGEOUS is this flower rosette?!  I have been admiring these paper rosettes for a while now, on other people's blogs.  I've seen tutorials on how to make them, and I've seen Tim Holtz's new Sizzix die cut that makes it super easy to make the rosettes.  My super-sweet hubby gave me a Michael's gift card this weekend, and I was able to get a few hours of ME time this weekend, so I spent some time wandering the aisles of Michaels, loving their new-and-improved selection of Tim Holtz products.  Anyway, they do not have the new rosette die...but I was thinking that I might want the Martha Stewart score board anyway, so that I could make multiple sizes of rosettes...so I got one!  Additionally, I did find a pair of Tim Holtz Sizzix embossing folders (the one with the notebook page and the numbers collage).  My first few attempts at making the rosette failed, but after watching this YouTube video, I finally got it right (AND got the idea to scallop the edge before scoring the paper, which I LOVE, anyway).


I don't remember the name of the paper pad this sheet of paper is from.  I used a scallop-edge punch from Stampin' Up!.  For the center of the rosette, I used the numbers collage embossing folder to emboss a sheet of mustard-colored cardstock.  I then used distress ink pads direct-to-paper to rub over the raised portions (colors used - Barn Door, Spiced Marmalade, Vintage Photo).  I punched out a circle, and inked around the edges with Walnut Stain, then glued it onto the rosette.  I also used Vintage Photo and Walnut Stain distress inks with a foam ink applicator to apply ink to the scalloped edges of the rosette and the raised "mountains" of the rosette.  Finally, I added some Scattered Straw and Spiced Marmalade colored Distress Stickles over the  embossed center of the rosette to give it a bit of vintage sparkle.  


Can you see that gorgeous sparkle from the distress stickles?  I LOVE them!!!  They are more matte and muted than regular stickles, and have a more vintage look to them.  They are quickly becoming a favorite of mine!!  I think I have 9 colors now...but STILL haven't found the ONE I've been searching for - Rock Candy!!  Anyway, I can't wait to make more of these rosettes and put them on some fun projects!!  (Or even make a project out of just the rosettes...can you see a rosette garland in your mind??)
*******************************************************


This next project is one I did with the kids, and I got the idea from here.  I free-hand drew the tree onto kraft paper and used removable glue dots to stick it to the slider doors.  I used recycled (i.e. the brown ones, not ones I've used!) coffee filters, and I sprayed them with water before the kids began painting them.  Rather than use watercolors (which the twins tend to really dig the paintbrushes into), I just watered down some tempera paints.  They had a blast - especially Mackenzie, who dumped the bowl of orange paint not once, but twice!  I let the coffee filters dry, and then cut various sizes and shapes of leaves out of them.  The kids then helped me stick them to the slider door...on the tree, and falling down to a "pile" near the bottom.


I love the colors of the leaves, and the way they seem to have a stained-glass effect against the outdoor light.  AND, as a bonus, while it was VERY hot all week, like magic, today it was wonderfully cloudy and cool!!  It was almost as if putting up the "fall tree" brought with it some "fall weather."  :)  If only the fall weather would stick around!!


*******************************************************


This final project is a simple little tag I made using another paper flower technique.  It was originally designed to be made using Tim Holtz's grungepaper, but not having any yet, I've been using cardstock.  I first made them on my fall banner, but since then, have learned that coating the flower pieces with Mod Podge on both sides before assembling the flowers actually helps a lot in helping the flowers keep their structure and gives them a really cool leather-like texture.  To make this tag, I started with a piece of pale yellow cardstock.  I cut the tag on my Cricut, and used an EK Success edge punch along the bottom.  I cut a 1/2" circle using a punch, out of the same paper I was using for the flower, then used a 1/4" hole punch to punch the center out of it, thus creating a "hole reinforcement" for the hole at the top of the tag - a technique I learned during one of the many tutorials I watch.  I then used 3 leaves I cut from my Cricut as masks, around which I applied several colors of distress inks and some Glimmer Mist in tiger lily.  


Finally, I stamped "gratitude" along the bottom, and tied a ribbon through the top.  I inked the edges of the flower with a little distress ink before gluing it to the tag, and that was it.  I sent the tag off with a note of thanks to a mama who had loaned a baby wrap to me for a while.


OH - I also did a page in my Inspiration Journal...I'll post that sometime this week.  And yes, I realize I didn't post an Inspiration Wednesday post last week.  I just didn't get a chance to work in my Inspiration Journal last week...but I made up for it this weekend.  :)

What about you?  Did you have a creative weekend?  I'd love links to whatever you created, if you did!!

Saturday, September 11, 2010

Young Boy's Handmade Birthday Gift


I don't know about you, but whenever one or more of my children gets invited to a friend's birthday party, I never seem to have a problem thinking up handmade gift-ideas for little girls, no matter the age.  But when it comes to little boys, once they're past the baby/toddler stage, it gets increasingly difficult to think of handmade  gift ideas.  So this week, as we approached today's party for my son's friend's party, a little boy turning 5 years old - a little boy who is ALL STAR-WARS these days, I had NO IDEA what to make.  His mom suggested a Star Wars pillow case...but I had no Star Wars fabric on hand, and really no money to go get any at the moment...so I wanted to come up with an idea using things I had on hand.

I started brainstorming with my OWN 5 year old son what things he really likes to do...and we came up with the fact that he really enjoys playing games.  So as I was laying in bed Thursday night, about to fall asleep, this idea came to me (and remember how I said I'm NOT one of those creative people who has to keep a notebook by my bedside to write down ideas?  Yeah - now I am!).  Anyway, I jotted it down before I drifted into never-never land, so that I wouldn't forget, and on Friday, Anthony and I made it a reality.

It was SUPER EASY.  I took a piece of 12x12 canvas (or duck cloth - whatever they call it in YOUR fabric store), and serged the edges so they won't fray.  Meanwhile, I sent my son out to our back yard (which is unfinished) to find rocks, while I painted tic-tac-toe lines on the canvas, using regular acrylic craft paint.  While that dried, my son and I went through the rocks and picked the ones that were relatively close in size and had at least one flat-enough side so that we'd be able to paint an X or O on it.

We washed the rocks, dried them thoroughly, and let them dry in the sun for a little while.  Meanwhile, I found a cloth, drawstring bag (have no idea what it came from), and used foam stamps with white acrylic paint to stamp, "Boys will be boys" on one side, and the child's name on the other side.  Once the rocks had dried, Anthony helped me paint the X's and O's on them.  He loved that it was something he could actually help with.


After it was all finished, we put the rocks in the bag, rolled up the canvas and added it to the bag, and pulled the drawstring closed.  I made a "card" using a shipping tag and distress inks and added it to the outside of the bag (wish I would've taken a pic of that).  Anthony LOVED how it all turned out - he asked me, "So when do you think I could get a gift like this??"  I said, "Well, maybe for Christmas!"  He thought for a minute, and then said, "Well...which wrapping paper will it be in?"  LOL

Sunday, August 22, 2010

Happy Birthday Daddy!!

This past Thursday was my husband's birthday.  I'm always at a loss as to what to have the kiddos do for him for his birthday (or, for that matter, what to do for him myself...).  I had made plans to have someone watch the kids so he and I could have a date night at the movies (a first in a LOOOONG time), which I knew he would enjoy.  And as I sat thinking of birthday card ideas for the kids to make, while we ate our Pizza Hut pizza hut, an idea formed in my head. 


We finished dinner, and I told the kids we had to work quickly (this was Wednesday night) before Daddy got home from work.  I cut the lid off one of the pizza boxes.  Anthony was just dying to know what on earth I was going to do with THAT.  I cut 4 squares from the pizza cardboard, about 4.25 inches by 4.5 inches each.  I cut matching sized pieces of cardstock and glued them to either side of the 4 pieces of cardboard.  I then cut 3 pieces of light yellow colored cardstock the same size and found a coordinating color (a rusty color) of acrylic craft paint.  I took turns painting one of each of my kiddos' hands and had them make a hand print on a piece of the yellow cardstock.  (This took some cajoling on my part for my sensory-challenged 2-year olds!)  After quickly washing their hands before they could touch anything, I used my heat gun to dry the hand prints, then wrote their names and the date on each of their hand prints, and let them each draw on the opposite side of their hand prints.

Meanwhile, I began running the covered cardboard pieces through my fun new tool - the Zutter Distrezz-it-All - to distress the edges.  Once the children were finished with their pieces, I also ran those through the Distrezz-it-All as well.  I put the pages in order and glued down pictures of the children opposite their hand prints, adding additional photos on the other pages.  I added a stamped greeting, a dated tag, some crumpled and inked book text, a piece of corrugated cardboard, and a playing card embellishment with a quote on it to the front of the booklet.  I then used my Crop-a-dile to punch holes in all of the pages, near the top and bottom, and used book rings to make the entire thing into a little booklet.

You can see here how thick it is and the texture the pages have due to the cardboard and distressing:


Here are the pages inside the book:


Another example of what the Distrezz-it-All does:


More pages:


My husband loved the book/card, and now he has both something he can take to work with him to show off current pictures of his children, as well as a keepsake/mini-album that I'm sure he will treasure much longer than an ordinary birthday card!!  And my son loves that we made it from a pizza box!!  :)

LinkWithin

Related Posts Plugin for WordPress, Blogger...