Showing posts with label organization. Show all posts

Monday, January 10, 2011

Recycled Tin Cans - Crafty Organizer Tutorial (Updated!!)

I posted this project on Crafts Unleashed last week, but wanted to share it with you all too!!  When I first organized my current craft studio, I created a unique craft organizer from quart-size paint cans.  I wish I could take all the credit for the idea, but I had actually seen a picture of something similar in a magazine, with no instructions attached (though I never could remember which one), and thought, "Hey, I could do that!"  My first organizer was made with store-bought, clean cans, and covered with simple scrapbooking papers.  My next organizer was made as a gift for a friend, out of larger, 24-oz recycled infant formula canisters, and it was at that time that all of my friends began asking for instructions on how to make this organizer!!  This is a fun and simple project, can be done in a few hours, makes a great gift or storage unit for your own studio, AND is a great way to recycle - it doesn't get much better than that!

For this project, I used 12.5 oz infant formula cans to make my organizer.  The possibilities are practically endless as to what you could use - just be careful with any sharp edges.
  • Clean out your cans well. I recommend against using water if your cans are metal, as it is very hard to prevent them from rusting. I used a baby wipe to clean mine out, and then dried them well with a paper towel. Be careful with the edge - it's not super sharp, but it's still possible to cut your hand if you're not careful.
  • I chose not to remove the paper from my cans, but you may decide to - it's your choice.  Since I left the paper on, I needed to put a coat of gesso on before starting my decoupage.

  • I had some GORGEOUS vintage music to use for covering my cans - check out the copyright date on this music!!  Tear the music into strips.  Using a foam brush, paint on layers of Mod Podge, and then lay on the strips of music (or other paper), gently but firmly pushing the paper down into the glue and smoothing out any wrinkles.  Let each layer dry before adding any additional layers.

  • Using an ink foam applicator, add distress ink as desired to highlight the torn edges of the music sheets and add depth to the paper.  I used Vintage Photo and Walnut Stain.  Then cover the paper in another coat of Mod Podge.  I used Matte Mod Podge.  Two final layers of Mod Podge will give a nice protective finish while keeping any stickiness and/or brush strokes to a minimum, but make sure to let the cans dry thoroughly between layers.

  • After the cans have dried, add whatever embellishments are desired.  I added vintage-y looking trims around each can to complement the vintage music.  Once you are happy with your cans, use a hot glue gun to build your pyramid.  Starting with the bottom row, use the glue gun to hot glue the cans to each other at the points where they touch in the center and on the backs of the cans.  For the middle and top rows, also add glue where they touch the cans below them.  Once they are all glued together, the pyramid will be quite sturdy - however, I still recommend always picking it up by the bottom row, to avoid stressing the glue points on the top can.


I hope you've enjoyed this updated tutorial - and that you'll find some cans to recycle in your own home to turn into a great crafty organizer for YOUR studio!!  Make sure you leave a comment with a link if you do!

Linking up to:


Sunday, January 02, 2011

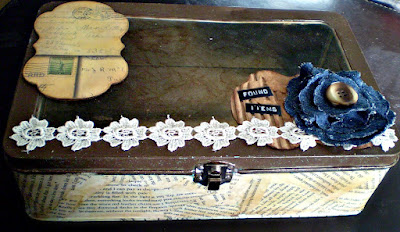
Shabby Chic Altered Tin - Found Items


Happy New Year to everyone!!  I hope 2011 is off to a great start for you - and of course, quite importantly, a CREATIVE start!  I was able, for the first time in many years, to actually stay up for the passing into the new year...and was able to accomplish something crafty at the same time, while my hubby cooked up a huge batch of delicious seafood gumbo - YUM!

Over at Crafts Unleashed, we've been focusing on crafty organization for the last week (and this coming week, too!)...and while my crafty space is, mostly, pretty well organized, I do still have certain odds and ends that just aren't quite organized to my liking.  OR, perhaps they are organized, but I don't happen to care for the actual containers in which they are stored.  So a couple of my goals for the first part of this year are to re-fashion some of the uglier storage containers, and to create some new solutions for things that aren't working.

This project was the first "turn ugly into pretty" one for the year.  Here's what I had to start with:


This tin, with an acrylic window on top, was originally a storage tin for a Stampin' Up! punch and stamp set, I believe - if I'm not mistaken - from MANY years ago.  It has since been used to store various sets of products - everything from tools to stamps to ink pads and stickles.  But...it's weird blue color with squiggly white lines on it just weren't working for me.  So, rather than scrap it altogether, I decided to alter it.

I started out by using my Espresso colored Adirondack paint dabber around the top edges.  Bits of the blue tin showed through after one coat, but I decided to not add a second coat, because I thought the bits of blue showing through added character.

Next, I got out my matte Mod Podge and a foam paint brush.  I have several books in my craft room that are for the sole purpose of tear pages out of, so I tore several pages out of one and tore them into smaller pieces in preparation for adding to the tin.  I painted a thin layer of Mod Podge onto the tin (starting on the bottom), and gradually added piece after piece of torn paper, adding more Mod Podge as needed to glue edges down.  After covering the bottom, I also covered the sides of the tin.  I used some Tim Holtz tissue tape to cover the bottom edges of the tin, wrapping it around to cover the gap between the sides and the bottom.


Once the paper and glue had dried, I used my foam ink applicators and distress inks (in Wild Honey, Vintage Photo, and Walnut Stain) to add color to the papers.  After the ink had dried, I added a top coat of Mod Podge, also covering the area of tin which had been painted with the dabber.


Next, I used felt on my ink applicator, with alcohol inks in Mushroom and Latte, with some Blending Solution, to add some color to the window of the container.  I added the ink to both the inside and outside of the window, for added effect.

I then used Spellbinders Nestabilities Labels 14, and cut 2 pieces of Donna Salazar's Zutter cardboard, and one piece of Tim Holtz cardstock from his Lost & Found collection, all using the largest die in the set.  I inked the piece of cardstock with distress ink, then glued it to one of the cardboard pieces, and glued the entire piece to the top of the tin.  For the second piece of cardboard, I tore most of one side of the cardboard off, revealing the corrugated center.  I inked the ridges with a Clearsnap chalk ink Catseye, and inked the edges with Walnut Stain distress ink, then glued the piece down on the tin.  I added a piece of flower trim across the entire tin, gluing it down with Glossy Accents.

To make the denim flower, I used the Spellbinders Nestabilities Classic Scalloped Circles (large), and a piece of my son's old cut-off jeans which I had saved.  I cut one scalloped circle in every size except the largest and smallest sizes (so the 5 center sizes).  (Note: I had to run the sandwich through my Big Kick back and forth several times to get the denim to cut all the way through.)  For each circle, I laid down a large dollop of Fabri-tac glue on my non-stick craft mat, laid the cut circle on top of it, then used my fingers to twist the circle and work it until it had pleated and formed into the shape I wanted it.  After all five layers were done in this way, I used the Fabri-tac glue to glue all the layers together, added a vintage button (which belonged to my grandfather) on top, and glued the flower to the corner of the tin.  

Finally, to finish things off, I used my Dymo labeler (believe it or not, one of the things I bought with my Michael's gift card after Christmas!!) to make the "Found Items" label.  I *adore* the look of the old Dymo labels!!!


I plan to keep odds and ends like dice, vintage porcelain dolls, bingo markers, corks, dominoes, etc., in here...cool things that I definitely want to keep for projects, but which I have NO IDEA where else I would keep!!  I absolutely LOVE how this turned out, and am SO glad I did not throw out the ugly blue tin!!

I think my NEXT storage solution needs to be something for storing all of my various glimmer/shimmer/smooch mists and sprays.  The plastic basket they are currently in is no longer large enough for them, and I'd like something that fits in with my craft studio a little better...so I'm considering trying to make my own container using corrugated board and binding it at the corners with jute.  I'll let you know if I do...and if so, how that works out!

So what about YOU?  Do you have any ugly storage items in your crafty space that you'd like to attempt a makeover on?  If so, I'd love to see your finished project - so make sure to leave a link in the comments!!

handmade projects


Tuesday, December 28, 2010

Crafty Organization

You've seen the pictures, and drooled over my crafting space...right?  But have you read about how easy it was to put together my main crafting station?


If you HAVEN'T, then you'll certainly want to hurry over to Crafts Unleashed today and read my post, where I describe in detail how simple it was to create my work station!!  We're focusing on crafty organization all week over at Crafts Unleashed, so be sure to visit all week long for inspiration and tips on how to organize YOUR creative space!  And every Friday, there is a giveaway - so be sure to keep on visiting for your chance to win some creative goodness!

Thursday, December 31, 2009

Craft Room Re-Do

So, as I explained in my last post, I haven't been doing much crafting lately...but even if I COULD have been crafting, I really COULDN'T have been crafting, because my craft room looked like an explosion had taken place. Somehow, slowly but surely, I had managed to accumulate so much crafting STUFF that every surface in my room was covered. And the day after Thanksgiving? I bought TONS of fabric - which was all still piled in bag after bag, on the floor, behind my desk...making it impossible to even get to my chair!! I had NO STORAGE left, and no ideas on where I could add storage without spilling into other rooms of the house (which my dear, wonderful hubby, who is so generous to allow me to take an entire room of the house for my crafts in the first place, was NOT in favor of!).

In steps my dad (who is visiting us for a long winter's vacation from New Hampshire), along my wonderful hubby, with a brainstorm of an idea. Replace my desk with a homemade workstation, at counter-height, with storage underneath! BRILLIANT! Initially, my dad suggested kitchen base cabinets, but upon measuring how much space we could work with and figuring out the cost, it was going to be more than I could afford to spend. Then I remembered seeing something similar to what I needed on Jona's blog a while back. So off to Ikea we went!

A day of building and a day of organizing later, this is what I have!!! I'm so happy!!


The workstation itself is made up of 6 metal shelf carts from Ikea - 3 are 36" long by 14" deep ($39.99 each), and the other 3 are 18" long by 14" deep ($34.99 each). They are arranged in such a way that I have about 15" of leg room on the back side, where I'll be sitting and working. The top is one piece of 83"x44" pressboard and one piece of 83"x44" gloss white flat wall paneling (total of about $35.00), glued together with Liquid Nails. To attach the top to the shelves, my dad screwed eyescrews into the bottom of the worktop, then used 20-guage wire and wired the shelves to the worktop. He also wired the selves to each other, so they'd stay in place and not shift around.

I used double sided sticky tape to put my cutting mat (24"x36") on one end of the workstation, so that it won't move around. I LOVE that I can have it there all the time and not have to move it around (and not be working on top of it all the time like I was on my old craft desk)! I have my printer and my Cricut on the other end of the workstation, and still have TONS of workspace. I do need to get a new chair, because my old chair doesn't raise up high enough. The workstation is the perfect height for standing at, though - which I often like to do, especially when I'm cutting fabric, and my back used to get so sore from leaning over to cut fabric on my desk!


I have my sewing machine cabine at an L-shape to my workstation, which is the same as it was with my old craft desk. It works out well there for me.


The storage cubes to the right of my workstation. They mostly hold scrapbooking/papercrafting supplies, stamping supplies, embellishments, etc. (The cubes are from Target.)


You can see that my serger is now sitting on the long desk against the wall behind my workstation, so I basically will be sitting in the middle of all of my crafting "stuff." Isn't it AWESOME?!


This is the view from the working side of my workstation. I have the things I use most often on the working side...my sewing basket, Xyron, Sizzix, dies, Cricut cartridges, a box with elastics/zippers/etc., a box with cover-yourself buttons/magnets/etc., a drawer for purse handles, a basket for sewing works-in-progress, and space on the floor for big tubs of things like sheets, clothing blanks, and tulle/ribbon/etc.


On the front side of the workstation, the shelves hold mostly fabric...felt, flannel, a bag of tulle, some corduroy, chenille, and other varilous fabrics. There is a box of cloth diapers for making burp cloths, an art kit of the kids, and even an empty shelf (with empty plastic boxes).


The shelf on the end holds all fleece - bulky stuff!!


My serger on the back desk, which is built into the niche in the wall (this is supposed to be the formal dining room of the house). That cabinet is filled with items to be recycled or altered.


The kids' desk..not much has changed (although it's much cleaner now than it was a week ago).


The view from above, on the stairs.


So what do you think? I am IN LOVE!!!! Signing off to go do some crafting...

Friday, October 03, 2008

Sanctuary


Welcome, company girls!! Grab a cup and have a seat! We don't have any big plans for the weekend...whew! After a tiring couple weeks, maybe some down-time is what we need around here!!

This week, Rachel Anne had us thinking about a mission statement for our homes. I still haven't written it out...(you can read my last post for an overview of my week), but I have pondered it a lot. I want our home to be a true sanctuary, a place of safety and refuge for our family; a place where our children will always know love and acceptance, discipline and forgiveness; a place where friends can come to find fellowship, a shoulder, a smile, good food, laughter, kleenex...whatever they need. I want our home to not be a museum, untouchable, but to be organized and functional, comforting, welcoming, and lived-in. I want it to be a place where creativity is nurtured and encouraged, where learning is fun, and where contentment is found in the simple things. I want the joy of the Lord to not be stifled by the things in our house. I want our home to be a true sanctuary.

If you would like more ideas about creating sanctuary, head on over to Home Sanctuary and check out Rachel Anne's wonderful ideas.

Thursday, October 02, 2008

Having it all together...the myth.

Or "1-800-222-1222" (that's the phone number for California Poison Control, in case you ever need it).

Or "Juggling 101."

Or "Man, I'm tired."

I couldn't decide what to title this post. It's been a challenging week, and we've only left the house once (and that was the easy part!). Both girls are teething, they've been on opposite schedules sleep-wise (and I just don't believe in waking a sleeping baby to try to get them back on the same schedule), and Anthony hasn't been napping well. Makayla woke up 5 times the night before last, and Anthony's been waking up with nightmares.

Remember the fun blue slime I made for Anthony? Well...we had a fun playdate here yesterday, with LOTS of kiddos (seriously - 4 moms, 10 kids). When everything got cleaned up, unbeknownst to me, Anthony put his bag of slime, open, on a low shelf in the craft room. Later in the day, I left the room to fill up my cup of water in the kitchen and get my phone - and when I returned, darling Makayla was sitting in the midst of a pile of blue slime, with blue drool dripping from her chin. Yum!! A quick call to Poison Control (mind you - Anthony is 3.5 years old and I've NEVER had to call Poison Control before!!) reassured me that she would be fine and that I should just give her some water. In sharing the story with a friend, I learned that, according to Poison Control, your kiddo can also eat up to 10 adult-strength ibuprofen and still be okay. Hopefully I won't ever need that information, but all the same, good to know.

My friends say I inspire them. My friends say they don't know how I do what I do. My friends say I'm supermom. Know what? It's all a juggling act. See, some weeks, the housework gets done, and there's no time for crafting or playdates. And some weeks mom gets lots of craft time, and the kids spend too much time entertaining themselves. And some weeks, we go to lots of playdates, but no housework gets done. And some nights, dinner just doesn't get made, and Darrell goes back out after he gets home from work and gets take-out. And some weeks, I try to do it all, and then I'm dog-tired, and I yell at Anthony too much and I don't have enough patience with the babies, and I'm not very nice to my husband. And my brain doesn't work quite right, because I haven't been getting nearly enough sleep. Really, does that sound like the picture of someone who "has it all together???"

I, like every other mama out there, am doing the best that I can. Some days are better than others, and some days I'd like to have a "do over" button. But I'm okay with my imperfection, because I know that He is who greater than me is stronger when I am weaker. We're making memories and we're living life. This is a journey, and I'm not focusing on trying to achieve some unachievable end, but rather, I want to focus on enjoying the daily travels.

So, join me, won't you? Let go of the myth and the mommy guilt, and enjoy the imperfect journey.

LinkWithin

Related Posts Plugin for WordPress, Blogger...