Wednesday, January 26, 2011

LOVE Showdown - go vote!!

Hey my friendly followers...if you loved my LOVE banner from my last post, why don't you just hop on over to Crafts Unleashed and leave a comment voting for my LOVE banner as your favorite in the Crafts Unleashed Design Team LOVE Showdown!!  :-)

Click photo to take you to Crafts Unleashed, then leave comment to vote


(You'll also get to see some other pretty cool Valentine's projects...but of course, we designers take our bragging rights pretty seriously, so of course you'll vote for me, right?)

Tuesday, January 25, 2011

LOVE Banner Tutorial - Valentine's Home Decor

I have really great memories of Valentine’s Day from my childhood.  My mom really went all-out for the holiday…from decorating the house with hanging tissue-paper hearts and banners, to breakfast on a table covered in red and pink decorations, and dinner with more surprises and fancy decorations…she really out-did herself.  As a mom now, I wonder how she did it all.  After all, she was a working mom; and as a stay-at-home mom, I am ashamed to admit that I, um, have NEVER put up a single Valentine’s decoration, or really done anything spectacular for my kids for the day.  I think I *did* buy some “x” and “o” shaped pancake molds one year, and they were a flop.  Anyway, this year, I am resolving to start doing a little more – and THIS banner is my start!
To create this banner, you’ll need these things:
First, you need to prepare your corrugated cardboard backing pieces.  Cut 4 pieces of cardboard, about 5″ x 7″.  Then, peel the front off one side, revealing most of the corrugation inside.  Take the white ink pad, and rub it directly over the corrugated cardboard, so that the bumps of the corrugations are highlighted with the white ink.  Set the cardboard pieces aside to dry.
Love Banner corrugated cardboard
Peel most of the facing off the cardboard
Next, take a sheet of black text paper from the Core’dinations paper pad, and lightly sand the surface of it using a sanding block, revealing the contrasting color beneath the black.  Cut four pieces of paper, 4″ x 6″, and adhere one to each piece of cardboard using Fabri-tac (I like using this glue due to its great grab and ability to use with wet applications).  Next, place your pieces in a protective spray box (I have a homemade one), and spritz each piece with a homemade Perfect Pearl spray (instructions to come!) or your choice of shimmery mist.
Background misted with homemade Perfect Pearl mist
Now you will cut take a sheet of the ivory-colored large dotted paper from the Core’dinations paper pad, and sand the dots, revealing the lighter color.  Then, you will use the largest die from the Nestabilities Labels 4 set to die cut a label shape for each of the four banner pieces.  Glue them onto the foundation pieces.
Adhere Nestabilities Label 4 to background
Using the Cricut font cartridge of your choice (I used Alphalicious), cut the letters to spell “LOVE,” at about 3″ size (depending on their width, you may need to adjust, to fit on the label), out of a sheet of the damask Core’dinations paper in red, sanding it before cutting.  Use Distress Ink and an ink blending tool with foam pad to add ink around the edges of the letters, and then glue the letters to the labels.
Using the Sweethearts cartridge (or any cartridge with a heart shape), cut several hearts in 1.25″ and 2″ sizes, also from the red damask paper.  These will be used for embellishing.
Cut four 1.75″ x 12″ strips of the red damask Core’dinations paper and lightly sand them.  Take a strip of the paper, and lightly spritz both sides of the paper with water to make it more pliable.  Begin folding the paper to make pleats in it.  Put a strip of Fabri-tac adhesive down across the very bottom of one of the banner pieces, and lay the pleated red cardstock across it, pushing down and holding for a short time until the glue grabs and holds the pleats in place.  Lay another bead of  Fabri-tac down on top of the pleated cardstock, at the very top of the pleats, and cover it with a 1/2″ wide strip of the ivory dotted Core’dinations paper.  Trim both the red and ivory cardstocks even at the sides of the banner piece, and then use scissors to cut a slight wave pattern in the pleated cardstock at the bottom.  Repeat for all of the banner pieces.
Begin embellishing the banner pieces with the red hearts, hot-fix rhinestones, and handmade tulle flowers as desired.   Use Glossy Accents to add a glossy, dimensional accent to areas of cardstock or entire pieces of cardstock.  I used it on embossed (raised) areas of some hearts, or on entire hearts, and on the dots of the strips at the bottoms of the banner pieces.
Use Paper Glaze to accent embossing or add dimension
Use Glossy Accents to accent embossing or add dimension
Twisted tulle flower with hot fix rhinestone and cardstock heart center
You can get creative with Fabri-tac and tulle in making flowers.  In the above flower, I covered a piece of cardstock with adhesive, then took a length of tulle and began twisting it and laying it down on the glue, going round and round until I covered the cardstock.  Below, I also covered a piece of cardstock in adhesive, but rather than twist the tulle, I simply gathered some between my fingers and pushed it down into the adhesive, then repeated over and over until I had a nice, floofy flower and the cardstock was covered.
Bunched tulle flower and distress-ink heart
You can see above that I rubbed a distress ink pad directly over my heart, so the ink hit only the raised, embossed areas.  I also inked the edges of the heart.
Continue to embellish the banner pieces as desired until you are satisfied.  Once completed, punch holes in the top corners of each piece, and thread twine through the holes of each piece, leaving about 3-4 inches between each banner piece and about 18 inches at each end for hanging.  Cut pieces of tulle and ribbon approximately 5 inches long and tie them around the twine all along the twine, as few or as many as desired, until you reach the look you desire.
Love Banner Completed
Now…isn’t that LOVE-ly?!
*****
Note: This project was made for the Crafts Unleashed blog, as part of a "LOVE" home decor competition amongst the Crafts Unleashed design team this month.  Go check out the other projects, and vote for your favorite (hint, hint!!) here!!

Sunday, January 23, 2011

Compendium of Curiosities Challenge #28

Well, I haven't participated in the CCC for a while, but I was feeling the need to do some art for ME tonight, rather than for anyone else, so I did!  Without further ado, here is my creation.  For more info on the Compendium challenges, check out Linda's blog!!

Thursday, January 13, 2011

I want to live in her studio!

I know I have a wonderful crafty studio.  I do.  But sometimes I look at it and think, "This really is just a little TOO clean and neat and white and organized for me."  Seriously.  Like...it needs to be grunged up and definitely needs more flair...but that's a whole project for another day.  Today...I'm laying on the couch, head pounding, throat raw, coughing, sniffling...doing that "couch mommy-ing" thing where you just try to keep all the kids from killing each other until hubby gets home.  And feeling so thankful that he has 3 day weekends every weekend!

Anyway, as I was saying...my studio...now THIS studio...this studio is one I just want to hop right into.  Seriously.  The pictures just call out to me.  See that row of jars in the background, on the little shelf?  (You might have to click to zoom the photo to really see them well.)  They look like they are filled with wonderful little bits and baubles...scrabble tiles, bingo markers, and who knows what other goodies are hidden within...but I would LOVE to see!!  And PLAY!!  Look at all those beautiful charms she's made for the All Things Tim charm swap!!  Gorgeous!!

And right now, Barbara is having an awesome giveaway, including some fantastic Tim stuff, among other goodies...even some mystery goodies, to celebrate her one-year blogoversary!!!  All you need to do is click that link to get the details.

Wednesday, January 12, 2011

Snow Day Project - Foamies Snowflakes

Anyone who has children knows that while the words “SNOW DAY” bring shouts of excitement from the mouths of any young children in the household, those same words may NOT bring the same level of excitement for the parents of those same small children!  For that matter, “sick day,” “holiday,” or “parent-teacher conferences” may also have the same effect.  The kids are home, mom and/or dad are off work and have things to do, and in spite of the dozens of “I just *have* to have THAT!” toys and activities received mere weeks ago during the holidays, suddenly…the kids are “soooo bored!”
Enter the wonderful line of Foamies Activity Buckets!  For these particular snowflakes, you’ll need:
I opened up both containers of these Foamies and literally just dumped them on the kitchen table, and let my three older children, along with a couple of my friend’s children, just go at it.  The larger Activity Bucket contains 24 circle bases, with holes punched in the top (so they can be hung from the included pre-cut fishing line), a large assortment of shapes and sizes of snowflakes (self-adhesive), several jewel-rhinestones, a small tube of white glue, a small tube of silver glitter glue, and a small package of white/iridescent glitter. All of the foam items and “jewels” in the Activity Bucket are in white or blue tones.   The smaller Baby Bucket contains a wonderful assortment of glittered snowflakes in smaller sizes, plus circles in two different sizes – all self adhesive as well.  There were two shades of pink, two shades of blue, and a beautiful glittery white.
Spread on table for kids to easily choose from pieces
The children were all quite creative in how they assembled their snowflakes, each taking different approaches.  I watched as one child even tore the balls off the tips of one snowflake to suit his liking, before sticking it down onto another snowflake.  One of my three-year old twins was content to just tear snowflakes apart – which is par for the course – she enjoys tearing almost anything apart…yet, it DID keep her occupied!  My 5-year old most enjoyed two different aspects – one, the silver glitter glue, and two, stacking as many layers as he possibly could – proudly telling me exactly how many layers he was able to add to each snowflake.
Kit includes rhinestones and glue to adhere them!
Layer upon layer upon layer!!
Even I couldn’t help but make a few snowflakes myself – the glitter just called out to me!  I tried removing the backing from one of the self-adhesive snowflakes, and dipping it in the glitter (much easier than spreading wet glue around and applying glitter that way).  My son watched and then had to try it himself, of course!
Dip adhesive side in provided glitter for alternative effect
I say you can’t go wrong with the Foamies Activity Buckets – and I’d definitely encourage you to stock up on a few to keep on hand for those days when you just may have some “bored” children at home!  For a great selection of Foamies Activity Buckets, other Foamies kids' crafts, and other kids' crafts in general, check out Consumer Crafts!!

Monday, January 10, 2011

Recycled Tin Cans - Crafty Organizer Tutorial (Updated!!)

I posted this project on Crafts Unleashed last week, but wanted to share it with you all too!!  When I first organized my current craft studio, I created a unique craft organizer from quart-size paint cans.  I wish I could take all the credit for the idea, but I had actually seen a picture of something similar in a magazine, with no instructions attached (though I never could remember which one), and thought, "Hey, I could do that!"  My first organizer was made with store-bought, clean cans, and covered with simple scrapbooking papers.  My next organizer was made as a gift for a friend, out of larger, 24-oz recycled infant formula canisters, and it was at that time that all of my friends began asking for instructions on how to make this organizer!!  This is a fun and simple project, can be done in a few hours, makes a great gift or storage unit for your own studio, AND is a great way to recycle - it doesn't get much better than that!

For this project, I used 12.5 oz infant formula cans to make my organizer.  The possibilities are practically endless as to what you could use - just be careful with any sharp edges.
  • Clean out your cans well. I recommend against using water if your cans are metal, as it is very hard to prevent them from rusting. I used a baby wipe to clean mine out, and then dried them well with a paper towel. Be careful with the edge - it's not super sharp, but it's still possible to cut your hand if you're not careful.
  • I chose not to remove the paper from my cans, but you may decide to - it's your choice.  Since I left the paper on, I needed to put a coat of gesso on before starting my decoupage.

  • I had some GORGEOUS vintage music to use for covering my cans - check out the copyright date on this music!!  Tear the music into strips.  Using a foam brush, paint on layers of Mod Podge, and then lay on the strips of music (or other paper), gently but firmly pushing the paper down into the glue and smoothing out any wrinkles.  Let each layer dry before adding any additional layers.

  • Using an ink foam applicator, add distress ink as desired to highlight the torn edges of the music sheets and add depth to the paper.  I used Vintage Photo and Walnut Stain.  Then cover the paper in another coat of Mod Podge.  I used Matte Mod Podge.  Two final layers of Mod Podge will give a nice protective finish while keeping any stickiness and/or brush strokes to a minimum, but make sure to let the cans dry thoroughly between layers.

  • After the cans have dried, add whatever embellishments are desired.  I added vintage-y looking trims around each can to complement the vintage music.  Once you are happy with your cans, use a hot glue gun to build your pyramid.  Starting with the bottom row, use the glue gun to hot glue the cans to each other at the points where they touch in the center and on the backs of the cans.  For the middle and top rows, also add glue where they touch the cans below them.  Once they are all glued together, the pyramid will be quite sturdy - however, I still recommend always picking it up by the bottom row, to avoid stressing the glue points on the top can.


I hope you've enjoyed this updated tutorial - and that you'll find some cans to recycle in your own home to turn into a great crafty organizer for YOUR studio!!  Make sure you leave a comment with a link if you do!

Linking up to:


Friday, January 07, 2011

One Little Word 2011

Ali Edwards, an awesome person and awesome creative soul, has, for several years, led a challenge to pick a word - just one word - at the beginning of each new year, to be your "one little word" for the year.  That one word that speaks to where you are, to what your goals are, to where you want to see yourself for the year.  I love this idea.  Ali is hosting a class on Big Picture Classes this year, which will give prompts throughout the year, and by the end of the year, you will have created an entire album centered around your "one little word."  I haven't enrolled in the class yet ($$), but would love to, and encourage any of you who can, to do so.  But even if you can't, I still encourage you to choose a word, and follow Ali's blog - as she also gives prompts on her blog periodically to remind you to check in with your word and think about where you are with respect to staying with your word.


So what's MY one little word for 2011?


BELIEVE

I didn't have to think long for this word to come to me.  I have had so many new opportunities opening up to me, and have starting taking some new risks...and to be honest, some of them are a little scary.  But I am choosing to believe.  To believe in myself.  To believe in the talent that the Lord has given me.  To believe in the promises He has made to me.  To believe in my dreams.  To believe that I have something unique and important and special to offer.  To believe that what I have to say (or write or CREATE) is worthwhile and worth sharing.  Yes, my word is believe.

What's YOUR word?  And why?

Tuesday, January 04, 2011

Don't forget - Tuesday Tutorials tonight!

Hey fellow crafsters...if you want some crafty inspiration, you should DEFINITELY come over to Ustream tonight to check out Donna Salazar's Tuesday Tutorial!!  It's live, from 7:30 - 8:30 pm PST (so sorry for you EST, 10:30 - 11:30!!), and is always full of awesome ideas.  I've learned a lot from Donna (nope, not getting paid by her!), including how to make that denim flower I used on my Shabby Chic Altered Tin I recently did (well, I modified it from her paper version).

Anyway, I'll be there, and I hope to see all of YOU there too!!

Monday, January 03, 2011

Crafting With the Stars!!

I keep laughing at the name...I've never really gotten into "Dancing with the Stars," but hey...crafting?  Just say the word and I'm there!!


So, I've entered my JOY wall hanging from my December guest design team assignment into this "Crafting With the Stars" contest over at Sew Dang Cute.  PLEASE, won't you go over and check out my project there?  Right now mine is in the 17th row, on the far right.  The number of times it is viewed just MIGHT have something to do with who gets through on the first round!!  The first round lasts until January 15...

Sunday, January 02, 2011

Shabby Chic Altered Tin - Found Items


Happy New Year to everyone!!  I hope 2011 is off to a great start for you - and of course, quite importantly, a CREATIVE start!  I was able, for the first time in many years, to actually stay up for the passing into the new year...and was able to accomplish something crafty at the same time, while my hubby cooked up a huge batch of delicious seafood gumbo - YUM!

Over at Crafts Unleashed, we've been focusing on crafty organization for the last week (and this coming week, too!)...and while my crafty space is, mostly, pretty well organized, I do still have certain odds and ends that just aren't quite organized to my liking.  OR, perhaps they are organized, but I don't happen to care for the actual containers in which they are stored.  So a couple of my goals for the first part of this year are to re-fashion some of the uglier storage containers, and to create some new solutions for things that aren't working.

This project was the first "turn ugly into pretty" one for the year.  Here's what I had to start with:


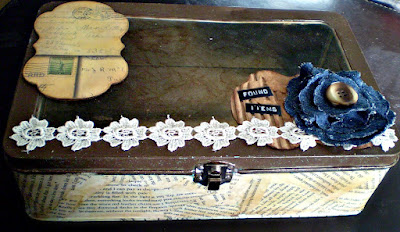
This tin, with an acrylic window on top, was originally a storage tin for a Stampin' Up! punch and stamp set, I believe - if I'm not mistaken - from MANY years ago.  It has since been used to store various sets of products - everything from tools to stamps to ink pads and stickles.  But...it's weird blue color with squiggly white lines on it just weren't working for me.  So, rather than scrap it altogether, I decided to alter it.

I started out by using my Espresso colored Adirondack paint dabber around the top edges.  Bits of the blue tin showed through after one coat, but I decided to not add a second coat, because I thought the bits of blue showing through added character.

Next, I got out my matte Mod Podge and a foam paint brush.  I have several books in my craft room that are for the sole purpose of tear pages out of, so I tore several pages out of one and tore them into smaller pieces in preparation for adding to the tin.  I painted a thin layer of Mod Podge onto the tin (starting on the bottom), and gradually added piece after piece of torn paper, adding more Mod Podge as needed to glue edges down.  After covering the bottom, I also covered the sides of the tin.  I used some Tim Holtz tissue tape to cover the bottom edges of the tin, wrapping it around to cover the gap between the sides and the bottom.


Once the paper and glue had dried, I used my foam ink applicators and distress inks (in Wild Honey, Vintage Photo, and Walnut Stain) to add color to the papers.  After the ink had dried, I added a top coat of Mod Podge, also covering the area of tin which had been painted with the dabber.


Next, I used felt on my ink applicator, with alcohol inks in Mushroom and Latte, with some Blending Solution, to add some color to the window of the container.  I added the ink to both the inside and outside of the window, for added effect.

I then used Spellbinders Nestabilities Labels 14, and cut 2 pieces of Donna Salazar's Zutter cardboard, and one piece of Tim Holtz cardstock from his Lost & Found collection, all using the largest die in the set.  I inked the piece of cardstock with distress ink, then glued it to one of the cardboard pieces, and glued the entire piece to the top of the tin.  For the second piece of cardboard, I tore most of one side of the cardboard off, revealing the corrugated center.  I inked the ridges with a Clearsnap chalk ink Catseye, and inked the edges with Walnut Stain distress ink, then glued the piece down on the tin.  I added a piece of flower trim across the entire tin, gluing it down with Glossy Accents.

To make the denim flower, I used the Spellbinders Nestabilities Classic Scalloped Circles (large), and a piece of my son's old cut-off jeans which I had saved.  I cut one scalloped circle in every size except the largest and smallest sizes (so the 5 center sizes).  (Note: I had to run the sandwich through my Big Kick back and forth several times to get the denim to cut all the way through.)  For each circle, I laid down a large dollop of Fabri-tac glue on my non-stick craft mat, laid the cut circle on top of it, then used my fingers to twist the circle and work it until it had pleated and formed into the shape I wanted it.  After all five layers were done in this way, I used the Fabri-tac glue to glue all the layers together, added a vintage button (which belonged to my grandfather) on top, and glued the flower to the corner of the tin.  

Finally, to finish things off, I used my Dymo labeler (believe it or not, one of the things I bought with my Michael's gift card after Christmas!!) to make the "Found Items" label.  I *adore* the look of the old Dymo labels!!!


I plan to keep odds and ends like dice, vintage porcelain dolls, bingo markers, corks, dominoes, etc., in here...cool things that I definitely want to keep for projects, but which I have NO IDEA where else I would keep!!  I absolutely LOVE how this turned out, and am SO glad I did not throw out the ugly blue tin!!

I think my NEXT storage solution needs to be something for storing all of my various glimmer/shimmer/smooch mists and sprays.  The plastic basket they are currently in is no longer large enough for them, and I'd like something that fits in with my craft studio a little better...so I'm considering trying to make my own container using corrugated board and binding it at the corners with jute.  I'll let you know if I do...and if so, how that works out!

So what about YOU?  Do you have any ugly storage items in your crafty space that you'd like to attempt a makeover on?  If so, I'd love to see your finished project - so make sure to leave a link in the comments!!

handmade projects


LinkWithin

Related Posts Plugin for WordPress, Blogger...