Monday, August 16, 2010

Gotta love the everyday!!


As some of you know, I had the unbelievable privilege this past weekend of going away to a scrapbooking retreat house in the mountains with 4 other ladies - a Mother's Day gift from my AWESOME hubby!!!  I actually hadn't done any scrapbooking in a VERY long time, up until my recent weekend of fabric scrapbooking workshops with Donna Downey - so I had been wondering what I was going to work on - but after those workshops, I knew precisely what I'd be working on!  Since today's Mixed Media Monday's challenge is "Embellish It," I'm also linking up to them for my album, because there is TONS of embellishing going on throughout this album!!!  

This blog post is VERY picture-heavy, so I'll do my best to keep my comments to a minimum.  Just know that all but one front and back are canvas - I only did one paper front and back (can you spot it??).  There are LOTS of embellishments throughout - including acrylic and watercolor paints, fabric, ribbon, buttons, patterned paper, book text, stamped images, heat embossed images,wire, flowers, beads, staples, eyelets, glossy accents, embroidered canvas tags and tabs, modeling paste, and even some corrugated cardboard recycled from the coffee cup cuff (what ARE those called?) that was around my coffee cup at breakfast on the way up to the retreat!


I do have to comment on this first page - we were told to paint "landscape" colors - and almost everyone in the class painted a blue sky and green grass.  I wanted a purple sky and have no idea why I painted an orange ground - I just thought the colors were pretty together.  Anyway, when I went to put the layout together, I was just thrilled with how the tag colors and the flowers and beads all coordinated so well with my colors.  And I love the wire smoke.  Tee hee.

I used Glossy Accents on my cut-strip ladder to make it look glossy to go with the shiny red playground ladder in the picture.


This page is one of my favorites, and was also one of the hardest to photograph.  The acrylic paint on the modeling compound has quite a shine to it, so the flash on the camera glares terribly, but getting a good picture without the flash, inside, was rather difficult.  But I love the colors, I love the swirl of the modeling compound...and I also LOVE the other technique I used on this page - gel medium to transfer a photocopied picture.  I didn't know if it would work on gesso'd canvas (I had only tried it on paper before), but I was pretty happy with how it came out.  For those who don't know, Mackenzie was born with a cleft lip and palate (and we almost lost her during delivery, and she was only 2 lbs, 15 oz at birth) - so her smiles are extra special...her smiles ARE proof of everyday miracles.  


These next couple photos I took just to try to give you an idea of the texture and layers on this page - there are LOTS of them!  I love the amount of embellishing and texture going on here!


This is another of my favorite pages.  Turquoise is one of my favorite colors, and I just love everything about this page...the stamps, the flowers, the book text, the quote, the "journey" tag, the black and white photo.  Love.

But this one.  This one, I think, is my absolute favorite.  When we did the base of this page in the workshop, it was a technique teaching us how to embed book text using gel medium, and then painting over it.  Then we used the "trust your heart" stamp, and watercolored that - Donna Downey actually watercolored MINE, using it as an example - my friend Deanna got a great photo of her doing so.   Anyway, I still wasn't sure what picture I was going to put on this page, and this weekend I was rifling through my giant stack of photos from the last 5 years or so...when I came across this one.  It's a picture that is precious to me, both because breastfeeding is an issue near and dear to my heart (and one I'm passionate about), and because I really don't have many (if any other) pictures of me nursing any of my children.  I don't even know who snapped this shot of me nursing my 6-week old firstborn - probably my husband, back in the ages when he used to take pictures of me!  LOL  Now it's all about the kiddos!  Anyway, I just thought there couldn't be a more perfect picture to go with the "trust your heart" stamp than a nursing mama - because you absolutely have to trust your heart when you are a new, breastfeeding mama, and half the moms in the Western world are telling you how much "easier" it would be to just give the baby a bottle of formula!!  And then the perfect quote - "Love comes from a place so deep it defies language."  So true, especially the love between a mama and her 6-week old baby!!


And finally, the last page.  Such a happy one...the colors, the look on my son's face...even the unexpected burst of red in the third button.  I used a Tim Holtz Alterations Edges die (Sizzix) to die cut the coffee cuff and layer it under the canvas tag and photo.  I love the look!!


And finally, I love the overall theme of the album - to embrace the everyday moments of our lives!!

Wednesday, August 11, 2010

Inspiration Wednesday


I know I'm cutting it close getting this posted - it's almost going to be an "Inspiration Thursday" post. I do have a good excuse...really, I do! :) Wanna hear it? Nah...'cause that's all it is...just an excuse.

Anyway, without further ado...today's entry for Inspiration Wednesday. Donna challenged us to use a quote today that we found, well, challenging. I also came across some stuff today...just, you know, that kind of stuff that makes you feel kind of sick inside on behalf of someone else. The stuff that we've all (as women, anyway) experienced...mostly at the hands of other women. And I was reminded, once again, of just how powerful our words really are. And of just how hard it is, at times, to control the tongue.

Once again, I was reminded that listening gets us SO much farther in life than talking. And that wisdom really does come with a closed mouth, not an open one!

As for my page, I used a combination of Golden Cobalt Teal and N5 Neutral Gray heavy body acrylics for the background, with some Golden white Airbrush Paint for drippage. I cut some flowers out of plain canvas using my Sizzix and colored them with Golden Quinacridone Magenta fluid acrylic. That top one, on the top layer, I stamped it first with a teal-colored Cat's Eye chalk paint and heat-gunned it dry before wetting and painting. I used glue and some seed beads for the center of the big flower. I used one of Donna Downey's rubber stamps with the magenta paint for the bird on the branch, and framed the bird with a metal accent. I used black india ink to write the quote, and the cobalt teal paint to stamp the word "listen." I outlined the word "listen" with a magenta colored ink using a glass dip pen (still trying to get the hang of that one). I glued a strip of crocheted trim down the right edge and added a few more flowers for embellishment. I'm pretty happy with how it turned out.

So...you really wanna hear my excuse for my late post? So yesterday morning, the kids were all getting dressed. Anthony was in his room, and I was next door in the twins' room helping them, when I heard a loud crash and that blood-curdling scream that makes a mama's heart start pounding. I go running, to find my 5-year old son UNDER his dresser, which is now front-down, on top of him!!! Images of head injuries, broken bones, etc., are flying through my head, as I she-womaned the massive 5-foot tall MDF Ikea dresser off of him by myself, and began to assess the damages. He had a long scratch across his back and a red mark on his arm, but aside from being scared, managed to escape pretty much unharmed. I consoled him, put his CD-player back on top of his dresser, and vowed to get an earthquake strap put on the dresser ASAP...and then forgot about the incident shortly thereafter.

That is, until about 12 hours later, when every muscle in my back started to clench up into a ball and I started to think, "Why on earth is my back hurting so bad???" It took me a few minutes, and then the brain cells kicked in, and I remembered. "Oh yeah!" DUH! Usually I cannot even slide that darn dresser over a few inches to get something that falls behind it! It is VERY heavy. For me to have run over and lifted it practically off the ground, with all the drawers open and full, back to an upright position, in a matter of seconds - I'm guessing I pulled about every muscle in my back! So this morning I woke up and could hardly move my head forward at all, without feeling it all the way down my spine...thus I made a trip to the doc for some muscle relaxers this afternoon.

After all, I am going on a scrapbooking retreat this weekend - with hours of sitting and crafting involved - I cannot be in pain the whole time!!! :) See? Told you I had a good excuse!

Monday, August 09, 2010

Mixed Media Monday - Memories

This is my creation for this week's Mixed Media Monday. It's my first week participating in MMM, and I was, at first, a little...afraid? I'm still a little hesitant to call myself an "artist," as you may have picked up on from my last week's Inspiration Wednesday entry...but I'm taking the jump! The theme for this week's MMM was "Memories," which is pretty broad. At first, I was thinking...oh, scrapbook page, easy peasy. But then, I was already working on this canvas, and realized how many memories it brought back.

The quote - "It is the sweet simple things in life which are the real ones after all," by Laura Ingalls Wilder... conjures up SOOOO many memories of hours and hours as a child spent watching (and reading) the stories of Little House on the Prairie. I used to (and still do sometimes, despite my obvious love for my laptop, cell phone, camera, etc.) think that I was born in the wrong century. I would daydream for hours on end about living in the olden days, when there was no electricity, when we could rise with the sun (and go to SLEEP when the sun went down!); when life seemed so much simpler, when life seemed more wholesome. I think of the world we live in today, and sometimes become overwhelmed with not just the technology and the busy-ness of it all, but also wonder - how on earth are we to raise our children in such a wild and crazy life??

Anyway, enough with the philosophizing...back to the mixed media. You can see in this photo that I painted a teal frame around the edge. But first, I drew the frame in with a charcoal pencil, went over it with an embossing pen, and heat embossed it with copper embossing powder, to help give me a defining frame. I then laid down a nice, somewhat watery, layer of the teal Claudine Helmuth semi-gloss acrylic paint, and once it was dry, I used my fingers to schmear (yes, in spite of what my spell-check says, I do believe that is a word! LOL) a thin layer of Golden glass bead gel medium over the teal paint. I went to a weekend of Donna Downey workshops a couple weeks ago (if you ever get the chance, GO!) and it changed my life!! I had never HEARD the words "gel medium" before that weekend! I painted inside the frame with some (Making Memories, I believe) vanilla-colored acrylic paint.

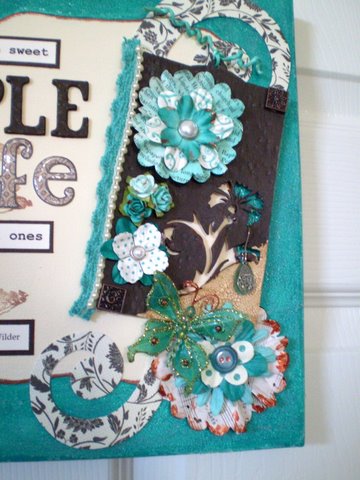
This chipboard tag was, a fun piece to put together. It started out as a plain, die-cut, chipboard tag. First, I laid on two layers of dark brown acrylic craft paint. Next, I used the Tim Holtz distressing hammer (awesome!!) to, well, distress it! (Those are the little bumps and stuff you see in it.) Then I glued the strip of pearl beads and turquoise trim to the left side. The tie on the top started as plain white paper twine. I spritzed it with some turquoise Glimmer Mist, tied it around the tag, then wrapped it around a paint brush handle and used my heat gun to dry it so it would hold the curl. I used Donna Salazar's paper flower tutorial to make all the paper flowers on this piece (layered with many Prima and other flowers), and lots of Glimmer Mist and homemade shimmer mist. A couple metal accents, more flowers, a thin layer of Tim Holtz's Distress crackle paint in one corner, and a long-unused earring completed the tag! I perched a Prima butterfly (again, spritzed with Glimmer Mist) on the bottom edge of the tag. I used my new Helmar liquid Scrap Dots (awesome, easy to use product!!!) to attach the tag to the canvas to give it lift and dimension. I cut a swirl of glossy-embossed cardstock and attached it to the canvas under the tag.

The left side of the canvas is covered in "the simple," - flowers. And what could be more "simple" than paper flowers - especially ones that start with a base of recycled sheet music or book text? I just added layer upon layer, and you can see touches of Golden copper acrylic paint. I also used Cats Eye chalk pads to use a Donna Downey stamp on the center of the canvas, behind the quote. I love her large, wood-mounted rubber stamps - they are simply gorgeous!

You can see in this last picture how much depth the multiple layers of the flowers give. That biggest flower in the bottom left corner is my favorite - I think it has 6 layers. It makes me happy to look at!! (And actually? I do believe that flower has one layer of felt in it too...)

So...I'm excited to be joining in on the MMM fun and am going to check out what all the other MMM artists have created for today!!

Bear with me...

I realized after I changed the address of my blog...that even though I kept all my posts, I lost all of my sidebar links to my friends, family, and inspiring blogs!!! UGH! So bear with me as I re-create these VERY important lists! And if you think you are supposed to BE on one of those lists, and don't see your blog listed, PLEASE leave me a comment on this post with your blog address so I can get you added back on!! Thanks!

Wednesday, August 04, 2010

Inspiration Wednesday - Aug 4, 2010

So, as you read a couple posts ago, I recently had the incredible privilege of spending an entire weekend with Donna Downey, and since then, have been on, like, creative CRACK.

No, really - my husband is seriously getting tired of me getting out of bed in the middle of the night to go downstairs to my craft room. Last night when I was complaining of being in pain, he had very little sympathy, citing my many late nights lately. "Yes, honey, but when I get that creative urge, I can't help it - I just can't sleep - I just have to go down and DO something with it!!" "Well all I'm saying is that when you don't get enough sleep, your body is going to pay for it."

Fast forward twenty minutes...

Me - "So honey, I had a few different ideas for over our bed, in between the curtains (that are basically a fake headboard, as there ARE no windows behind our bed, which was what HE said when he came home to find the curtains hung there in the first place). First, I was considering some sort of vinyl wall decal, like a chandelier or something, or maybe even vinyl frames, with or without frames. Second, some sort of canvas painting BY ME, of course. Or third, a set of four smaller canvases, each covered completely in a photo, but also with one letter so all together they spelled 'LOVE' in a 2x2 format. What do YOU think?" I hear chuckling in response. "Why are you laughing at me???" No response...just more chuckling. "No, seriously, honey, why are you laughing?"

Finally, I figure it out. It's 11:45 p.m. We've just had a discussion about me NOT staying up late to craft at night. "Oh no, honey, I'm not planning to do any of this TONIGHT...I'm just saying I have these IDEAS." He's still laughing.

I think it had something to do with the fact that he was ready to fall asleep and my creative mojo was just waking up. I'm not quite sure what it is about midnight, but for some reason, that's about the time my creative mojo seems to come alive. Maybe it's because that's when everyone else in the house is ASLEEP and I can actually have peace and quiet? Or when no one interrupts me? I don't know. At any rate, I woke up this morning, knowing it was Inspiration Wednesday, DETERMINED that I would get a page done in my journal done BEFORE midnight!!!! And not only did I get it done before midnight - I had it done before I even got the kids in BED!!! Go me!

I had a LOT of fun creating this page, even though there is also a LOT of truth behind what it says. Even though I've been doing a lot of creating lately, including even selling a piece of art (really? me? I still can't believe that!), I have a tremendous fear that I have no artistic talent. I am SUCH a perfectionist, and that has always impeded my ability to even START the creative process - which is why Donna Downey is SOOOO good for me!!! She colors outside the lines. She breaks all the rules. What rules? There ARE none! Scrapbook in chronological order? Forget it! Figure out what you're doing ahead of time? Why? Just start...and go from there! I'll admit, it's still hard for me to do that...but it's getting easier with each attempt.

When I started this page, I started with some happy colors - two of my favorites (one of which Donna kept talking about at the workshops - quinacrinodone magenta - and I probably totally spelled that wrong - but LOVE it!) and yellow ochre. It was a little TOO happy, given that I knew I wanted the page to be about my fear of failure in art, so I decided to add some dark purple drippage. I thinned some dark purple paint - but even the darkest purple paint I had wasn't dark enough, so I got an idea - and I added some "elegant eggplant" re-inker ink (Stampin' Up) to the mixture and that definitely did the trick - it darkened it and it thinned it some more. So the drippage was great - I still sprayed it with water, and then added some more at the top again, but it gave a great effect.

But then I felt like it was a little TOO dark and dreary...and earlier in the day, I had been playing with making some paper flowers ALA another Donna-style (Donna Salazar - I've decided all Donna's must be fantastically creative!) and had mixed up some homemade gold shimmer mist...so I spritzed some of that over the entire page, which gave a lovely effect.

I also ended up using a couple of those paper flowers on the page, one of which you can see here. This one is double layered - the bottom layer has a mixture of Tiger Lily Glimmer Mist and my homemade gold shimmer mist, and the top layer has a mixture of some homemade purple shimmer mist and some turquoise Glimmer mist.

This side view gives you a great view of just how shimmery the page actually is from the golden shimmer mist. You can also see a rhinestone from a rub-on/rhinestone combo.

I stamped a few butterflies in black Staz-on, because I thought they lent well to my message. How does that saying go - something about just when the caterpillar thinks things are the worst, he becomes a butterfly and learns to fly? I've always liked that. Anyway, I also stamped this other quote in the lower right hand corner - a Tim Holtz stamp - which I love!! And you can see the brown circle tag that a certain person got me hooked on. Ahem.

This is the second paper flower I created. The first one, up top, was made with music score pages. This one here was made from book text pages. Both were made in the same manner, using the tutorial on the website posted above. This one uses just the Tiger Lily Glimmer Mist and homemade purple shimmer mist.

A good view of the bottom half of the page. Oh - and you should know - just the thought of free-handing the writing was hard for me. I hate my handwriting, hate free handing stuff - so even that was a big step for me!! Stamping, flowers - those are easy. Free handed writing? Not so much. The white writing was done with a ...um...can't remember the name of it now and don't want to go downstairs and find out right now...marker. Slick writer? Is that it? Then for "FEAR," I didn't actually have a stamp that said "FEAR," nor did I have an alpha set, but I was able to just paint white paint onto the F of one word, the E of another, etc, drying in between each one, until the whole word was done. And then I outline "CREATING" with my india ink fountain pen (which I finally got to work right).

And a nice view of the top half of the page. I just love the shimmer on that flower, and you can see the little rub-on with rhinestones over on the left side of the page. (I have a slight addiction to both flowers and rub-ons.)

See? Close-up of the rub-on. Isn't that a cool mix of colors in the paint behind it? It makes me happy!

So, there you have it - my first official Inspiration Wednesday!

Tuesday, August 03, 2010

Playing with clay

I think I've mentioned before JUST how much I {heart} the magazine Simply Handmade (published by Northridge Media). Enough so that when my original gift subscription from my mom ended last year, I re-subscribed on my own. I just get SO many awesome ideas from there - and I am a person who NEEDS ideas. Lots of them. I thrive on them. I've never been a person who wakes up in the middle of the night and hits my husband and says, "Oh! Honey, we should do THIS!" (Like Donna Downey does. I only wish I was that kind of creative.)

Anyway, in the most recent edition of Simply Handmade, there was this most adorable magnet made from oven-bake clay. I've always seen oven-bake clay and felt it call out to me...but aside from a couple bracelets my friend Deanna and I made several years ago, I had not followed through on the urge to play with clay.

But on my recent mega trip to Michaels (supposedly only to get painting supplies to try all my new Donna Downey tricks), I noticed that the Sculpey clay was on sale 4 for $5, plus I had an additional 20% off my entire purchase coupon...making them just a little over a dollar a pack, so I decided to pick up a few packs (and an acrylic roller, a cheapo pack of plastic tools, and a cheapo pack of mini-cutters) to try my hand at some things.

First on the list? Most definitely a magnet like the one I had seen in Simply Handmade. I have a dear friend who is having surgery next week, and I know she is scared and would SO appreciate a little cheer right now. First I just had to roll out a rectangle of clay. Then I stamped a sentiment with brown Staz-on ink. Next, I used a leaf shape to make three leaves from green clay, and used a tool to make lines in the clay. I then positioned them onto the blue rectangle and sort of pressed them down a bit. Finally, I used two different sizes of tear-drop shaped cutters to cut petals from pearl-white clay and arranged them in layers to make the flower, using a tool to push them down in the middle. For the flower middle, I cut a small circle of the white and pressed it down over all the centers. I followed the baking instructions for the clay (275 degrees for 30 minutes per 1/4 inch thickness), then allowed it to cool.

After the clay had cooled, I used a thin brown marker to highlight the lines in the leaves. I used wire cutters to cut the back off a turquoise blue brad, then hot glued the top to the center of the flower. I used clay-glaze and a paint brush to apply glaze to the entire magnet. Once the glaze was dry, I hot glued two magnets to the back of it...and it was finished!

I am SO in love with how the magnet turned out - and it wasn't NEARLY as hard as I thought it would be!! (Read: will definitely be making more!)

But then it needed some cute packaging. I mean, it's a small magnet - about 2.25 inches wide by 2 inches tall, so it's not like I wanted to just wrap it in tissue and drop it in some huge gift bag. I had a few empty Prima flower tins from my recent emptying of all my tins and jars and bottles of flowers into one big plastic shoe box (um...yeah...I have a paper flower addiction)...anyway, the magazine ALSO showed a cute way of decorating a tin for just such an occasion.

I reminded Darrell - "Remember, honey, how when I first asked you to get me a sewing machine, it was for the purposes of sewing on paper?" He remembered. That was, um, about 5 or 6 years ago. I finally started sewing, what, like 2 years ago? Today was the first time I've actually sewn on paper! I sewed together several rectangles of paper and ran them through my Xyron to stick them to the tin (and then later had to use my craft knife to cut a strip off the top because my lid would no longer fit on the tin). I used some coordinating die cuts, flowers, and another brad to adorn the top of the tin, inking edges, of course! (What would I do without ink?!)

I even put our shredder to use to make some shredded paper packaging for inside the tin! Whoever knew that a shredder could be used for crafting?!

I'm fairly certain my friend to whom this is going doesn't read my blog...so I should be safe posting this. :) If she DOES see it before I get it to her...well, she'll just get to enjoy it twice!

LinkWithin

Related Posts Plugin for WordPress, Blogger...