Saturday, June 25, 2011

Vision Board - Soul Restoration 2

You may recall that a while ago, I mentioned that I was participating in an online class taught by Melody Ross through Brave Girls Club, called Soul Restoration 1.  Well, I enjoyed it SO much that now I am taking the sequel, Soul Restoration 2!!  And I just cannot tell you how VERY much I am loving it and how VERY much I am getting out of it!!!  

Have you ever felt like you were sort of stuck in your life?  Like when you go to bed at night, you don't really feel like you've moved forward toward any of your long-term goals (or maybe even your short-term ones)?  Or maybe some days you go to bed feeling really great about how you spent your time, but other days you just feel like you don't know where the time went?  Well that's how I've been feeling, and I don't like it.  

I want to know, first of all, what my goals ARE; and secondly, I want to be very intentional about living my life. I want to spend my time in meaningful ways, being more conscious of my choices and making them wisely.  I don't want another week, a month, a year, or 5 years to go by and nothing has changed, all while I'm saying, "Someday I'm going to...."  And that's exactly what Soul Restoration 2 is all about.  It's about living the life you want to live (after figuring out what kind of life that is!)...instead of just letting life happen to you.  

Anyway, one of this week's projects was to make a vision board, and I thought I'd share mine with you.  It took a LONG time to make...a LOT of cutting obviously...but I'm SO glad I did it.  What a wonderful project it was, one that I wish I would have done years ago!  Alas, I love that I have it now!

Wednesday, June 08, 2011

Canvas Art

I think I mentioned a couple posts ago that one of the online workshops I'm taking is called the She Art Workshop, by Christy Tomlinson.  I just have to tell you - I cannot, cannot, cannot speak highly enough of Christy or of this workshop!!!!  Seriously.

When my friend signed the two of us up for the workshop, I was more than a little intimidated.  I thought it was a bit above my skill level.  I thought 3 weeks was not nearly long enough (even though we have access to the material for 3 months, it's still only 3 weeks of new lessons.)  I saw her art before taking this workshop, thinking to myself, "There is just NO WAY that in 3 short weeks, she is going to be able to teach ME how to do THAT."

I was wrong.

I am amazed at what an awesome teacher Christy is - the workshop is WELL worth the money.  It is very well put together, I have learned SO much, and did I mention that I'm having a total blast?

So I never showed you my first canvas.  That's because it's a birthday gift for my sister.  Whose birthday was in April.  And I still haven't mailed it.  Yeah.  I'm kind of bad about that.  Mailing stuff.  (Hides head under a bag.)  Sigh.

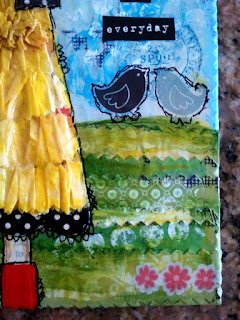
But.  I get to show you my SECOND canvas!!  I am SO happy with how this sweet girl turned out, and with my first attempt at a "scene."  I used a lot of products from Fancy Pants (more on this in my review of Fancy Pants on Craft Test Dummies on June 17).


This is an 8" x 10" flat canvas.


Don't you love the glittered words from Fancy Pants?


I die cut the flowers from corrugated cardboard using a Sizzix flowers die and doodled the stems/leaves.


The grass is a combination of layers of paper and paint, along with stamping and rub-ons.  Isn't it fun?!


These two little birds are rub-ons and they just crack me up...they are SO stinkin' cute!!


Can you get a load of the texture in her skirt?!  Is that awesome, or what?!  And check out those shiny red boots she's sportin'!!  Seriously cute!  (And don't get me started on the polka dots!!)


Her hair is the one thing I really need to work on.  My first canvas, the hair was better...this one, I feel like the braid needs some work.  But still, I think, not bad for my first go.  I also want to try some different styles of clothes, and try making a girl with arms showing (instead of behind her back, like this one - you thought she had no arms, didn't you!).

So...what do you think?  Worth the $45 for the workshop, yes?  I promise you, there is NO WAY I could ever have created anything like this before I took this workshop!  And so much of what makes these canvases adorable is in the details...details I never would have realized were there (or been able to figure out how to create) had I not taken this workshop.  The best part is that once you learn how to create them, they really are not that difficult, and truly are LOTS of fun to create!!  I can't wait to make more!!

Reversible Decoupaged and Embossed Metal Monogrammed Necklace

Whew...that's quite a title, eh?  Maybe it should say...one ONE side, the pendant is decoupaged, and on the OTHER side, it's an embossed metal monogram!  At any rate, you should definitely run over to Crafts Unleashed today to check out my tutorial for how to create this super easy necklace!!


And what I did NOT show on Crafts Unleashed is that on the reverse side, you can add a piece of cardstock, cardboard, or grungeboard (which is what I happened to use here), and then dress it up to your heart's desire.  I used E-6000 to adhere a rectangle piece of grungeboard, then used a paint dabber to paint it white.  I went over it with a chalk queue to add just a bit of ink to it, and then added my girl-image with Mod Podge (the girl and the words are from Cosmo Cricket's Odds & Ends line - SOOOO cute!).  Then I cut out all the words and added them with Mod Podge as well, and added a couple top coats of Mod Podge over the entire piece.  Final result - LOVE!  And what makes this piece SO easy is that the actual necklace part comes prepared (ribbon, beads, clasp and all)...all you have to do is make the pendant, add a couple jump rings to attach it to the necklace, and you're done!


Enjoy!  This entire month is jewelry month over at Crafts Unleashed...so if jewelry is your thing, you might want to keep checking in over there for lots of inspiration and giveaways!!

LinkWithin

Related Posts Plugin for WordPress, Blogger...