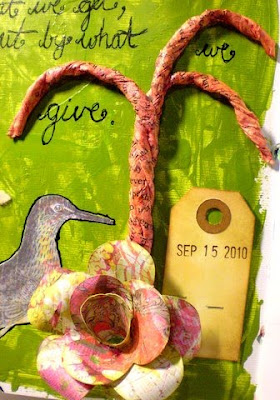
As usual, I'm posting my Inspiration Wednesday work on Thursday - because by the time Donna gets HER video up, and I take care of all my homeschooling duties, children who need feeding, household stuff, etc...I just can't manage to get it all done (or posted) by the end of Wednesday!! LOL I suppose if I just did my own thing and started first thing on Wednesday mornings, I could...but what fun would THAT be? I wanna try whatever technique Donna is demonstrating...so I wait for her to post her video and then I get to play along!!
So this week, we painted the background with fluid acrylics using a palette knife! Totally a cool look! I love the lines and texture it gives the background. I didn't have the color of green I wanted, so I had to mix up some Hansa Yellow Medium, Phthalo Green (blue shade), and Yellow Ochre (all Golden fluid acrylics) to get just the right shade I was aiming for. My pictures don't quite show it right - it's a little bit more olive-colored in real life. My inspiration for the color was actually the shade of green in the patterned paper I used to make the flower at the bottom of the page (more on that in a bit).
I love this quote - it came from a women's devotional book I have. I have been working with my 5-year old a LOT lately on focusing more on others' needs than on his own, and on paying more attention to giving than to getting - so this thought has been on my mind lately.
This twisted paper swirly thing - not exactly sure WHAT to call it - was something that Donna Salazar taught during her Tuesday Tutorial a couple nights ago (you should definitely check those out - free online video classes - live - every other Tuesday - there's a link on my left sidebar). I tore three pieces of book text into about 2.5 inch-wide strips, coated them in Liquitex Gloss Medium & Varnish (she used a Beacon Fast Finish Decoupage, I believe), then gently twisted them one at a time. I formed a peak at the top, and a sort of flattened part at the other end. After forming all three and having curved them the way I wanted, I gently twisted all three together and smooshed the flattened bottom ends together, then laid them on my non-stick craft mat to dry. Once they were dry (I used my heat gun to sort of speed up this process), I spritzed the now-one-piece swirly with some Tiger Lily Glimmer Mist and some homemade magenta colored shimmer mist. It's hard to catch just how shimmery it really is, in photos - but let me tell you, it really shimmers! I adhered it to the page using Beacon 3-in-1 Craft Glue (love that stuff!).
The bird, I cut out of the same patterned paper that I used to make this beautiful rose. I outlined the bird using my dip pen and black india ink, just as I used for writing my quote. Notice the eye of the bird - I added a drop of Glossy Accents to give it a dimensional look. I also added several drops of the Glossy Accents to the flower petals to make it look like drops of dew or rain on the flower. The Accents go on a little cloudy-looking, but dry crystal clear and very glossy, giving a very cool look. Glossy Accents can also be used as an adhesive and will even adhere paper to metal.
Now - the flower! This is my newest fun technique!!! And SO easy it's ridiculous! I still can't believe I never knew until now how to make these! Can I just say how much I adore You-Tube? You can really learn just about anything there - I've learned how to sew, how to knit, and many many other skills by watching videos people have posted on You-Tube. Anyway, apparently this technique was originally a flower that Tim Holtz made using a Sizzix flower die; however, a very creative woman figured out a way to make them even faster using her Cricut and the George & Basic Shapes cartridge - which is the cartridge that comes with the orginal Cricut...the one I just happen to have. However, I would imagine you could find a flower shape on MANY of the Cricut cartridges that would work with this technique. THREE cut flowers is ALL it takes, a few snips of your scissors, some curling of the petals around a pencil or paintbrush, and a hot glue gun - and you've got yourself a GORGEOUS, 3-dimensional rose!
So...that's this week Inspiration Journal entry. I hope you enjoyed it...and I hope you do something to express your own creativity this week! I promise you that the more you take the time to practice being creative, the more you will find your creative impulses exploding in your mind!!


1 comment:
I thought of you yesterday...I was in Archiver's, stamping with some of my friends. Anyway, I saw the Unity stamps that are designed by Donna Downey, plus they had these tiny little stretched canvases (and some other sizes, too) and canvas tags and some other canvas things that I had never seen before :-)
Post a Comment