

But today, I wanted to share this scrapbook layout I made using the 12"x12" template called Birds of a Feather. And since I have such a hard time just showing you what I made...I'm going to do a little tutorial to show how I made the background, as well as another cool technique!
I started with a vanilla-colored piece of smooth cardstock under the template, and pulled out my Distress Embossing Ink Pad by Ranger. I love this pad, because it's extra "juicy." I applied the ink pad directly to the template, pushing down and "squishing" a bit in the more detailed areas. I decided to only use 2 of the bird houses - and this is part of what I love about these templates...if you only want to use part of it, you totally can! I removed the template and sprinkled clear embossing powder over the ink, then embossed with my heat gun.

Next, I started applying distress ink over the embossed areas - the embossed areas resist the ink and will stay vanilla. You can use a damp cloth to wipe over the embossed areas to clean off any wet ink.

Isn't that just awesome?! I love this technique! I continued adding ink colors until the entire page was covered and I was happy with it.
 |
| Distress ink colors used: Crushed Olive, Broken China, Tumbled Glass, Stormy Sky, Wild Honey, Vintage Photo |
Next, I thought about what I wanted the page to be about. I decided to scrap about ME - which I never do, and so went searching for photos of me. Finding them was difficult - I'm always the one TAKING the pictures...but I eventually found a few and chose which to include. I decided that since I wanted the colors of the page to really shine, I made the photos black and white.
 |
| Black & white photos show off the colors of the page |
I began adding embellishments - some of which I've had in my stash for years! It was nice to finally be using them. The title and butterflies are all from Marcella by K&Co.
 |
| Title and butterflies from Marcella by K&Co. |
I wanted to add some bling, and I had a sheet of Prima Say It In Crystals. But I didn't want them to be clear - I wanted them to coordinate with my page. Fortunately, I knew just what to do!
First, I have been saving the plastic inserts from certain Tim Holtz Ideaology packaging...because they make great palettes for alcohol inks. So I added just two drops of each of the three colors I wanted to use into each well of one of these plastic inserts. I let the ink dry. I took one of my Pentel water brushes (to see a great review of water brushes, check out this one at Craft Test Dummies) and, empty of water, filled it with some alcohol blending solution. Then, I was able to use my brush to pick up the ink from my homemade palette, and color the bling just the way I wanted it.
 |
| Blending solution-filled water brush, picking up color from dry alcohol ink on plastic package insert |
 |
| Color your bling any color you like using alcohol inks! |
 |
| Perfectly colored bling! |
I added some Prima flowers, and some really fabulous newsprint leaves I found at Michael's. For the center of the orange and blue flower, I used my Epiphany Crafts Shape Studio to make an epoxy flower center from a piece of book text. I added some trims from my bucket-o'-trims - and have no idea what brand they are.
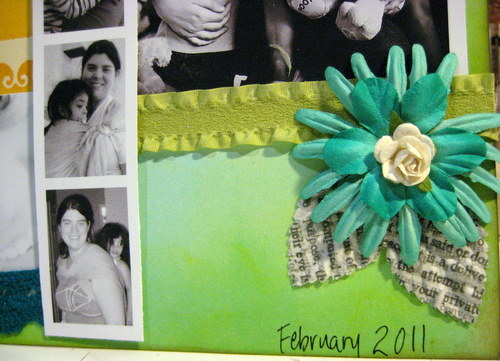 |
| Flowers by Prima; newsprint leaves by Recollections from Michael's |
 |
| Flowers by Prima; epoxy center made using book text and Shape Studio by Epiphany Crafts |
Finally, I added my journaling using a dip-pen and black india ink. I know the dip-pen may seem intimidating, but I find india ink to be the absolute best for writing over ink or paint.
 |
| Journaling done with dip pen and india ink |
I love my final result, and I especially love that I created the background paper myself! I hope you've enjoyed my little tutorial - let me know if you have any questions!
5 comments:
Great page! Love your details and the colors are amazing.
I'm not a bling kinda gal but I love this!
Hi Jen- holy cow, this is an incredible page! What a gorgeous birdcage...the colors are fantastic.
I'm so glad to have found another scrapper/blogger:) Thank you, Crafterminds...
I wanted to contact you about a guest post swap. I'm doing a monthly blog hop series and am looking for guest posts related to the following themes. As I have a scrapbooking blog, all posts must be scrapbooking or paper craft-related.
March- baby albums
April- a year in review
May- album about YOU- heritage, life stories, etc.
June- weddings
July- Christmas in July (this can be any craft, not limited to scrapbooking:)
A month-long blog hop incorporating the monthly theme will also be available to link up your projects.
Please contact me if you are interested in doing a guest post and/or swap. Thanks!
C:)
http://mbcscrapbooking.blogspot.com
s nice you should do youtube videos
have a look on my new blog all advices are very welcome
http://handmadebyagadka.blogspot.com/
Wow awesome!They're beautiful. You do such a great job. I love your work style.
Post a Comment