Thursday, April 30, 2009

The Tuesday Blog Party is Coming!!!


If you've never heard of Tuesday Fiona Whitt, I'm sorry. I'm sorry because you've missed out on knowing an incredible little girl, and you've missed out on knowing an incredibly strong, amazing mama. And, I'm sorry...because her story will break your heart.

Tuesday was a twin. Piper's twin. Sweet, beautiful little girls. 14 months older than my twin girls. Last year, Tuesday was diagnosed with neuroblastoma, a terrible, evil kind of pediatric cancer. The least-funded kind of pediatric cancer. After an 8-month battle, which she seemed to be winning until the last couple weeks, she went to see Jesus on January 30, 2009.

This Mother's Day will be her mom Jess's first Mother's day without her sweet Tuesday. In honor of Tuesday, and to raise awareness and funds to fight this devastating disease, friends of Tuesday are holding a blog party all week, May 5 - 12. Lots of blogs...lots of giveaways...and all you'll have to do to enter to win each giveaway is donate ONE dollar to the Tuesday Fiona Whitt Foundation, via Paypal. (You can see the button over on the right side of my blog.) Not only will you be helping to raise awareness about and provide funding for the fight against this horrific cancer, but you will be helping to support other families broken by this disease. Families like Cora's family, Will's family, and Lukas' family.

I will be participating in the blog party by offering a giveaway of a set of 3 handmade stylish burp cloths. Check back next week for all the details on how to win the giveaway!!! If you would like to host your own giveaway and join in supporting the cause, click the "blog party" pic at the top of this post for more info.

Daisy frame

I've mentioned before, maybe once or twice, how much I *love* my subscription to Simply Handmade magazine. (It was a Christmas gift from my mom, along with a subscription to Scrapbook Trends, another very cool magazine by the same company....thanks again, Mom!!) There was a cute, simple Daisy Frame in the April/May issue, which was one of several projects I have marked to do "at some point in the future."

I was feeling crafty this afternoon, so I decided to give this one a try. While the one in the sample didn't have a ribbon for hanging, I decided mine didn't seem to want to stand up on its own very well, so I attached a piece of twill ribbon with two heart-shaped brads, so that it can be hung on the wall. I just love this picture of Mackenzie being loved on by her daddy...and so this project is going to Darrell's office to be hung on the wall.

Wednesday, April 29, 2009

Baby shower gifts

My dear friend Heather's baby shower was Saturday afternoon, and I had been trying to figure out what to make for her. I knew it would be *something* handmade, but hadn't decided on what - a blanket? Bibs? Burpcloths? Too many decisions! Finally, it dawned on me - a nursing cover-up!! (And some matching burp cloths...you can NEVER have too many burp cloths, right?!)

I found a great tutorial here, which I mostly followed. I do recommend making the boning a bit longer...I made mine 14" rather than 12", but that's just personal preference. I also recommend using 1.25" D-rings, rather than the 1-inch - I used the 1-inch, because that's what I had on hand, and that's what was called for, but I think they were just a little bit too small.

I used some Amy Butler fabric I'd been holding in my stash - I *love* pink and orange together - they are just so bright and cheery - such happy colors together! A great feature to this cover-up is that both bottom corners have a triangle pocket made of flannel. The flannel can be used to wipe baby's mouth when she's finished nursing, and the pocket can be used to stash nursing pads, pacifiers...whatever!

For the burp cloths, I just turned under the edges of a strip of fabric, and stitched it down the center of a pre-folded cloth diaper. (I do pre-wash and dry the cloth diapers before doing this, because they do shrink up quite a bit on their first wash, and otherwise they would end up quite puckered.) This is an easy way to transform a plain cloth diaper into a stylish burp cloth!

I added some nursing pads, Lansinoh cream, milk bags, and Mother's Milk tea, for a complete breastfeeding-themed gift. (Heather's quite the lactivist like me!) I hope she enjoys the gifts, and I can't wait to meet sweet baby girl Macy in a couple months!!

Tuesday, April 28, 2009

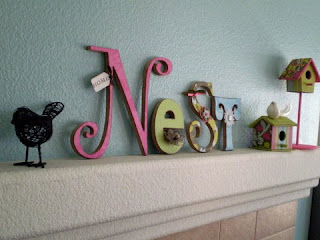
Nest letters

Spring has sprung on my mantel!! Finally...as well it should, seeing as it surpassed the 100-degree mark here this past week! A couple months ago, in my Simply Handmade magazine (which I *highly* recommend, by the way - awesome, awesome, awesome), I saw these NEST letters (order here), which were decoupaged and decorated and just so cute. I immediately thought I needed them, but wasn't quite sure. A few days later, I saw some bird houses at Wal-Mart, and snagged them, thinking they would go great with the Nest letters. (Have you noticed how everyone's loving birdhouses these day? Check out these cute ones my friend Deanna decorated!) And a week or so after that, my sister Karen told me about the little bird tealight holder from Target, which I *adore*.

Anyway, I've had the letters for several weeks now, but just hadn't gotten the time or motivation to get them decorated. I had started the birdhouses during my March craft night - and hadn't ever made any more progress on them! Last Saturday, after craft night the night before, and while Anthony and Darrell were working on their model car, I decided to get going on my letters.

The papers are the Amy Butler Bella line from K & Company. I inked around the edges with a brown Stampin' Up! ink pad. The bird is from Jo-Ann's. The moss and eggs are from Wal-Mart. The felt flowers on the "S" and the grosgrain ribbons are from Stampin' Up!. The buttons are from Making Memories.

I wanted one of the birdhouses to be raised, so I drilled a hole in the bottom of it, cut a dowel, drilled a hole in a little oval plaque, and glued the dowel into both the plaque and the birdhouse.

I'm quite happy with how everything turned out, and the colors go well with the Garden Party accessories in my kitchen, from Target. I'll have to remember to take pics of that stuff too...my table is looking rather cute, and I have an adorable apron to match!

Monday, April 27, 2009

Tin can organizer mini-tutorial

You may remember this picture from my craft room photos - either my recent "messy" photos, or from when I first organized my craft room. It's an organizer I made out of quart-size paint cans. I'd love to take credit for the idea, but I saw it in a magazine (wish I could remember which one). There IS a really cute one pictured in the current Stampin' Up! catalogue, on page 151.

I decided to make another one as a birthday gift for my friend Deanna, using slightly larger cans (recycled 24-oz infant formula cans). It's a fun project, doesn't take too long, and the organizer is fun, functional, and adds a touch of color to any room you decide to use it in.

1. Clean out your cans well. I recommend against using water if your cans are metal, as it is very hard to prevent them from rusting. I used a baby wipe to clean mine out, and then dried them well with a paper towel. Be careful with the edge - it's not super sharp, but it's still possible to cut your hand if you're not careful.

2. Decide on your colors and choose 6 coordinating patterned papers. For these cans, one piece of 12x12 was enough for each can, for the outside. I chose to line the cans with a neutral solid cardstock as well.

3. Measure the height of your can, as well as the circumference, and cut the patterned paper accordingly. You will most likely (if using large cans like I did) need to cut 2 pieces and tape them together.

4. Attach the paper to the cans using double stick tape. If lining the cans, also attach the linings with double stick tape.

5. Begin to assemble the pyramid by using a hot glue gun to attach the cans to each other, making a long strip of glue from one end of the can to the other. Do the entire bottom row first, before starting the second row. The bottom row won't feel very stable, but once you get the entire thing assembled, it's much more stable.

I recommend always picking it up by holding the cans on the bottom. You don't want the hot glue to rip the paper off the cans, which I guess could potentially happen if you grabbed it by the top can.

I'd love to see pictures if you decide to make one of these - so come back and post a link!!

Sunday, April 26, 2009

Daddy and son activity

"Does Daddy have to go to work today?" is the question I get asked every morning by my 4-year old son, usually followed by "Why???" when the answer was "Yes." A couple weeks ago, on a trip to Michaels, I had found a cute little wooden model race car for $1 - yes, ONE dollar - and told Anthony it would be a project he and Daddy could do together on the weekend. This was followed by several days of "When is Daddy going to stay home so we can make my car???"

So, finally, last Saturday morning, Anthony and Darrell sat at the craft table together and put together the little race car. I was impressed with what it came with, for that dollar - wooden parts, sandpaper, glue, a paintbrush (though the actual bristles were missing! ha!), and paint. Given that it was *made in China* though, we decided on using some *made in USA* Making Memories acrylic paint I already had on hand, just in case - not wanting to deal with an "oops - that had lead in it" later!!

I couldn't get a picture of the finished project, because Anthony couldn't find it when I wanted to take a picture!! But I'm thinking I need to go back and get more - they have an airplane, a boat, a train, and I can't remember what else. I'm thinking they'll be fun for Anthony, and would be great birthday gifts for his friends!

Saturday, April 25, 2009

Medical stuff

I've been busy trying to get some craft posts up, because I have actually been busy doing some crafty things! It's been fun after going through a dry spell. But I wanted to take a minute to update you on some of the medical stuff that's been going on with us.

I think - I hope - I might be feeling a little bit more energy these days. The thyroid medicine may be kicking in, and I've been loading up on B-12, which seems to help me some too. My colonoscopy was normal, and the GI doc said I probably have some Irritable Bowel Syndrome. An ultrasound revealed that my ovaries are covered in cysts - not surprising, given that my OB diagnosed me with Poly-Cystic Ovarian Syndrome a few years ago. At any rate, I need to follow up with my doctor, as the hormone imbalance resulting from this can also cause some issues.

Mackenzie has been diagnosed with Charcot-Marie-Tooth disease, which is the same neuromuscular disease that I have. The doctors don't know, however, if the CMT is what is causing her delayed gross motor skills and her spasticity, or if it could be a mild cerebral palsy caused by hypoxia during birth, or if it is related to her mild brain bleed while she was in the NICU. Regardless - she IS walking now, albeit stiffly, and she is improving every day. She's going to start receiving physical therapy through Early Intervention services soon, which should also help.

Makayla has continued to have food allergy issues...not just to milk, but from the food journal we've kept, it *looks* like she's also potentially reacted to soy, eggs, and fish. She saw an allergist last week, and she did some skin testing, which didn't really show anything (somewhat strange, but not totally out of the ordinary). They followed up with some blood testing, which I am supposed to call the doctor about on Monday to discuss the results and develop a plan. She saw a GI specialist on Tuesday, who thinks that her reflux issues are completely related to her food allergies (as do I), and he's not happy with the extent of what's been done on the allergy front so far. He wants her to see a particular allergist in Los Angeles, who is supposed to be *the best*. So he put in a referral for her to go there, and in the meantime, he put her on Prevacid. I was really happy with him, overall - he seemed to really know his stuff and took everything seriously. So now we are waiting for an appointment to take her to L.A.

Anthony had his 4-year check-up a couple weeks ago. He seems to be the healthiest out of us all!!

And Darrell's plugging along...allergies and sinus issues, like every spring...but otherwise doing well. He's been busy doing landscaping in the front yard - can't wait to take some pics and post them!!

Craft night

Last Friday night was my monthly craft night, when I invite my girlfriends over after the kiddos are put to bed, and we craft the night away. Some people scrapbook, some knit/crochet, some make hairbows, some decoupage, some sew, some make cards...whatever we feel like doing, it's more fun whilst hanging out with other mamas!! We start at 8:00 p.m., and have gone as late as 2:00 a.m.

My friend Deanna and I decided we hadn't done any stamping or card-making for a while, so that's what we worked on. Being as we were both exhausted, and neither of us were in much of a mind to make many decisions, it took us an insanely long time just to decide layouts and colors, so we didn't get many done. But it did remind me of how much I love stamping and that I really need to use my stamps more often!!

Oh, and yes...*this* is what my craft room looked like earlier in the day, before craft night. Not much crafting was happening in that room, needless to say.

...complete with the "E" from "CREATE" fallen off the wall...

You will be happy to know that the "E" has been re-hung, and my craft room was cleaned up before my friends arrived that night. It is, however, once again, on its way to being a disaster, thanks to a flurry of sewing and card-making the last two days.

Thursday, April 16, 2009

Shake it, baby!

Tuesday afternoon, I was avoiding housework bored and wanted to do something just a little crafty, but that wouldn't take too much time. I had these two 12-oz soda bottles which I had saved from a recent retreat I went on, thinking they were the perfect size for little hands. The girls LOVE anything that shakes and makes noise.

I filled one with rice and one with elbow macaroni noodles. I used super-glue to attach the lids permanently. (Note to self - do NOT leave super glue in the reach of a 4-year old when doing said activity.)

I used a hot glue gun (which I did not leave in the reach of my 4-year old...hey, I'm not THAT dense!) to attach a piece of fabric, the edges of which I had used pinking shears on. Finally, I hot-glued a strip of coordinating felt around the fabric-covered lid.

The kiddos knew just what to do with the shakers! (Don't mind Mackenzie's fancy 'do...we had a jamma day today, complete with no hairstyling!!)

Wednesday, April 15, 2009

Easter 2009

We had a great Easter weekend here, celebrating our Savior's gift of eternal life through his death on the cross and his resurrection to new life. Hope you did too!! It was especially sweet this year, since Anthony had just prayed to ask Jesus into his heart a few days before Easter!

Saturday morning, our church held a Resurrection Breakfast for the 4 year olds through 6th graders. Anthony just made the cut, having recently had a birthday. He was so excited about the live worship time - he didn't stop talking about the "special music" all day! And it was great - at the end, when the children's ministry leader talked to the kids about asking Jesus into their hearts, Anthony turned to me and said, "I already HAVE Jesus in my heart!!"

Anthony was thrilled to have some of his friends from the moms group there at the breakfast with him! This is Chris, one of my friend Allison's boys. He and Anthony held hands almost the entire 3 hours they were together!! It was so cute!

Sunday morning we went to church. It had been really chilly the day before, so I was worried the girls wouldn't be able to wear the pretty dresses my mom had sent for them...but it warmed up and was beautiful on Easter day. I couldn't get any pics of both girls actually looking AT the camera, though!

Darrell and Anthony spent the afternoon working out front, planting some flowers and ground cover, so the girls spent a lot of time at the front window, watching. Makayla, as you can see, is teaching Mackenzie the art of climbing. Last week, one day, Anthony called to me, "Mama, come quick!" I ran into the play room, but it was too late, and Makayla was on the floor crying. Apparently, she had climbed up on a stool, then got on a little white Ikea side table, and was standing on it!! And then she fell...at least she didn't get hurt, though!

Mackenzie spent a lot of time riding the girls' little pony that my mom got them for their birthday. When I asked her if she was sleepy, she laid her head down on the pony!


Easter baskets this year were very un-sugary!! We've decided not to do the "Easter bunny," but will still give the kids baskets and hide eggs as a fun game. I did my shopping last minute, and there were virtually NO baskets left at Target when I went on Saturday, so I decided to go with practical baskets that I could use anyway - who doesn't need more storage baskets? The kids couldn't care less about the actual basket anyway!

Mackenzie's basket - a very cute skirt and tank top, a little dollar book, and a Melissa & Doug wooden doll with magnetic clothes - I love it!

Makayla's basket - another cute skirt and tank, another dollar book, and a Melissa & Dough wooden cube puzzle - with a different farm animal picture on each side, so 6 puzzles in all.

Anthony's basket - socks (much needed - and he was so excited!), pajamas, Lightening McQueen swim trunks and a swim shirt, a Lightening McQueen water bottle, a flashlight (so he can stop taking mine!), sidewalk chalk, one egg with candy, and a Melissa & Doug (sensing a theme here?) wooden clock puzzle. He's learning how to tell time, so he loves the clock (and the girls love the shape pieces and are pretty good at getting them in the slots, actually!).

Anthony enjoyed hunting for eggs in the backyard. He didn't even mind that most of the eggs weren't filled with candy! I filled a few with a couple Starbursts each (knowing that he doesn't really care for chewy candy, so wouldn't eat many of them), three were filled with a dollar bill, and the rest were filled with animal crackers.

Anthony enjoyed "assisting" daddy with some front yard landscaping in the afternoon. As you can see - he mostly supervised, and he's got the hand-on-the-hips down pat!

Tuesday, April 14, 2009

Flower washcloth

I recently got the book, Weekend Knitting, by Melanie Falick. It has LOTS of great projects in it that I want to try, but the very first project in the book grabbed me and I had to do it. This knitted flower-shaped washcloth just looked SO luxurious and soft and wonderful - I just knew that every time I used it, it would be a little gift to myself!

I used the yarn she used in the book - Cotton Chenille, by Crystal Palace Yarns. I must say, it makes a wonderfully soft-textured washcloth...but I did NOT enjoy knitting with this yarn. At all. I started off by breaking the yarn 3 times within the first 10 minutes, which was a whole new experience for me, as I'd never had a yarn break before. Then I had a terrible time getting the stitches to move well on the needles, and I ended up switching to a needle one size larger hoping that would help a bit, and it did. But this yarn, I guess because it is cotton (which I did not know, having never knitted with cotton before) has NO give to it, and it was very hard on my hands and wrists. My hands got tired quickly while knitting with it, and it took me a lot longer to finish the project than I think it would have with a different yarn. But what other yarn would you want to use for a washcloth?!

When I originally saw the pattern in the book, I totally thought I would make knitted washcloths and handmade soaps for Christmas gifts this year. After knitting this one, I'm thinking...not so much. At least on the washcloths, anyway!! Nonetheless, I do love my one washcloth, and who knows...I may end up knitting another one or two for myself...I did order 6 skeins of the yarn, after all!!

LinkWithin

Related Posts Plugin for WordPress, Blogger...