

How completely GORGEOUS is this flower rosette?! I have been admiring these paper rosettes for a while now, on other people's blogs. I've seen tutorials on how to make them, and I've seen Tim Holtz's new Sizzix die cut that makes it super easy to make the rosettes. My super-sweet hubby gave me a Michael's gift card this weekend, and I was able to get a few hours of ME time this weekend, so I spent some time wandering the aisles of Michaels, loving their new-and-improved selection of Tim Holtz products. Anyway, they do not have the new rosette die...but I was thinking that I might want the Martha Stewart score board anyway, so that I could make multiple sizes of rosettes...so I got one! Additionally, I did find a pair of Tim Holtz Sizzix embossing folders (the one with the notebook page and the numbers collage). My first few attempts at making the rosette failed, but after watching this YouTube video, I finally got it right (AND got the idea to scallop the edge before scoring the paper, which I LOVE, anyway).
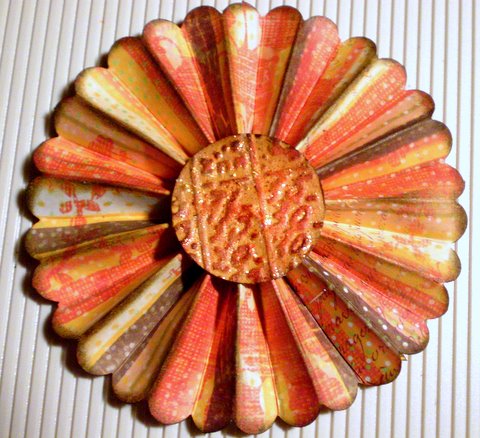
I don't remember the name of the paper pad this sheet of paper is from. I used a scallop-edge punch from Stampin' Up!. For the center of the rosette, I used the numbers collage embossing folder to emboss a sheet of mustard-colored cardstock. I then used distress ink pads direct-to-paper to rub over the raised portions (colors used - Barn Door, Spiced Marmalade, Vintage Photo). I punched out a circle, and inked around the edges with Walnut Stain, then glued it onto the rosette. I also used Vintage Photo and Walnut Stain distress inks with a foam ink applicator to apply ink to the scalloped edges of the rosette and the raised "mountains" of the rosette. Finally, I added some Scattered Straw and Spiced Marmalade colored Distress Stickles over the embossed center of the rosette to give it a bit of vintage sparkle.

Can you see that gorgeous sparkle from the distress stickles? I LOVE them!!! They are more matte and muted than regular stickles, and have a more vintage look to them. They are quickly becoming a favorite of mine!! I think I have 9 colors now...but STILL haven't found the ONE I've been searching for - Rock Candy!! Anyway, I can't wait to make more of these rosettes and put them on some fun projects!! (Or even make a project out of just the rosettes...can you see a rosette garland in your mind??)
*******************************************************

This next project is one I did with the kids, and I got the idea from here. I free-hand drew the tree onto kraft paper and used removable glue dots to stick it to the slider doors. I used recycled (i.e. the brown ones, not ones I've used!) coffee filters, and I sprayed them with water before the kids began painting them. Rather than use watercolors (which the twins tend to really dig the paintbrushes into), I just watered down some tempera paints. They had a blast - especially Mackenzie, who dumped the bowl of orange paint not once, but twice! I let the coffee filters dry, and then cut various sizes and shapes of leaves out of them. The kids then helped me stick them to the slider door...on the tree, and falling down to a "pile" near the bottom.

I love the colors of the leaves, and the way they seem to have a stained-glass effect against the outdoor light. AND, as a bonus, while it was VERY hot all week, like magic, today it was wonderfully cloudy and cool!! It was almost as if putting up the "fall tree" brought with it some "fall weather." :) If only the fall weather would stick around!!

*******************************************************

This final project is a simple little tag I made using another paper flower technique. It was originally designed to be made using Tim Holtz's grungepaper, but not having any yet, I've been using cardstock. I first made them on my fall banner, but since then, have learned that coating the flower pieces with Mod Podge on both sides before assembling the flowers actually helps a lot in helping the flowers keep their structure and gives them a really cool leather-like texture. To make this tag, I started with a piece of pale yellow cardstock. I cut the tag on my Cricut, and used an EK Success edge punch along the bottom. I cut a 1/2" circle using a punch, out of the same paper I was using for the flower, then used a 1/4" hole punch to punch the center out of it, thus creating a "hole reinforcement" for the hole at the top of the tag - a technique I learned during one of the many tutorials I watch. I then used 3 leaves I cut from my Cricut as masks, around which I applied several colors of distress inks and some Glimmer Mist in tiger lily.

Finally, I stamped "gratitude" along the bottom, and tied a ribbon through the top. I inked the edges of the flower with a little distress ink before gluing it to the tag, and that was it. I sent the tag off with a note of thanks to a mama who had loaned a baby wrap to me for a while.

OH - I also did a page in my Inspiration Journal...I'll post that sometime this week. And yes, I realize I didn't post an Inspiration Wednesday post last week. I just didn't get a chance to work in my Inspiration Journal last week...but I made up for it this weekend. :)
What about you? Did you have a creative weekend? I'd love links to whatever you created, if you did!!
2 comments:
I love all of the things you've made and shown in this post. I especially love the flowers...just not sure I have the patience to sit and make one (or more). I did do some sewing this weekend...I'm making my niece an outfit for Christmas. It is the Oliver + S Sunday Brunch Jacket (and the matching skirt in the pattern). I only have the jacket finished so far. It turned out sew cute, though!
Love the flower, Love the tree (I'm going to make one with Taylor), and the tag is gorgeous!
I see by the comment you left on my blog, you know what my creative adventures were this weekend! I'm loving making Taylor's doll!
Post a Comment