Showing posts with label Claudine Helmuth black gesso. Show all posts

Monday, November 21, 2011

Art Journal: 30 Days, Days 15 - 19

Okay, it's getting serious now - only 11 days left in our class!  Yikes!  BUT I am SOOOO jazzed about how this art journal page turned out.  I've never done an art journal page over black gesso, and oh my gosh - I'm so totally hooked!  (As in, I went out and bought another big jar of black gesso this week just to make sure I don't run out!  Ha!)  

These flowers...I have to tell you about them.  Because they started off being colored with my Caran d'Ache Neocolor II watercolor crayons - which I absolutely love.  I only own 13 of them, but I adore them.  I have 2 other kinds of watercolor crayons (did I mention I'm a watercolor junkie?), and while the Stampin' Up watercolor crayons ARE pretty decent, neither they nor definitely not the Reeves ones can hold a candle to the Caran d'Ache crayons.  And I was SUPER excited to learn that they would color over black gesso and show up!  How awesome!  The first time I colored, I added water, and didn't really care for the results...so I colored over them again and just left the crayons.  It was pretty cool looking.  But they just weren't popping quite as much as I liked.


And THEN, at Aaron Brothers, I found these awesome things - I say "things," because they are sort of a cross between a pencil and a crayon - they're made by Stabilo, and they're called "Woody 3-in-1" - and they work as a crayon or a colored pencil or a watercolor crayon.  
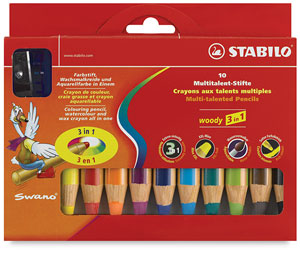

Anyway, I got them, and I colored over my flowers again - and SHUT THE FRONT DOOR - look at how bright my flowers got!!!  These babies rock!  


How much fun is this, with all the white journaling (done with a Pentel Sunburst gel pen), and the doodles (if you haven't tried the Sakura Souffle pens, you MUST), and most of all...those incredibly brilliant, vibrant pops of color in those flowers!  (And YES, I know I spelled "believe" incorrectly...but it was so pretty, I didn't want to mess it up by trying to fix it...such is life!)  

Anyway - if you haven't given black gesso as your base a try - you should try it out!  SO MUCH FUN!

Supplies Used:

Friday, November 11, 2011

The Crafter's Workshop: "Ava" Stencil

Today over on Craft Test Dummies, I have posted my second review (here's my first) of the stencils made by The Crafter's Workshop.  You've seen me write about them here before, and I've shown you projects I've used them on...so you already know that I love them.  Today I wanted to show you one of the face stencils - Ava is her name - and just how versatile she is.  I showed you an art journal page in my last post, where I used her in her most basic form...I simply traced her lines with a Pitt Artist Pen, then went over the lines a bit with some oil pastels.  I didn't color in her face, no paint, nothing...very simple.  But today, I'm showing you my very first attempt at something completely different (no judging allowed...I just told you, this is my FIRST ever attempt...!).  

I started out in a 9x12 art journal by scribbling all over the paper with Derwent Inktense watercolor pencils, and then adding water with a brush.  I love these pencils because once the color is dissolved and dry, it is permanent and is no longer water-soluble...so you don't have to worry about it moving around on you as you work in layers over it.


Then I placed the 6"x6" Ava stencil on my page.  I decided I was only going to use the face and neck portion of the stencil, so I traced those parts with a pencil onto my page, along with just a bit of the hair as a guide for reference.  You can just barely see my pencil lines in the photo below - I wanted to keep them light so they wouldn't show through the paint.


Then came the challenging part...for me, at least.  I've *never* painted a face before.  Not ever.  Nor have I ever drawn a face.  I am clueless when it comes to shading and shadows and all of that...you know, the technical aspects of art!  (I really do want to take some actual art classes someday and learn these things!)  So I just went for it and started adding paint.  And my first attempt was a hot mess...but fortunately, it's just paint...so I added some more paint, and painted right over her, until I found a happy medium.  I knew ahead of time that I wanted to put long, flowing hair on her (though I hadn't really planned on it being *quite* so poofy...but hey...what can I say...she wanted to have poofy hair!).  So this is how she looked after I painted over the traced lines.


And then the magic happens.  I placed the stencil BACK on her, and used a cosmetic sponge with some Claudine Helmuth Black Gesso (LOVE that stuff!), and I stenciled in her eyes, nose, lips, chin, and neck lines again.  It's AMAZING what an instant transformation just that little bit gives.  That gave me a guide.  Then I used my paint brush and continued from there, adding her eyebrows completing her mouth, and filling in all the hair lines.  (I also went back in with some white to add a few highlights on her face and neck...it seemed to help.)


Now the page is all ready for me to add some other elements and do some journaling.  While I know she's no masterpiece, having never painted a face before, I am pretty happy with how she turned out...and I owe it all to my friends at The Crafter's Workshop!  

For more details on this and other great ideas for using the face stencils, be sure to check out this great post on stencil designer Julie Fei-Fan Balzer's blog!!  And make sure you hop over to Craft Test Dummies to check out all the other things I did with these great stencils for my review!

Are you a fan of The Crafter's Workshop stencils?  I'd love to see links to projects you've made using them!

Supplies Used:


BLICK ART MATERIALS: Save up to 82% on Select Items through November 16th!

LinkWithin

Related Posts Plugin for WordPress, Blogger...