Showing posts with label distress ink. Show all posts

Sunday, February 26, 2012

Dylusions Stamps & Stencils with Distress Markers

These tags combined some of my absolute favorite new products - Dyan Reavely's new (and old) stamps and stencils, along with Tim Holtz's new Distress Markers.  I only had a short time to play...in the midst of a HUGE reorganization and overhaul of my craft room, but I had SO MUCH FUN playing, and am completely in love!  


On this first tag, I used Distress Ink Refills (Worn Lipstick, Mustard Seed), Distress Stains (Tattered Rose, Scattered Straw, Dusty Concord), Dylusions Ranger/TCW stencil (Dotted Flowers), Dylusions stamps (Basic Backgrounds, Around the Edge, Curious Corrin, The Right Words), Distress Markers (Shabby Shutters, Peeled Paint, Stormy Sky, Broken China, Weathered Wood, Brushed Corduroy, Black Soot, Picket Fence), and Archival Ink (Basic Black).  

Let me just tell you...you are going to LOVE the Picket Fence Distress Marker!!!


On this second tag - which I adore...I just love her whimsical hair and her polka dot tights! - I got to play with more colors of the Distress Markers.  I used Distress Ink Refill (Worn Lipstick), Distress Stains (Wild Honey, Tattered Rose, Scattered Straw, Dusty Concord), Dylusions/Ranger/TCW stencil (Dotted Flowers), Dylusions stamps (Basic Backgrounds, Around the Edge, In-betweenies, The Right Words, Dooally Dorris, Curious Corrin), Distress Markers (Broken China, Tumbled Glass, Barn Red, Scattered Straw, Mustard Seed, Shabby Shutters, Picket Fence, Peeled Paint, Black Soot).  

I am planning to teach these tags at my LSS soon, so if you are in the Inland Empire area of Southern California, and would like the info, let me know.   :)

Happy creating!!

Friday, December 23, 2011

Christmas Tags

One of the treats of the Christmas season each year is Tim Holtz's 12 Tags of Christmas.  Beginning December 1, each night for 12 nights, he posts a new tag - created that day - and boy, are they ever fantastic!  He's done them for 5 years now, though this is only my 2nd year participating.  I never can keep up with doing them at the same time as him, but I try to do at least some of them before the month is over.  So far, I've got these three finished.


I love how Tim had us use the embossing pad on the embossing folder to get this cool double-embossed effect on this tag.  And the pine cone die - wow - it takes a bit of learning, but it is SO much fun once you figure it out, and it can also be used to make cute little dried roses as well.  (Check out my Sizzix embossing folders review over on Craft Test Dummies to see a cute card I made with a dried rose on it using this die!!)


Day 2's tag had us using the Picket Fence Distress Stain over some Christmas Kraft Resist paper...two of my new loves!  And I just love how when you apply some Distress Ink over the Picket Fence Distress Stain, it takes on sort of a chalky look - totally cool!  I've had that little bow from Jenni Bowlin in my stash for ages...just waiting for the perfect project...and this was definitely it!  That reindeer couldn't be cuter...the little greenery wreath and that ivory bow on his neck are just too cute!


I skipped ahead a few days to Day 6 for this one - and I swapped out techniques, too, for one he showed us a couple years ago.  While the metal tape, embossing, coloring and clear embossing powder on top are from this year, I decided to color the metal with alcohol inks instead of paint dabbers (though I did paint the wreath with paint dabbers).  I absolutely LOVE the look of the clear embossing powder over the embossed,  colored and sanded metal - my first time trying this - but definitely NOT my last!  Totally in love with this look!

And I especially love how you can add the Distress Ink over the alcohol ink, and because of the clear embossing powder, the Distress is sealed in and gives the tag a vintage feel.  


I'm still hoping to get a few more tags done before December is over.  I also have a couple handmade ornaments to show you in another post!

Saturday, November 05, 2011

Art Journal Pages

I mentioned in my last post that I'm taking Julie Fei-Fan Balzer's online workshop, 30 Days In Your Journal.  What's so awesome about this class is that she really focuses on showing you how to fit art journaling into your life every single day...for just 10 minutes.  So you don't do a page or a spread a day - you work on a two-page spread for several days, adding a bit at a time.  In the past, I've usually done entire pages (or more) in one setting, though I have sometimes gone back and added layers - and I do have multiple pages in multiple journals that are in various stages of work.  But this idea of really limiting myself to 10 minutes a day is new to me.  And I think it could work, and I think it just might be the key to actually being able to art journal more frequently - because finding chunks of time to sit and play is usually what prevents me from doing it as much as I'd like.  So we'll see how this goes.


At any rate, after the first 5 days, I've completed this two-page spread.  It's much busier and fuller than most of my art journal pages normally are, but I'm okay with that.  I did a lot more actual journaling than I often do, which I like, and less time-consuming processes than I've used on other pages...which I'm torn about.  I really do like playing with new mediums and trying new techniques in my art journals...but maybe those should be saved for the times when I have bigger chunks of time, and my "10 minutes a day" art journaling can be a bit more basic.

I *love* the black stamped hand on the left side.  That was done with a Styrofoam stamp I made by tracing one of the hands from the Henna Hands stencil (also designed by Julie Fei-Fan Balzer) from The Crafter's Workshop and then using a technique I learned in the Random Creative Scrapple Doodle workshop by Stephanie Ackerman.  I used Claudine Helmuth's Black Gesso to stamp with, and then journaled on the hand with a white Sakura Glaze pen (new to me - totally in love!).  I also used the Punchinella stencil from The Crafter's Workshop (another one designed by Julie) to add layers of color with Distress Ink and Paint Dabbers randomly over the pages.  I am absolutely addicted to The Crafter's Workshop Stencils...I use them ALL THE TIME - seriously!  If you haven't tried them, you definitely need to check them out.  (I reviewed them earlier this year on Craft Test Dummies, and will be writing an updated review in a few weeks, covering the newer releases.)

The remainder of these pages were done some time ago - back in July/August, I believe - when I was taking Christy Tomlinson's She Had 3 Hearts workshop.  (Can you tell I love taking online workshops??  That's what happens when you're a stay at home, home-schooling mom of four children ages 6 and under!)


I did an image transfer (the row of scissors on a shelf) on this page, and played with melting some crayon wax.  I really like how the green wax blew across the page in little droplets when I used my heat gun to melt the crayon!  I also love the stack of hearts - canvas, glassine paper, fabric, and a rusty metal heart that I dipped into melted UTEE (which I had colored orange with Pan Pastel).  I used a little clip of some kind that I got in a random assortment of trinkets from this way cool store Zinnia to clip the hearts together.


I used another stencil from The Crafter's Workshop on this page - Ava - to create the girl's face.  There are SOOOO many ways to use this stencil - check out this blog post about the face stencils to see just how versatile they are!  I also used another of their stencils for the journaling.  I dripped acrylic inks on the page for drippage, and used acrylic inks to color the scallops around the edges of the page as well.  To make the scallops, I just punched circles from vintage music paper, vintage book text, vintage dictionary pages, old map pages, etc., and glued them on the page hanging off the edge and then trimmed the excess.  I love using vintage papers!!


This is another fun page.  I used Adirondack Colorwash Sprays and - surprise - The Crafter's Workshop stencils on the background (along with an alphabet stencil from...???).  And then I played with wax.  I used clear beeswax at first, and then added some blue crayon to the wax to color it a bit.  I stamped into the wax in the upper left hand corner using Unity's Giving It All Meaning stamp - what awesome texture that created!    And I love Prima's Chickenwire stamp, which I used to add texture over the wax and around the edges.  I was happy to discover that the Pitt Artist pens from Faber-Castell write easily even over cooled beeswax!  


This last page was super fun.  I can't claim credit for the idea of rolling the paper - another student in the workshop did that on a page in her journal, and then Christy actually did a piece of art on her blog inspired by it, which is when I saw the technique.  Anyway, it was my idea to roll them up and glue them to the base, then cut them out in a heart.  Then I actually did my journaling - using the Pitt Artist pen - right on the rolled paper heart!!  It wasn't anything I really needed anyone else to be able to read - and I know what it's about - and that's all that matters...so I was okay knowing that the writing was going to get covered up.  Unfortunately, my heart has gotten rather smooshed from my journal being closed - I should have taken a picture right when I made the page - not several months later!

And then...came the string gel.  Have you ever played with string gel?  Well, I hadn't, prior to this page...and boy oh boy, was it ever fun!  I fell in love with the stuff!!  Basically, it's this polymer stuff, and it starts out clear, so you need to add some paint (or acrylic ink) to color it.  And then you let it sit for a while - I want to say like 2 hours or so.  Then you take a spoon or a palette knife or whatever, and you scoop some of it up, and you basically drizzle it all over your project.  It's SO fun - makes you feel like a kid!  It's totally messy and awesome and fun.  When it dries, it still looks wet, and it's glossy and dimensional - and did I mention it's FUN?!  Seriously.  {Just don't make the same mistake I did.  I had some extra string gel - which of course, I didn't want to waste.  So I drizzled it on the page facing this one, figuring I'd play around with that page too.  I wasn't thinking...now I have to keep a piece of wax paper in there all the time, or the pages stick together because the string gel on the two pages wants to stick to each other.  Live and learn.}

Anyway, hope you enjoyed those.  If you want to learn more about art journaling, you really should check out Julie's class - she really tells you exactly what she's doing and why she's doing it, every step of the way.  It's great for beginners or for more advanced artists who just want some inspiration.


BLICK ART MATERIALS: Save up to 82% on Select Items through November 16th!

Tuesday, November 01, 2011

Happy Halloween!

Yeah, I know - Halloween was YESTERDAY!  It also happened to be Jeremiah's FIRST birthday...so we were a little bit busy around these parts.  :)  I cannot believe he's already a year old, and that he's been a part of our family for 7 days shy of a year!  Wow!

Even though I'm a day late (and usually a dollar short...or lots of dollars short, as the case may be!), I did want to show you a couple of Halloween projects I made using Authentique's Glowing line, for my post on Craft Test Dummies yesterday. Really, you need to go check it out, because in my post, I explain how I made everything.  Both projects were super easy, and I think a Christmas version of these cans will soon be in order!

Burlap-covered tin cans, with
Authentique Glowing line embellishments

Scrapbook layout, ready for photo, made with
Authentique Glowing line
Anyway, we took all the kids to Knotts Berry Farm on Friday - in their costumes, of course - and we had a great time.  Then yesterday, we all visited the BRAND NEW HOBBY LOBBY that just opened.  It's about 40 minutes from here, but YAY for having Hobby Lobby!  And last night we started off at our church's Hallelujah Night, but after standing in one line for 15 minutes to get a couple pieces of candy, we changed plans and went trick-or-treating back home in our neighborhood...which turned out to be a much better plan.  The twins were hilarious...this was their first year trick-or-treating, but once they got the hang of it, they were hamming it up!  Mackenzie in particular was so cute - she would get her candy, and then just keep standing there, saying "trick-or-treat" over and over, with her bag open, until the people at the door, confused as to why she wasn't leaving, gave in and gave her more candy!  She was really working the neighborhood...and by the time we got home, she was dragging her bag on the ground because it was so heavy - she ended up with almost double what the others got.  (It's all good - we always pour all the candy into one big bowl.)  The kids are satisfied with their new stash of lollipops, and mom's satisfied with the new stash of chocolate!

In other news, Julie Fei-Fan Balzer's new 30 Days In Your Journal class starts today - are you taking it?  I'm getting it as an early birthday gift from a friend.  I think it's a great deal for the amount of information she's providing.  I love all of Julie's work, and I am addicted to the stencils she designed for The Crafter's Workshop (you can see some of them in my project for the Halloween blog hop I participated in a couple weeks ago).  Anyway, I think it will help me with my art journaling...I kind of feel like I'm all over the place and need to get in a groove.

That's all for now.  I have some other projects I've made for Craft Test Dummies that I still need to show you...later this week!

Wednesday, March 02, 2011

LaBlanche Stamps - UTEE Tag

While at CHA, I discovered a brand-new-to-the-U.S. stamp company, LaBlanche stamps.  At first, I looked at them and sort of started walking right on by - they LOOKED like foam stamps, and I just wasn't interested.  And then I stopped, as I saw a woman demonstrating the stamps - I saw the detail of the stamp she was demonstrating, and I immediately knew these were NOT your ordinary foam stamps!  So I took a closer look.  As it turns out, while the top part, where you hold the stamp, is actually foam, the bottom part - the stamp itself - is NOT foam, but is SILICONE!!  Who knew?!  And of course, we all know one of the unique and fun features of silicone is that it is remarkably heat resistant...which means that these stamps can be used particularly well with melted UTEE!

Now, to read my full review of these stamps, head on over to Craft Test Dummies and check it out!  But I wanted to share with you here today the tag I made while playing around with my stamp.

Products I used:


To start off, I took a size 8 manila tag.  I took my four colors of Glimmer Mist, and in the order listed above, I sprayed a bit of mist, on the craft mat. I then laid the tag down on top of the mist, pressing gently all around so it would soak up the Glimmer Mist.  I picked up my tag, turned it over, and used a heat gun to dry it.  I laid it back down a second time in the mist that remained on the mat (don't worry that it's all mixed together at this point), and repeated the process.

Next, I took my Distress Embossing ink pad (I prefer this one because it's extra juicy) and pressed it down all over my tag, making sure to cover the entire tag with ink.  Then I poured UTEE over the inked tag, tapped off the excess, and melted it with my heat gun.  Now, I've read in various places that it's possible to pour on more UTEE while the first layer is still hot, and to continue building layers this way.  Those people must be extremely fast.  Because I've never gotten that method to work for me.  So, I repeated the process of inking the tag with embossing ink, pouring on the UTEE, and melting it with the heat gun.  After about three layers, I decided to add a bit of Snow Cap paint dabber around the top edge and down the sides of the tag before proceeding with more UTEE.  The UTEE stuck to the paint just as it did to the ink, and as I continued melting, the white paint moved and shifted in really cool ways so that it no longer stayed just on the edges.

Finally, after about 6 layers of UTEE, I inked my LaBlanche stamp with Timber Brown Staz-on ink, made sure my UTEE was nice and melted, and stamped it onto the top part of the tag.  I repeated for the lower part of the tag.  This was my first time stamping into UTEE and I absolutely LOVED the incredible texture that was immediately created!  But I wanted to emphasize the texture even more...so I got out my inks.

Check out the Snow Cap paint dabber paint around
the top and sides of the tag, as it drifted into the melted UTEE
On the top part of the tag, I used the dark brown chalk ink and rubbed it into the crevices created by the stamped flourish.  On the bottom, I used the turquoise chalk and then the brown.    I also intentionally bent the tag to create cracks in the UTEE all over the tag, and then used my ink blending tool with some Walnut Stain Distress Ink and rubbed it into the cracks.  I went around the edges of the entire tag with the distress ink as well.

Incredible texture created from stamping into melted UTEE; tissue paper
flower created with just tissue, Glimmer Mist, glue, and filigree center

To embellish the tag, I first stamped the word "create" onto a relatively smooth portion of the tag using Staz-on, with a stamp from the newly-released Art & Soul set from Unity Stamps.  (LOVING this set - will review it on Craft Test Dummies soon!!)  I created a layered tissue-paper flower using Glimmer Mist and a filigree gem center, and added it to the lower right corner of the tag.  I found some ribbon that was almost the right color, just a bit too bright - so I dulled it with a bit of Distress Ink, and it was perfect.  I put the ribbon through the hole on the tag, and I added a jump ring to the ribbon so that I could hang a leaf charm from the Industrial Chic collection (available only at Michael's).


And that's it.  My tag is complete.  It was a new experience for me, and I had fun playing!  I will definitely be playing with UTEE again - and I most certainly see a melting pot in my future!!

What's YOUR favorite thing to do with UTEE?  Do you enjoy stamping into UTEE?  Or is there something else you enjoy more?  I'd love to hear - or see links to your projects!  And have you tried LaBlanche stamps?  What do you think?

Wednesday, February 23, 2011

Scrapbook Layout Using Crafter's Workshop Template

I recently had the opportunity to try out some templates from Crafter's Workshop for the first time.  Now, I know what you're thinking...templates, stencils..."Aren't those SOOOO 1980's?!"  I thought so too...until I started playing with these!  These templates (or stencils - whatever you'd like to call them) are contemporary, versatile, and affordable.  Check out my full review of them, as well as other techniques to use with them, on Craft Test Dummies tomorrow!  To see even MORE techniques and read Jenny's review (THE Craft Test Dummy!!), go here.  AND, she even includes a link to a great video full of techniques using these fabulous templates.


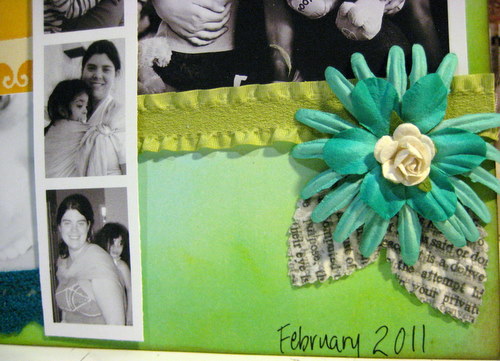
But today, I wanted to share this scrapbook layout I made using the 12"x12" template called Birds of a Feather.  And since I have such a hard time just showing you what I made...I'm going to do a little tutorial to show how I made the background, as well as another cool technique!


I started with a vanilla-colored piece of smooth cardstock under the template, and pulled out my Distress Embossing Ink Pad by Ranger.  I love this pad, because it's extra "juicy."  I applied the ink pad directly to the template, pushing down and "squishing" a bit in the more detailed areas.  I decided to only use 2 of the bird houses - and this is part of what I love about these templates...if you only want to use part of it, you totally can!  I removed the template and sprinkled clear embossing powder over the ink, then embossed with my heat gun.


Next, I started applying distress ink over the embossed areas - the embossed areas resist the ink and will stay vanilla.  You can use a damp cloth to wipe over the embossed areas to clean off any wet ink.


Isn't that just awesome?!  I love this technique!  I continued adding ink colors until the entire page was covered and I was happy with it.  

Distress ink colors used: Crushed Olive, Broken China,
Tumbled Glass, Stormy Sky, Wild Honey, Vintage Photo

Next, I thought about what I wanted the page to be about.  I decided to scrap about ME - which I never do, and so went searching for photos of me.  Finding them was difficult - I'm always the one TAKING the pictures...but I eventually found a few and chose which to include.  I decided that since I wanted the colors of the page to really shine, I made the photos black and white.

Black & white photos show off the
colors of the page

I began adding embellishments - some of which I've had in my stash for years!  It was nice to finally be using them.  The title and butterflies are all from Marcella by K&Co.  

Title and butterflies from Marcella by K&Co.

I wanted to add some bling, and I had a sheet of Prima Say It In Crystals.  But I didn't want them to be clear - I wanted them to coordinate with my page.  Fortunately, I knew just what to do!  

First, I have been saving the plastic inserts from certain Tim Holtz Ideaology packaging...because they make great palettes for alcohol inks.  So I added just two drops of each of the three colors I wanted to use into each well of one of these plastic inserts.  I let the ink dry.  I took one of my Pentel water brushes (to see a great review of water brushes, check out this one at Craft Test Dummies) and, empty of water, filled it with some alcohol blending solution.  Then, I was able to use my brush to pick up the ink from my homemade palette, and color the bling just the way I wanted it.

Blending solution-filled water brush, picking up color
from dry alcohol ink on plastic package insert

Color your bling any color you like using alcohol inks!

Perfectly colored bling!

I added some Prima flowers, and some really fabulous newsprint leaves I found at Michael's.  For the center of the orange and blue flower, I used my Epiphany Crafts Shape Studio to make an epoxy flower center from a piece of book text.  I added some trims from my bucket-o'-trims - and have no idea what brand they are.

Flowers by Prima; newsprint leaves by
Recollections from Michael's

Flowers by Prima; epoxy center made using book text and
Shape Studio by Epiphany Crafts

Finally, I added my journaling using a dip-pen and black india ink.  I know the dip-pen may seem intimidating, but I find india ink to be the absolute best for writing over ink or paint.  

Journaling done with dip pen and india ink

I love my final result, and I especially love that I created the background paper myself!  I hope you've enjoyed my little tutorial - let me know if you have any questions!


Thursday, February 17, 2011

Valentine's Mini-Book


Valentine's Day was fast approaching, and I still didn't have a card or a gift for my husband...so I was thrilled to see the little mini-book that Tim Holtz posted on his blog on the 11th.  What a wonderful creation, made from just one sheet of 12x12 paper!  This is my version of the mini-book, and I'm pleased to say that my hubs loved it!

Grungeboard heart covered in Fired Brick
Crackle Paint, then Walnut Stain distress ink

Maya Road calendar sheer; Vintage Valentine printed
from TammyTutterow.typepad.com
Three tags (7 Gypsies) for the pockets of the mini-book
Mini-alpha stickers inked with distress ink
Prima flower inked w/ distress ink then covered with
Rock Candy distress stickles; button colored with
alcohol inks
Metal Philosophy Tag colored with alcohol ink
Mini-alphas colored with alcohol inks, then covered
with Rock Candy distress stickles; Epoxy bingo marker
made using Epiphany Crafts Shape Studio
School-yard Valentine page printed from SisBloom.com/blog
and covered in Rock Candy distress stickles
Embossed chipboard from IOD inked with distress ink
then "LOVE" covered with copper Perfect Pearls
LOVE my labeler!!  
Back side; Grungeboard hinge attached with brads
What did you do for YOUR special someone for Valentine's day?

P.S.  You may have noticed the epoxy bingo marker I made using the Epiphany Crafts Shape Studio - be sure to check out my review of this awesome tool tomorrow over on Craft Test Dummies!!

Tuesday, January 25, 2011

LOVE Banner Tutorial - Valentine's Home Decor

I have really great memories of Valentine’s Day from my childhood.  My mom really went all-out for the holiday…from decorating the house with hanging tissue-paper hearts and banners, to breakfast on a table covered in red and pink decorations, and dinner with more surprises and fancy decorations…she really out-did herself.  As a mom now, I wonder how she did it all.  After all, she was a working mom; and as a stay-at-home mom, I am ashamed to admit that I, um, have NEVER put up a single Valentine’s decoration, or really done anything spectacular for my kids for the day.  I think I *did* buy some “x” and “o” shaped pancake molds one year, and they were a flop.  Anyway, this year, I am resolving to start doing a little more – and THIS banner is my start!
To create this banner, you’ll need these things:
First, you need to prepare your corrugated cardboard backing pieces.  Cut 4 pieces of cardboard, about 5″ x 7″.  Then, peel the front off one side, revealing most of the corrugation inside.  Take the white ink pad, and rub it directly over the corrugated cardboard, so that the bumps of the corrugations are highlighted with the white ink.  Set the cardboard pieces aside to dry.
Love Banner corrugated cardboard
Peel most of the facing off the cardboard
Next, take a sheet of black text paper from the Core’dinations paper pad, and lightly sand the surface of it using a sanding block, revealing the contrasting color beneath the black.  Cut four pieces of paper, 4″ x 6″, and adhere one to each piece of cardboard using Fabri-tac (I like using this glue due to its great grab and ability to use with wet applications).  Next, place your pieces in a protective spray box (I have a homemade one), and spritz each piece with a homemade Perfect Pearl spray (instructions to come!) or your choice of shimmery mist.
Background misted with homemade Perfect Pearl mist
Now you will cut take a sheet of the ivory-colored large dotted paper from the Core’dinations paper pad, and sand the dots, revealing the lighter color.  Then, you will use the largest die from the Nestabilities Labels 4 set to die cut a label shape for each of the four banner pieces.  Glue them onto the foundation pieces.
Adhere Nestabilities Label 4 to background
Using the Cricut font cartridge of your choice (I used Alphalicious), cut the letters to spell “LOVE,” at about 3″ size (depending on their width, you may need to adjust, to fit on the label), out of a sheet of the damask Core’dinations paper in red, sanding it before cutting.  Use Distress Ink and an ink blending tool with foam pad to add ink around the edges of the letters, and then glue the letters to the labels.
Using the Sweethearts cartridge (or any cartridge with a heart shape), cut several hearts in 1.25″ and 2″ sizes, also from the red damask paper.  These will be used for embellishing.
Cut four 1.75″ x 12″ strips of the red damask Core’dinations paper and lightly sand them.  Take a strip of the paper, and lightly spritz both sides of the paper with water to make it more pliable.  Begin folding the paper to make pleats in it.  Put a strip of Fabri-tac adhesive down across the very bottom of one of the banner pieces, and lay the pleated red cardstock across it, pushing down and holding for a short time until the glue grabs and holds the pleats in place.  Lay another bead of  Fabri-tac down on top of the pleated cardstock, at the very top of the pleats, and cover it with a 1/2″ wide strip of the ivory dotted Core’dinations paper.  Trim both the red and ivory cardstocks even at the sides of the banner piece, and then use scissors to cut a slight wave pattern in the pleated cardstock at the bottom.  Repeat for all of the banner pieces.
Begin embellishing the banner pieces with the red hearts, hot-fix rhinestones, and handmade tulle flowers as desired.   Use Glossy Accents to add a glossy, dimensional accent to areas of cardstock or entire pieces of cardstock.  I used it on embossed (raised) areas of some hearts, or on entire hearts, and on the dots of the strips at the bottoms of the banner pieces.
Use Paper Glaze to accent embossing or add dimension
Use Glossy Accents to accent embossing or add dimension
Twisted tulle flower with hot fix rhinestone and cardstock heart center
You can get creative with Fabri-tac and tulle in making flowers.  In the above flower, I covered a piece of cardstock with adhesive, then took a length of tulle and began twisting it and laying it down on the glue, going round and round until I covered the cardstock.  Below, I also covered a piece of cardstock in adhesive, but rather than twist the tulle, I simply gathered some between my fingers and pushed it down into the adhesive, then repeated over and over until I had a nice, floofy flower and the cardstock was covered.
Bunched tulle flower and distress-ink heart
You can see above that I rubbed a distress ink pad directly over my heart, so the ink hit only the raised, embossed areas.  I also inked the edges of the heart.
Continue to embellish the banner pieces as desired until you are satisfied.  Once completed, punch holes in the top corners of each piece, and thread twine through the holes of each piece, leaving about 3-4 inches between each banner piece and about 18 inches at each end for hanging.  Cut pieces of tulle and ribbon approximately 5 inches long and tie them around the twine all along the twine, as few or as many as desired, until you reach the look you desire.
Love Banner Completed
Now…isn’t that LOVE-ly?!
*****
Note: This project was made for the Crafts Unleashed blog, as part of a "LOVE" home decor competition amongst the Crafts Unleashed design team this month.  Go check out the other projects, and vote for your favorite (hint, hint!!) here!!

LinkWithin

Related Posts Plugin for WordPress, Blogger...