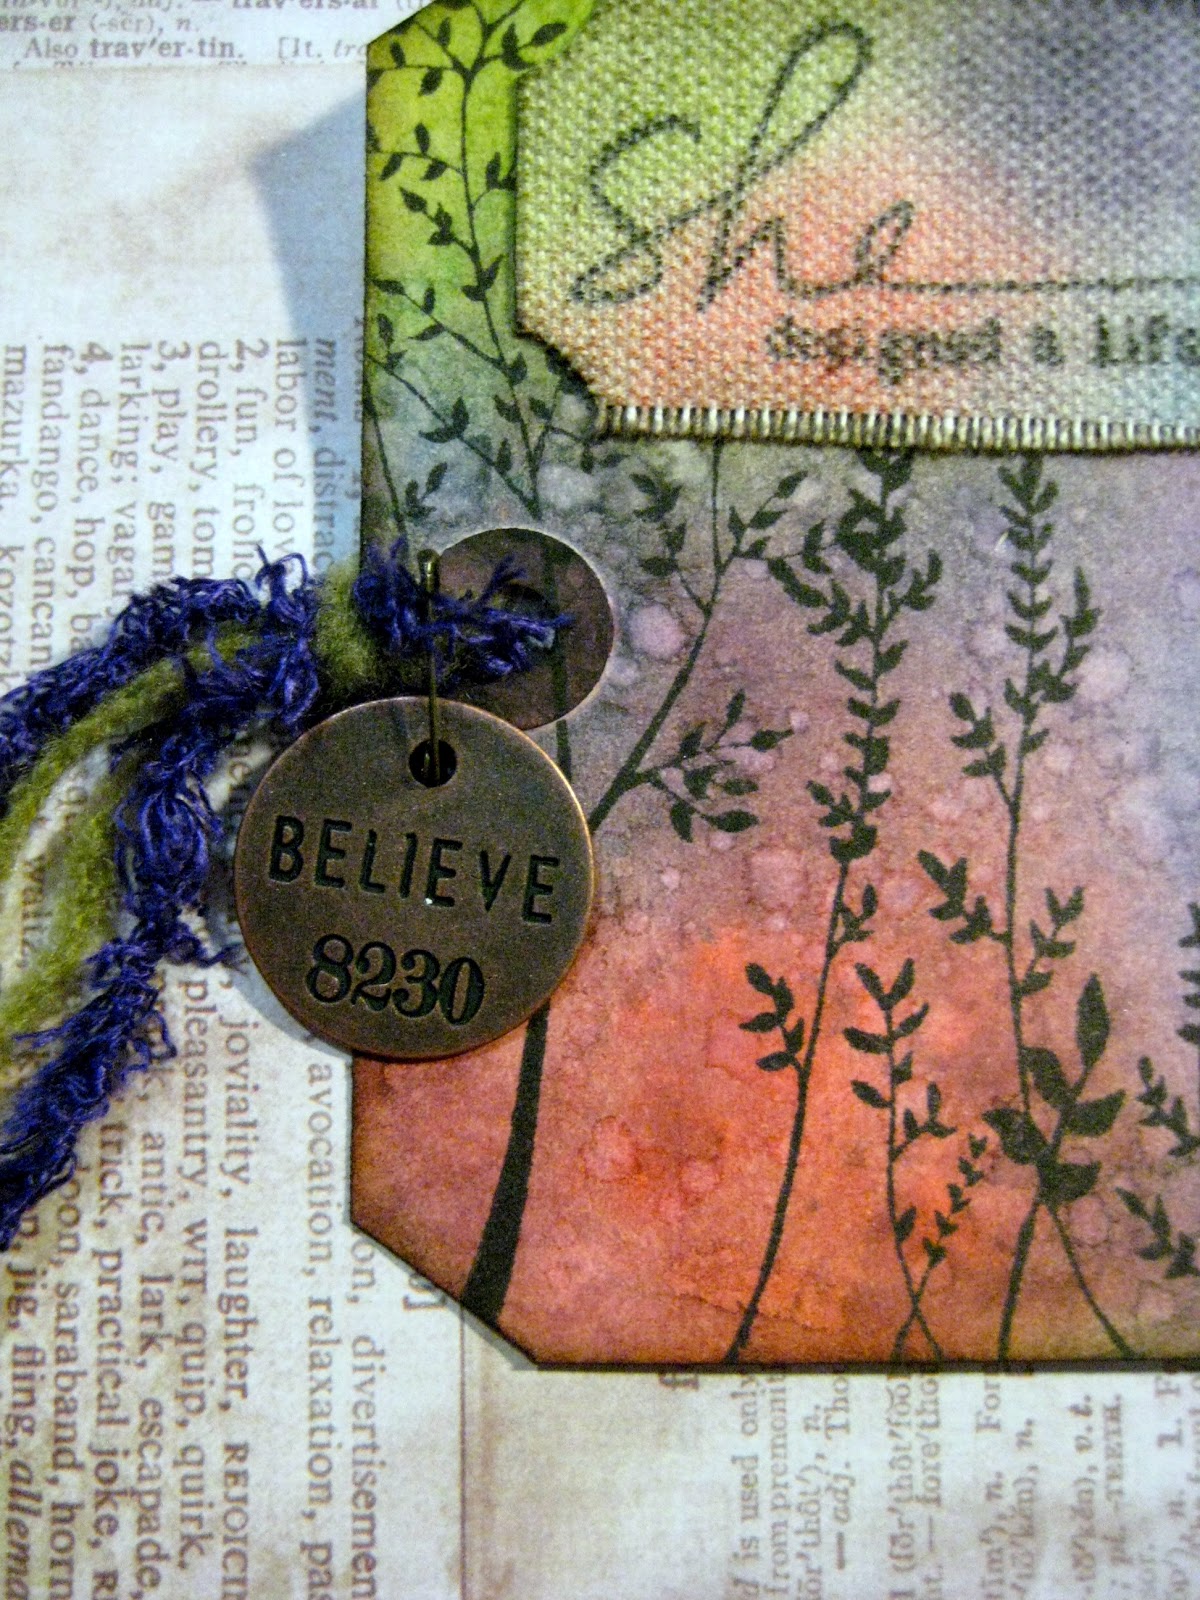
It's been a few weeks again since I've been able to participate in the weekly Compendium of Curiosities Challenge hosted by Linda over at Studio L3, so I was super happy to get some artsy play time in today!! I loved the technique for this week's challenge - it's one I've done before, so this wasn't actually my first time trying it (for once!). It's an easy but fun technique which always creates beautiful results. I decided to incorporate my "One Little Word" for the year, believe, into my tag, since I haven't done anything related to my word lately...though it HAS been on my mind a lot. And I just ADORE this quote, from a Donna Downey stamp - "She created a life she loved."
And as luck would have it, the challenge this week at Simon Says Stamp and Show is to create a tag, which I honestly didn't even know going into this creation...but since that's exactly what I did, I'm entering their challenge as well!!
Showing posts with label challenge. Show all posts
Saturday, February 19, 2011
Wednesday, January 26, 2011
LOVE Showdown - go vote!!
Hey my friendly followers...if you loved my LOVE banner from my last post, why don't you just hop on over to Crafts Unleashed and leave a comment voting for my LOVE banner as your favorite in the Crafts Unleashed Design Team LOVE Showdown!! :-)
(You'll also get to see some other pretty cool Valentine's projects...but of course, we designers take our bragging rights pretty seriously, so of course you'll vote for me, right?)
| Click photo to take you to Crafts Unleashed, then leave comment to vote |
(You'll also get to see some other pretty cool Valentine's projects...but of course, we designers take our bragging rights pretty seriously, so of course you'll vote for me, right?)
Monday, January 03, 2011
Crafting With the Stars!!
I keep laughing at the name...I've never really gotten into "Dancing with the Stars," but hey...crafting? Just say the word and I'm there!!

So, I've entered my JOY wall hanging from my December guest design team assignment into this "Crafting With the Stars" contest over at Sew Dang Cute. PLEASE, won't you go over and check out my project there? Right now mine is in the 17th row, on the far right. The number of times it is viewed just MIGHT have something to do with who gets through on the first round!! The first round lasts until January 15...
Thursday, December 09, 2010
The (Paper) Trailmakers Challenge Blog - Guest Design Team project
I tell you what - I am really loving playing with this December Paper Trail kit!! First, the frame project was a blast to make, and now, these cards were SO FUN!! These papers by Lily Bee Designs are just wonderfully versatile and coordinate so well together, the kit makes it super easy to put together great projects, no matter what you're making.
This first challenge of "put a stamp on it" was not such a stretch for me - me who recently "de-stashed" by getting rid of over 100 stamp sets!!! Yep, you read that correctly!! Not to fear - I still have well over 50 stamp sets still in my stash, and somehow still manage to pick up a new one here and there - and always have more on my wish list. Actually, my papercrafting - really, my entire artsy-craftsy life - started out with rubber stamping. I went through a time period of several years when I didn't even pick up a stamp, though, and I thought I was done stamping...but then just in the past 6 months or so, I've gotten back into it. There really is SO much you can do with stamping and ink - I think that's what draws me to it...the huge variety of techniques. I'm a technique junkie, of sorts. Anyway, for this challenge, I made three different cards for you, all using different stamping techniques.
**********************************************************
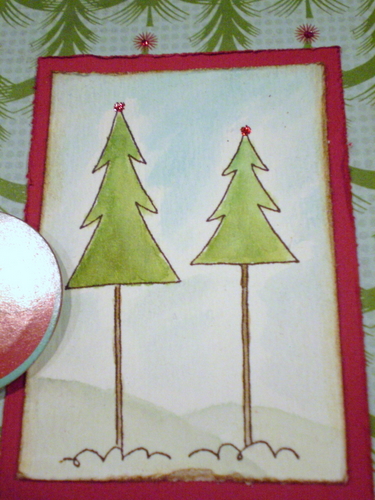
For this first card, I stamped an outline stamp of a couple trees on a small piece of watercolor paper. I like using watercolor paper for this technique because it holds up well and you can move color around nicely on it. After stamping the trees in brown permanent ink, I rubbed distress inks directly on my craft sheet, then used an aqua painter (a brush filled with water - you could also just use a paint brush and water) to pick up the ink and paint the stamped trees. I also painted some snow and a faint sky background. I used a paper distresser along the edges of both the watercolor piece and the red piece beneath it, and inked the edges with distress ink.
***********************************************************
For the second card, I only did a little stamping - I stamped "Joy to the World" on one of the kit's cardstock stickers, layered it on black cardstock, and popped it up on foam squares, on the front of the card; and I stamped a greeting inside the card, as well. I layered a couple of the pattered papers from the kit, using a notebook-paper edge punch along the top of the red one. I added distress ink around the edges of both papers. I made a paper rosette with the black and white paper, using my Martha Stewart scoring board, and layered one of the chipboard buttons from the kit on top of it, placing some additional chipboard buttons beside it.
The greeting inside the second card.
**********************************************************
Finally, the third card. This was my favorite to make - I think because I love the colors, and because I absolutely LOVE this Tim Holtz Sizzix die that I used. It's called "Townscape," and I just think the miniature houses are adorable!! They have so much potential - and for every season!! Anyway, I created the houses by gluing a piece of the black cardstock to a piece of corrugated cardboard. I then ran it through my Sizzix Big Kick with the Townscape die, cutting the houses. I trimmed just a tad off the bottom, and a little off each end, to fit the card. Then I used my Snow Cap (white) Adirondack paint dabber to ink up my definition background stamp, and stamped the houses. I thought it looked really cool, with the black text on the white snowflakes on the background paper. (Note - I love using my paint dabbers on my stamps - and you will too - but make sure you wash them off right after you use paint on your stamps, or you won't be happy with your stamps the next time you go to use them!) I used the paint dabber to add a little "snow" to the roofs of the houses as well, and then glued the strip onto the card.
Then I added the 25 with Thickers from the kit, and stamped a sentiment inside.
So...there you have it. Now it's YOUR turn!! Have you grabbed your December Paper Trail kit yet? And if so, what are you creating with it? Stamping isn't just for cards, either - you can certainly use stamps on scrapbooking layouts, tags, home decor projects - most anything! Make sure you add your stamped project to our linky widget in the challenge post so that we can see what you've created and for your chance to win some of the Lily Bee papers from this kit!! You have until Saturday, December 18, at 5 pm EST to get your project linked up for your chance to win!
Sunday, October 24, 2010
CCC #18 - A Christmas Tag
This week's Compendium of Curiosities Challenge was the Paint Dabber resist technique. I am also entering this in this weeks' Simon Says Stamp and Show challenge, where the challenge was, "Anything but a Card!" I think a tag will most definitely fit the bill! I'm a bit over Halloween at this point (and it's not even here yet!), so I'm moving on to Christmas! (At least for this week...we'll see what next week brings...who knows?!) I love this reindeer stamp - and it's part of a stamp set I got for a whopping $2.00 at the Scrapbook Expo I went to yesterday!! What a steal!
While I can't share the details of the technique I used as far as the dabber resist technique, I will share that the distress ink colors I used were Barn Red, Shabby Shutters, Peeled Paint, and Vintage Photo. My dabber color was white. I also heat embossed around the edges of the entire card with Peeled Paint distress embossing powder.
I finally got the Tim Holtz Tattered Florals Sizzix dies - YAY! I used what the ladies at Jo-Ann's insisted is crinoline (I wouldn't know the difference...except it doesn't really look like the crinoline Tammy Tutterow uses for her flowers...) to make the flower. I combined several layers in different sizes. I sprayed them with a combination of Glimmer Mists, homemade shimmer mists, and the top red one got painted with Glimmer Glam. I then used Rock Candy Distress Stickles over several of the petals sort of randomly. I used the Peeled Paint distress embossing powder on a black button and glued it in the center. I inserted a memo pin (love those), and attached an adage ticket, which I had inked lightly around the edges with some Barn Red distress ink.
I also added a couple pieces of Tim Holtz's Tidings tissue tape to a couple corners of the tag, and used my finger to apply some distress ink to the tape. I do so love how the white of the stamp stands out against the inks!!! Here's yet another pic of the stamped reindeer, as well as the tissue tape.
Someone reminded me that Christmas is just 2 months away! Have you started to prepare your handmade gifts?
Monday, October 18, 2010
She Dreams card - generation stamping technique
This is the second card I made for the second week of the Holiday Thinking Inking class on 2 Peas. I really LOVED the card Jennifer made in her video - you can see it here, along with the instructions for this technique. I, however, don't have a tree in my stamp collection that would work for this technique (note to self - get one!). So it took me a minute to figure out what I was going to do for this challenge...and then I remembered my bird from this Donna Downey set. I knew they would be perfect. I also knew this quote would be perfect; it's from a different Donna Downey set. It reads, "She pursued big dreams instead of small realities." LOVE THAT!
I won't go through the entire technique, since I linked to the PDF with the instructions above. I will tell you that I used Spiced Marmalade distress ink for my birds, and since I didn't have any purple distress ink yet, I used another dye-based purple ink with a water-brush to do the water-coloring around the birds. I used a Stampin' Up! script background stamp (probably retired by now) over the birds and purple background. I layered the stamped/painted piece on a gorgeous piece of patterned cardstock from the K&Co Que Sera Sera paper pad, and then onto a vanilla-colored card. I wrapped linen thread around the card front several times before tying it off and adding a Tim Holtz philosophy tag to finish it off.
Thankful Card with Ink Bleeding Technique
I am participating in a free inking techniques class on 2 Peas given by Jennifer McGuire, called Holiday Thinking Inking. (I actually missed the first week, though I did watch the videos, and jumped right in during the second week - so you can jump in NOW too!) The instruction videos are posted both on Jennifer's blog and on 2 Peas, but you need to upload your challenge entries to your gallery on 2 Peas.
Anyway, I made this card as part of the second week's challenges, using a technique called "ink bleeding." This technique is shown here on the leaves. I stamped a leaf (unknown brand) onto watercolor paper using distress ink, then spritzed the stamped image with water a few times to allow the ink to bleed. Once I got the desired effect, I used my heat gun to dry it and stop the bleeding. I repeated this two more times with different colors. It is an especially nice effect for leaves, as it gives them a "veiny" look.
After the leaves were completed, I carefully cut them out, and used some Vintage Photo distress ink around the edges of them to give them more depth. I also applied some Antique Linen with a foam ink applicator over them to soften the look. Finally, I added some color-coordinating distress stickles to each one and dried them with my heat gun. (Note: do not heat regular Stickles with a heat gun, as it will bubble - only Distress Stickles are formulated to be able to withstand heating.)
Next, I started on the card. I cut a piece of cardstock that was 9"x6.5" and scored it slightly off the middle lengthwise, so that when I used the scallop punch on the front, the front and back would line up. After using the scallop punch along the long side of the front, I used distress inks to add some color on all 4 sides of the front of the card. I added a strip of Tim Holtz Nostalgic tissue tape along the folded side, and colored it with distress inks (LOVE the tissue tape - you've GOT to try this stuff!!). I found that my finger was the best bet for applying ink to specific spots on the tape.
Then I used my brand new Spellbinders Nestabilities Labels 14 - which I've been lusting after for a VERY long time and just got in on Saturday - to cut two sizes from two coordinating pieces of DCWV patterned paper. I added some Vintage Photo distress ink around the edges of the larger one and glued it down lengthwise on the card. I added distress ink to the smaller one, as well, all over, and then stamped my sentiment using brown Staz-on ink. I then used my copper Adirondack Paint Dabber to go around the edges of the smaller one to highlight it. I used foam squares to pop up the sentiment label and adhered it horizontally over the larger label.
Finally, before I was ready to adhere my leaves to the card, I felt the bottom of the card needed something, so I used a large flourish stamp (Donna Downey for Unity) with Spiced Marmalade distress ink (masking the tissue tape so as not to stamp over it) to add a background. I then used foam squares to adhere the leaves, using different levels of squares so the leaves are not all popped up at the same height.
You can see the incredible, vintage-feeling sparkle the distress stickles add to the leaves. I just love them!!
I hope you feel inspired to make something inky or showing gratitude yourself! And come join me in the Holiday Thinking Inking class - we are only starting week 3 of 8, so there are still plenty of inky techniques for you to learn and try out!
(P.S. I still have one more card to show you from week 2!!)
Sunday, October 17, 2010
Halloween Fright
I really haven't been much into Halloween in the past, but for some reason, this year I've had more fun playing with all the fun Halloween papers, accessories, tools, and color themes!! And even though I don't typically like the whole "scary" aspect of the holiday, and for my kids, I definitely keep it more fun and lighthearted, for my projects, I have not been drawn to the more whimsical papers and colors...but the darker, spookier colors instead. With that said, I present my Halloween Fright wall hanging.
I am linking this to the Compendium of Curiosities Challenge #17 - Fragment Charms, as well as this week's Simon Says Stamp and Show challenge, "Show Some Metal."
This started with an 8x8 sheet of patterned paper from a Recollections Halloween pad from Michaels. I ran the paper through my Zutter Distrezz-it-All just mildly, and inked the edges with Spiced Marmalade distress ink. I took a sheet of white cardstock and embossed it using Tim Holtz's Halloween Fright texture fade. I then used distress inks to add color, and covered portions of it in Rock Candy crackle paint. I decided I wanted to place this piece behind the crow on the patterned paper, so I used a craft knife to carefully cut around the crow. I then used an embossing pen to cover the crow, and heat embossed it with black embossing powder. I used Lettuce alcohol ink to color a pearl sticker accent for the crow's eye.
For the Compendium of Curiosities Challenge this week, I had to make a Fragment charm - which is the clock. I can't share the details of how I made it, per the rules. :) I attached a couple jump rings, and then a swivel clasp - showing some metal - which was the challenge for Simon Says Stamp and Show. I attached the swivel clasp to the header on the layout with a brad. The brad was originally bright sparkly purple and silver - which would NOT have fit in - so I covered it with some Pitch Black acrylic dabber paint, and it had the perfect effect.
The title piece started as a blank white piece of watercolor paper. I used a technique called "block inking." I first applied Spiced Marmalade distress ink all over an acrylic stamping block, and then went around the edges with a darkish purple dye-based ink (I don't have a purple distress ink yet). I then spritzed the block a few times with water, and then placed it down on the paper. I pushed it down until the paper was completely saturated under the block, and then carefully lifted straight up. I then used a cloth to blot the excess puddles of ink off the paper, and used my heat gun to dry the paper. I then used my Distrezz-it-All to distress the edges of the paper, and used distress inks to add color to the edges all around, then glued the header to the background paper. I stamped "Happy Halloween," using a dark purple dye-based ink - with a stamp I had cut on my Cricut.
I took two small skulls from the minis set of grunge board, and wanted to paint them with metallic dabbers; however, neither the gold, silver, or copper seemed to fit with the bronze colored swivel clasp. So I mixed some copper and black on my craft mat, and got almost a perfect match, then used my finger to apply the paint to the grunge pieces. I attached both to their respective places with the Tim Holtz Tiny Attacher (seriously - BEST little stapler EVER!).
I added a piece of velvety bat trim (Recollections from Michaels), and made a rosette out of a piece of Donna Salazar's Crafty Chronicle using the Martha Stewart scoring board. (If you've never seen Donna's Crafty Chronicle - you seriously NEED to! It's like a newspaper, but not...it's all crafty articles and tutorials, on acid-free newsprint paper, intended to be read and then used for flowers and such! She even has a new one out just for Christmas, called Musical Memories! So fun!) I spritzed the rosette with Tiger Lily Glimmer Mist and some homemade purple glimmer mist, then cut out a couple nesting circles of purple and orange cardstock for the center. Finally, I stapled the second painted grunge board skull to the center, and used hot glue to attach the rosette to the entire piece.
To finish it off, I used the Tiny Attacher to add a few "stitches" along a couple sides. I decided the piece should be a wall hanging, so I backed it with a pieces of cardboard, and added a piece of wire and tied a few pieces of coordinating tulle and ribbon and fibers around the wire.
Saturday, October 09, 2010
CCC #16 - Wrinkle Free Distress
This is my first week joining the Compendium of Curiosities Challenge (CCC), hosted by Linda of Studio L3. Each week (or in this case, two weeks, as many of the participants have just spent the last week on a cruise with Tim Holtz himself!), Linda posts a challenge using one of the techniques presented by Tim in his newest idea book. You should DEFINITELY check out Linda's blog - her artwork is amaZING!!!
So, to start off, I knew I wanted to do a tag - but I don't currently have any size 8 tags. I do, however, have grunge paper. Many of my friends, who are not Tim Holtz addicts like I am, may not know quite what grunge paper is, exactly. It's not really paper, and it's definitely not chipboard. It's hard to describe - but it's sort of got this leathery feel (and smell!) to it, and it's very flexible! It inks, paints, cuts, distresses, etc., just like you can do with paper. It is VERY cool stuff! So, knowing the dimensions of a size 8 shipping tag, I made my own from grunge paper - complete with cardstock hole reinforcements. :)
Here are a few photos to show you the thickness and flexibility of grungepaper.
You can see that even after folding down the corner, once I release it, there is no crease mark at all, thanks to the qualities of the grunge paper.
So, onto the tag itself. While I cannot tell you about the actual challenge technique (out of respect for Tim and his book and copyright issues), I can tell you about the rest of the tag. :) I used my Zutter Distrezz-it-All to distress the edges of the tag, and then used Walnut Stain distress ink to ink the edges. I stamped a Donna Downey-Unity stamp quote onto the upper right side, using brown Staz-on ink - I love this quote!! I threaded multiple earth-toned fibers through the hole at the top of the tag.
At the bottom of the tag, I laid a piece of natural-colored magic mesh (remember that stuff???) that has been in my stash FOREVER!! Then I took a piece of thin brown paper (it actually came from a box of goodies I received - it was packing material paper), and spritzed it with homemade red and green glimmer mists, and Tattered Angels tiger lily Glimmer Mist. Then I put down a line of Beacon 3 in 1 craft glue, and gathered the paper into pleats while adhering it to the bottom of my tag. I took a piece of mustard-colored cardstock the width of my tag, used several colors of distress inks on it, and added some distress stickles to it, before gluing it over the top of where the pleated paper was glued to the tag. I then used deckle scissors to cut off the misted paper to the length I wanted it. Finally, I cut a 1"x12" piece of cardstock from Tim's Lost & Found paper pad, and used my Martha Stewart scoring board to score it every 1/4". I then folded it accordian-style, cut off one piece, used my Tiny Attacher to join the ends together, and pressed the center down to form a rosette, using a hot glue gun to attach the rosette to a circle of cardstock on the back. I cut another piece of cardstock for the front, used distress inks on it, added a smaller piece of patterned cardstock, with distress stickles on it, and glued those onto the front of the rosette. I used Walnut Stain distress ink around the edges of the rosette and brushed it lightly on top of some of the peaks of the rosette, then used hot glue to attach it to the tag. You can see the vintage sparkle on the cardtock above the ruffle, and the shimmer from the mists on the ruffle itself.
I used to wonder what the draw was in decorating "shipping tags." Oh my. Whatever was I thinking?! LOL!! I am SOOOO hooked! There is SUCH gratification in creating a work of art in a relatively short period of time, and the tag is just such a wonderful medium to work with in doing so!
And wow, these rosettes are TOTALLY addictive! Don't be surprised in the least if they seem to show up on anything and everything that I make in the near - and not-so-near - future!! ;)
Subscribe to:
Posts (Atom)