Showing posts with label Mod Podge. Show all posts

Wednesday, June 08, 2011

Canvas Art

I think I mentioned a couple posts ago that one of the online workshops I'm taking is called the She Art Workshop, by Christy Tomlinson.  I just have to tell you - I cannot, cannot, cannot speak highly enough of Christy or of this workshop!!!!  Seriously.

When my friend signed the two of us up for the workshop, I was more than a little intimidated.  I thought it was a bit above my skill level.  I thought 3 weeks was not nearly long enough (even though we have access to the material for 3 months, it's still only 3 weeks of new lessons.)  I saw her art before taking this workshop, thinking to myself, "There is just NO WAY that in 3 short weeks, she is going to be able to teach ME how to do THAT."

I was wrong.

I am amazed at what an awesome teacher Christy is - the workshop is WELL worth the money.  It is very well put together, I have learned SO much, and did I mention that I'm having a total blast?

So I never showed you my first canvas.  That's because it's a birthday gift for my sister.  Whose birthday was in April.  And I still haven't mailed it.  Yeah.  I'm kind of bad about that.  Mailing stuff.  (Hides head under a bag.)  Sigh.

But.  I get to show you my SECOND canvas!!  I am SO happy with how this sweet girl turned out, and with my first attempt at a "scene."  I used a lot of products from Fancy Pants (more on this in my review of Fancy Pants on Craft Test Dummies on June 17).


This is an 8" x 10" flat canvas.


Don't you love the glittered words from Fancy Pants?


I die cut the flowers from corrugated cardboard using a Sizzix flowers die and doodled the stems/leaves.


The grass is a combination of layers of paper and paint, along with stamping and rub-ons.  Isn't it fun?!


These two little birds are rub-ons and they just crack me up...they are SO stinkin' cute!!


Can you get a load of the texture in her skirt?!  Is that awesome, or what?!  And check out those shiny red boots she's sportin'!!  Seriously cute!  (And don't get me started on the polka dots!!)


Her hair is the one thing I really need to work on.  My first canvas, the hair was better...this one, I feel like the braid needs some work.  But still, I think, not bad for my first go.  I also want to try some different styles of clothes, and try making a girl with arms showing (instead of behind her back, like this one - you thought she had no arms, didn't you!).

So...what do you think?  Worth the $45 for the workshop, yes?  I promise you, there is NO WAY I could ever have created anything like this before I took this workshop!  And so much of what makes these canvases adorable is in the details...details I never would have realized were there (or been able to figure out how to create) had I not taken this workshop.  The best part is that once you learn how to create them, they really are not that difficult, and truly are LOTS of fun to create!!  I can't wait to make more!!

Reversible Decoupaged and Embossed Metal Monogrammed Necklace

Whew...that's quite a title, eh?  Maybe it should say...one ONE side, the pendant is decoupaged, and on the OTHER side, it's an embossed metal monogram!  At any rate, you should definitely run over to Crafts Unleashed today to check out my tutorial for how to create this super easy necklace!!


And what I did NOT show on Crafts Unleashed is that on the reverse side, you can add a piece of cardstock, cardboard, or grungeboard (which is what I happened to use here), and then dress it up to your heart's desire.  I used E-6000 to adhere a rectangle piece of grungeboard, then used a paint dabber to paint it white.  I went over it with a chalk queue to add just a bit of ink to it, and then added my girl-image with Mod Podge (the girl and the words are from Cosmo Cricket's Odds & Ends line - SOOOO cute!).  Then I cut out all the words and added them with Mod Podge as well, and added a couple top coats of Mod Podge over the entire piece.  Final result - LOVE!  And what makes this piece SO easy is that the actual necklace part comes prepared (ribbon, beads, clasp and all)...all you have to do is make the pendant, add a couple jump rings to attach it to the necklace, and you're done!


Enjoy!  This entire month is jewelry month over at Crafts Unleashed...so if jewelry is your thing, you might want to keep checking in over there for lots of inspiration and giveaways!!

Monday, January 10, 2011

Recycled Tin Cans - Crafty Organizer Tutorial (Updated!!)

I posted this project on Crafts Unleashed last week, but wanted to share it with you all too!!  When I first organized my current craft studio, I created a unique craft organizer from quart-size paint cans.  I wish I could take all the credit for the idea, but I had actually seen a picture of something similar in a magazine, with no instructions attached (though I never could remember which one), and thought, "Hey, I could do that!"  My first organizer was made with store-bought, clean cans, and covered with simple scrapbooking papers.  My next organizer was made as a gift for a friend, out of larger, 24-oz recycled infant formula canisters, and it was at that time that all of my friends began asking for instructions on how to make this organizer!!  This is a fun and simple project, can be done in a few hours, makes a great gift or storage unit for your own studio, AND is a great way to recycle - it doesn't get much better than that!

For this project, I used 12.5 oz infant formula cans to make my organizer.  The possibilities are practically endless as to what you could use - just be careful with any sharp edges.
  • Clean out your cans well. I recommend against using water if your cans are metal, as it is very hard to prevent them from rusting. I used a baby wipe to clean mine out, and then dried them well with a paper towel. Be careful with the edge - it's not super sharp, but it's still possible to cut your hand if you're not careful.
  • I chose not to remove the paper from my cans, but you may decide to - it's your choice.  Since I left the paper on, I needed to put a coat of gesso on before starting my decoupage.

  • I had some GORGEOUS vintage music to use for covering my cans - check out the copyright date on this music!!  Tear the music into strips.  Using a foam brush, paint on layers of Mod Podge, and then lay on the strips of music (or other paper), gently but firmly pushing the paper down into the glue and smoothing out any wrinkles.  Let each layer dry before adding any additional layers.

  • Using an ink foam applicator, add distress ink as desired to highlight the torn edges of the music sheets and add depth to the paper.  I used Vintage Photo and Walnut Stain.  Then cover the paper in another coat of Mod Podge.  I used Matte Mod Podge.  Two final layers of Mod Podge will give a nice protective finish while keeping any stickiness and/or brush strokes to a minimum, but make sure to let the cans dry thoroughly between layers.

  • After the cans have dried, add whatever embellishments are desired.  I added vintage-y looking trims around each can to complement the vintage music.  Once you are happy with your cans, use a hot glue gun to build your pyramid.  Starting with the bottom row, use the glue gun to hot glue the cans to each other at the points where they touch in the center and on the backs of the cans.  For the middle and top rows, also add glue where they touch the cans below them.  Once they are all glued together, the pyramid will be quite sturdy - however, I still recommend always picking it up by the bottom row, to avoid stressing the glue points on the top can.


I hope you've enjoyed this updated tutorial - and that you'll find some cans to recycle in your own home to turn into a great crafty organizer for YOUR studio!!  Make sure you leave a comment with a link if you do!

Linking up to:


Sunday, January 02, 2011

Shabby Chic Altered Tin - Found Items


Happy New Year to everyone!!  I hope 2011 is off to a great start for you - and of course, quite importantly, a CREATIVE start!  I was able, for the first time in many years, to actually stay up for the passing into the new year...and was able to accomplish something crafty at the same time, while my hubby cooked up a huge batch of delicious seafood gumbo - YUM!

Over at Crafts Unleashed, we've been focusing on crafty organization for the last week (and this coming week, too!)...and while my crafty space is, mostly, pretty well organized, I do still have certain odds and ends that just aren't quite organized to my liking.  OR, perhaps they are organized, but I don't happen to care for the actual containers in which they are stored.  So a couple of my goals for the first part of this year are to re-fashion some of the uglier storage containers, and to create some new solutions for things that aren't working.

This project was the first "turn ugly into pretty" one for the year.  Here's what I had to start with:


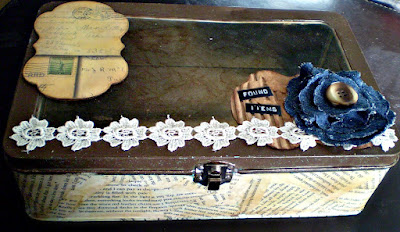
This tin, with an acrylic window on top, was originally a storage tin for a Stampin' Up! punch and stamp set, I believe - if I'm not mistaken - from MANY years ago.  It has since been used to store various sets of products - everything from tools to stamps to ink pads and stickles.  But...it's weird blue color with squiggly white lines on it just weren't working for me.  So, rather than scrap it altogether, I decided to alter it.

I started out by using my Espresso colored Adirondack paint dabber around the top edges.  Bits of the blue tin showed through after one coat, but I decided to not add a second coat, because I thought the bits of blue showing through added character.

Next, I got out my matte Mod Podge and a foam paint brush.  I have several books in my craft room that are for the sole purpose of tear pages out of, so I tore several pages out of one and tore them into smaller pieces in preparation for adding to the tin.  I painted a thin layer of Mod Podge onto the tin (starting on the bottom), and gradually added piece after piece of torn paper, adding more Mod Podge as needed to glue edges down.  After covering the bottom, I also covered the sides of the tin.  I used some Tim Holtz tissue tape to cover the bottom edges of the tin, wrapping it around to cover the gap between the sides and the bottom.


Once the paper and glue had dried, I used my foam ink applicators and distress inks (in Wild Honey, Vintage Photo, and Walnut Stain) to add color to the papers.  After the ink had dried, I added a top coat of Mod Podge, also covering the area of tin which had been painted with the dabber.


Next, I used felt on my ink applicator, with alcohol inks in Mushroom and Latte, with some Blending Solution, to add some color to the window of the container.  I added the ink to both the inside and outside of the window, for added effect.

I then used Spellbinders Nestabilities Labels 14, and cut 2 pieces of Donna Salazar's Zutter cardboard, and one piece of Tim Holtz cardstock from his Lost & Found collection, all using the largest die in the set.  I inked the piece of cardstock with distress ink, then glued it to one of the cardboard pieces, and glued the entire piece to the top of the tin.  For the second piece of cardboard, I tore most of one side of the cardboard off, revealing the corrugated center.  I inked the ridges with a Clearsnap chalk ink Catseye, and inked the edges with Walnut Stain distress ink, then glued the piece down on the tin.  I added a piece of flower trim across the entire tin, gluing it down with Glossy Accents.

To make the denim flower, I used the Spellbinders Nestabilities Classic Scalloped Circles (large), and a piece of my son's old cut-off jeans which I had saved.  I cut one scalloped circle in every size except the largest and smallest sizes (so the 5 center sizes).  (Note: I had to run the sandwich through my Big Kick back and forth several times to get the denim to cut all the way through.)  For each circle, I laid down a large dollop of Fabri-tac glue on my non-stick craft mat, laid the cut circle on top of it, then used my fingers to twist the circle and work it until it had pleated and formed into the shape I wanted it.  After all five layers were done in this way, I used the Fabri-tac glue to glue all the layers together, added a vintage button (which belonged to my grandfather) on top, and glued the flower to the corner of the tin.  

Finally, to finish things off, I used my Dymo labeler (believe it or not, one of the things I bought with my Michael's gift card after Christmas!!) to make the "Found Items" label.  I *adore* the look of the old Dymo labels!!!


I plan to keep odds and ends like dice, vintage porcelain dolls, bingo markers, corks, dominoes, etc., in here...cool things that I definitely want to keep for projects, but which I have NO IDEA where else I would keep!!  I absolutely LOVE how this turned out, and am SO glad I did not throw out the ugly blue tin!!

I think my NEXT storage solution needs to be something for storing all of my various glimmer/shimmer/smooch mists and sprays.  The plastic basket they are currently in is no longer large enough for them, and I'd like something that fits in with my craft studio a little better...so I'm considering trying to make my own container using corrugated board and binding it at the corners with jute.  I'll let you know if I do...and if so, how that works out!

So what about YOU?  Do you have any ugly storage items in your crafty space that you'd like to attempt a makeover on?  If so, I'd love to see your finished project - so make sure to leave a link in the comments!!

handmade projects


LinkWithin

Related Posts Plugin for WordPress, Blogger...