Showing posts with label tissue tape. Show all posts

Friday, January 20, 2012

Scor-Buddy Mini Score Board

It's a brand new year, and I'm excited at the possibilities and opportunities in store for this year!  As I'm preparing to head to CHA in a couple weeks (woo hoo!), I have one last product review up on Craft Test Dummies today before we begin a whole new round of reviews on the newly released products.  Have you been watching any of the sneak peeks?  I have, and I've been pinning some of my favorites over on Pinterest!

Screen shot of my Pinterest boards
Go check out my boards to see what I'm looking forward to seeing at CHA, as well as tons of artsy inspiration!  Don't know what Pinterest is?  Click on through anyway and see what you've been missing out on. If you don't have an account, and would like an invitation to join, leave me a comment with your email address, and I'll be happy to send you an invitation.  Be forewarned: Pinterest is addictive!  Many a time, I've gone in search of an idea for one little thing, only to find myself looking at something completely different - 3 hours and hundreds of pins later!

Anyway, this is the Scor-Buddy - a mini version of the Scor-Pal.  It is a scoring board, and this mini one is designed especially with the card-maker in mind.  It's small size, light weight and great portability make it perfect for taking to crops or traveling with.  To read my full review, be sure to head on over to Craft Test Dummies.

Scor-Buddy scoring tool
I'll leave you with a simple, sweet little Valentine's card I made using the Scor-Buddy.  I absolutely love the look of simple kraft with white paper doily, and paper tape is my absolute favorite flat embellishment right now (whether store-bought or homemade).

Card made using Scor-Buddy scoring tool
I've done a couple of fun crafty home projects that I hope to get written up for you soon, and CHA starts the 29th, so until then...get crafty and have fun!

Sunday, January 02, 2011

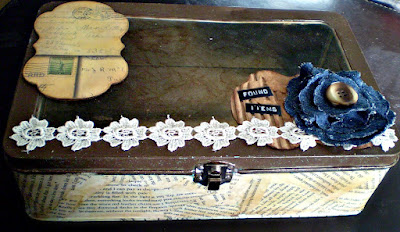
Shabby Chic Altered Tin - Found Items


Happy New Year to everyone!!  I hope 2011 is off to a great start for you - and of course, quite importantly, a CREATIVE start!  I was able, for the first time in many years, to actually stay up for the passing into the new year...and was able to accomplish something crafty at the same time, while my hubby cooked up a huge batch of delicious seafood gumbo - YUM!

Over at Crafts Unleashed, we've been focusing on crafty organization for the last week (and this coming week, too!)...and while my crafty space is, mostly, pretty well organized, I do still have certain odds and ends that just aren't quite organized to my liking.  OR, perhaps they are organized, but I don't happen to care for the actual containers in which they are stored.  So a couple of my goals for the first part of this year are to re-fashion some of the uglier storage containers, and to create some new solutions for things that aren't working.

This project was the first "turn ugly into pretty" one for the year.  Here's what I had to start with:


This tin, with an acrylic window on top, was originally a storage tin for a Stampin' Up! punch and stamp set, I believe - if I'm not mistaken - from MANY years ago.  It has since been used to store various sets of products - everything from tools to stamps to ink pads and stickles.  But...it's weird blue color with squiggly white lines on it just weren't working for me.  So, rather than scrap it altogether, I decided to alter it.

I started out by using my Espresso colored Adirondack paint dabber around the top edges.  Bits of the blue tin showed through after one coat, but I decided to not add a second coat, because I thought the bits of blue showing through added character.

Next, I got out my matte Mod Podge and a foam paint brush.  I have several books in my craft room that are for the sole purpose of tear pages out of, so I tore several pages out of one and tore them into smaller pieces in preparation for adding to the tin.  I painted a thin layer of Mod Podge onto the tin (starting on the bottom), and gradually added piece after piece of torn paper, adding more Mod Podge as needed to glue edges down.  After covering the bottom, I also covered the sides of the tin.  I used some Tim Holtz tissue tape to cover the bottom edges of the tin, wrapping it around to cover the gap between the sides and the bottom.


Once the paper and glue had dried, I used my foam ink applicators and distress inks (in Wild Honey, Vintage Photo, and Walnut Stain) to add color to the papers.  After the ink had dried, I added a top coat of Mod Podge, also covering the area of tin which had been painted with the dabber.


Next, I used felt on my ink applicator, with alcohol inks in Mushroom and Latte, with some Blending Solution, to add some color to the window of the container.  I added the ink to both the inside and outside of the window, for added effect.

I then used Spellbinders Nestabilities Labels 14, and cut 2 pieces of Donna Salazar's Zutter cardboard, and one piece of Tim Holtz cardstock from his Lost & Found collection, all using the largest die in the set.  I inked the piece of cardstock with distress ink, then glued it to one of the cardboard pieces, and glued the entire piece to the top of the tin.  For the second piece of cardboard, I tore most of one side of the cardboard off, revealing the corrugated center.  I inked the ridges with a Clearsnap chalk ink Catseye, and inked the edges with Walnut Stain distress ink, then glued the piece down on the tin.  I added a piece of flower trim across the entire tin, gluing it down with Glossy Accents.

To make the denim flower, I used the Spellbinders Nestabilities Classic Scalloped Circles (large), and a piece of my son's old cut-off jeans which I had saved.  I cut one scalloped circle in every size except the largest and smallest sizes (so the 5 center sizes).  (Note: I had to run the sandwich through my Big Kick back and forth several times to get the denim to cut all the way through.)  For each circle, I laid down a large dollop of Fabri-tac glue on my non-stick craft mat, laid the cut circle on top of it, then used my fingers to twist the circle and work it until it had pleated and formed into the shape I wanted it.  After all five layers were done in this way, I used the Fabri-tac glue to glue all the layers together, added a vintage button (which belonged to my grandfather) on top, and glued the flower to the corner of the tin.  

Finally, to finish things off, I used my Dymo labeler (believe it or not, one of the things I bought with my Michael's gift card after Christmas!!) to make the "Found Items" label.  I *adore* the look of the old Dymo labels!!!


I plan to keep odds and ends like dice, vintage porcelain dolls, bingo markers, corks, dominoes, etc., in here...cool things that I definitely want to keep for projects, but which I have NO IDEA where else I would keep!!  I absolutely LOVE how this turned out, and am SO glad I did not throw out the ugly blue tin!!

I think my NEXT storage solution needs to be something for storing all of my various glimmer/shimmer/smooch mists and sprays.  The plastic basket they are currently in is no longer large enough for them, and I'd like something that fits in with my craft studio a little better...so I'm considering trying to make my own container using corrugated board and binding it at the corners with jute.  I'll let you know if I do...and if so, how that works out!

So what about YOU?  Do you have any ugly storage items in your crafty space that you'd like to attempt a makeover on?  If so, I'd love to see your finished project - so make sure to leave a link in the comments!!

handmade projects


Wednesday, November 03, 2010

Art-Full Horizons Jolly Jumpstart Blog Hop - Day 3 (and CCC #20)


Welcome to the Art-Full Horizons 
Jolly Jumpstart
 Blog Hop!


Check out all of the fabulous holiday-themed projects, gift ideas, and more from our wonderful Blog Hop Contributors from around the world!!
  1. Art-Full Horizons http://art-fullhorizons.blogspot.com
  2. Tammy Inman http://tammyi.com
  3. Nan Paturzo http://scrappynan.blogspot.com
  4. Robyn Weatherspoon http://herebygrace.typepad.com/
  5. Mykle Parker http://scrapbohemia.blogspot.com
  6. Sherry Mendoza http://sherryscreations.typepad.com/
  7. Robin Redd http://robinredd.typepad.com/west_coast_scrapper/
  8. April Meeker www.suaviloquy.blogspot.com
  9. Erin Bassett www.erinbassett.com
  10. Jennifer Clark http://jenspartyof5.blogspot.com
  11. Jennifer Edwardson http://frommypapercraftstudio.blogspot.com/

Here's how it works:
  1. Hop through each of the blogs listed above to get fabulous holiday inspiration. If you are starting at a blog in the middle of the Hop, please start back at the Art-Full Horizons blog.  You should be arriving here from Erin's blog.
  2. Leave a comment on each blog hop post in the list above between now and November 7, 2010.
  3. Enter to win our giveaway by doing any of the following. For each thing you do, you will be entered into the drawing one more time:
  • Leave a comment on the Art-Full Horizons blog hop post between now and November 7, 2010.
  • Join the Art-full Horizons email list (fill out the form in the left hand column on the A-H blog).
  • Become a follower of the Art-full Horizons blog! Just click the "Follow" button in the lower right column on the A-H blog.
  • "Like" the Art-Full Horizons Facebook Page.
  • Join the Art-Full Horizons Facebook Group.
  • Share about this Blog Hop on your own blog, posting a link to the Art-full Horizons blog.
  • Share about this Blog Hop on Facebook, posting a link to the Art-full Horizons blog.
  • Share about this Blog Hop on a message board or forum, posting a link to the Art-full Horizons blog.
  • U.S. entries only please

To let us know you've done these things, please return to the first Art-full Horizons Jolly Jumpstart Blog Hop post and leave a comment for each thing you did, i.e. one comment for posting on each blog, another comment for posting on facebook, and another comment for joining our email newsletter. Please note: if you post it all in one comment, it will only count as one entry, so be sure to post EACH ENTRY as a separate comment.

On November 8, 2010 we'll choose the winners using the Random Integer Generator from random.org. U.S. entries only please.


**************************************************
Today, here on Party of Five (and if you stay tuned...we may need to change the name of this blog soon...just sayin'...), I am sharing with you a holiday wall hanging made from a simple, ONE DOLLAR wooden picture frame from Michael's craft store.  


Seeing as I finished it VERY late tonight, I didn't get a chance to actually HANG it for you...so sorry for the pics of it just laying down with the ribbon on the table!!  But trust me, the ribbon is staple-gunned to the back, and it will hang nicely!!


I started out by using gel medium to cover the front of the frame with some gorgeous Donna Salazar cardstock.  I sanded the edges, and then added some Tim Holtz Tidings tissue tape around the outside and inside edges, making sure to push it all down well.  I then used distress inks (Pine Needles, Peeled Paint, and Barn Red) to ink around the edges of the frame, and used my fingers to add a layer of gel medium over the tissue tape to be sure it stays in place well over time.  Next, I covered the two strips of what looked like lace, on the cardstock, with a thin layer of Rock Candy distress stickles.  You can see the shimmer over on the left side of the frame.  If you can only get ONE color of distress stickles, I guarantee you will never regret going with the Rock Candy!!!


Next, I took a holiday pick and cut a couple things off of it - a small piece of evergreen, and a leaf.  I covered the leaf with a copper Adirondack Acrylic Paint Dabber, and then I used hot glue to attach both pieces to the frame.  I cut a tree out of grungepaper, using my Winter Woodland Cricut cartridge.  I then ran it through my Sizzix, using my Tim Holtz sheet music embossing folder.  I inked it with distress inks, and then applied Peeled Paint distress stickles on it.  I attached it to the frame using foam squares.


Next, I made the snowflakes.  Because I am using this pieces for the Compendium of Curiosities Challenge for this week (you should totally check that out!), I can't explain just how I made the snowflakes.  ;)  Just know that I used a technique explained by Tim Holtz in his awesome book, A Compendium of Curiosities.  I attached the snowflakes in layers, so that they would pop off the frame a little at a time, with the biggest one being popped out the most.


Finally, for the center...I started by simply using the cardboard filler that came in the frame as a foundation.  That way I would know for sure that my center would fit perfectly.  I covered the back with a scrap piece of coordinating green cardstock.  The front, I covered with a piece of vintage Christmas music from a songbook.  Then, using the same Cricut cartridge as above, I cut out the word "Joy" from another sheet of Donna Salazar's cardstock, and a shadow from a sheet of coordinating green cardstock.  I glued the two together, and glued them to the music, then replaced the center into the frame.  I used a staple gun to attach a length of dark red, 7/8" wide grosgrain ribbon to the frame so it can be hung, and I was finished!


I hope you've enjoyed today's holiday inspiration!  I know that I am going to pick up a few more of these dollar frames the next time I am at Michaels, because this was a fun project!!

Remember that you have through November 7 to complete the Jolly Jumpstart blog hop.

***Additionally...here at Party of Five, I will also be having a giveaway at the end of the week!!  I will be posting throughout the week, from now through November 7, various posts about holiday projects, recipes, traditions, and memories.  On November 8, I will choose TWO winners of surprise grab bags filled with goodies to get you in the holiday spirit.  How do you enter?  Several ways!  You will get one entry for each comment you leave (one per Jolly Jumpstart blog post).  You will get another entry by becoming a follower of my blog (if you are already following, just let me know) and leaving a comment letting me know you are following.  You can get another entry by posting about this project on YOUR blog, and leaving me a comment with a link to your blog.  Make sure you check back on November 8 to see if YOU are a winner!!***

Thank you for participating!!  Comments are now disabled, and winners will be announced soon!!

Sunday, October 24, 2010

CCC #18 - A Christmas Tag

This week's Compendium of Curiosities Challenge was the Paint Dabber resist technique.  I am also entering this in this weeks' Simon Says Stamp and Show challenge, where the challenge was, "Anything but a Card!"  I think a tag will most definitely fit the bill!  I'm a bit over Halloween at this point (and it's not even here yet!), so I'm moving on to Christmas!  (At least for this week...we'll see what next week brings...who knows?!)  I love this reindeer stamp - and it's part of a stamp set I got for a whopping $2.00 at the Scrapbook Expo I went to yesterday!!  What a steal!


While I can't share the details of the technique I used as far as the dabber resist technique, I will share that the distress ink colors I used were Barn Red, Shabby Shutters, Peeled Paint, and Vintage Photo.  My dabber color was white.  I also heat embossed around the edges of the entire card with Peeled Paint distress embossing powder.  


I finally got the Tim Holtz Tattered Florals Sizzix dies - YAY!  I used what the ladies at Jo-Ann's insisted is crinoline (I wouldn't know the difference...except it doesn't really look like the crinoline Tammy Tutterow uses for her flowers...) to make the flower.  I combined several layers in different sizes.  I sprayed them with a combination of Glimmer Mists, homemade shimmer mists, and the top red one got painted with Glimmer Glam.  I then used Rock Candy Distress Stickles over several of the petals sort of randomly.  I used the Peeled Paint distress embossing powder on a black button and glued it in the center.  I inserted a memo pin (love those), and attached an adage ticket, which I had inked lightly around the edges with some Barn Red distress ink.


I also added a couple pieces of Tim Holtz's Tidings tissue tape to a couple corners of the tag, and used my finger to apply some distress ink to the tape.  I do so love how the white of the stamp stands out against the inks!!!  Here's yet another pic of the stamped reindeer, as well as the tissue tape.


Someone reminded me that Christmas is just 2 months away!  Have you started to prepare your handmade gifts?

Monday, October 18, 2010

Thankful Card with Ink Bleeding Technique


I am participating in a free inking techniques class on 2 Peas given by Jennifer McGuire, called Holiday Thinking Inking.  (I actually missed the first week, though I did watch the videos, and jumped right in during the second week - so you can jump in NOW too!)  The instruction videos are posted both on Jennifer's blog and on 2 Peas, but you need to upload your challenge entries to your gallery on 2 Peas.  
Anyway, I made this card as part of the second week's challenges, using a technique called "ink bleeding."  This technique is shown here on the leaves.  I stamped a leaf (unknown brand) onto watercolor paper using distress ink, then spritzed the stamped image with water a few times to allow the ink to bleed.  Once I got the desired effect, I used my heat gun to dry it and stop the bleeding.  I repeated this two more times with different colors.  It is an especially nice effect for leaves, as it gives them a "veiny" look.
After the leaves were completed, I carefully cut them out, and used some Vintage Photo distress ink around the edges of them to give them more depth.  I also applied some Antique Linen with a foam ink applicator over them to soften the look.  Finally, I added some color-coordinating distress stickles to each one and dried  them with my heat gun.  (Note: do not heat regular Stickles with a heat gun, as it will bubble - only Distress Stickles are formulated to be able to withstand heating.)


Next, I started on the card.  I cut a piece of cardstock that was 9"x6.5" and scored it slightly off the middle lengthwise, so that when I used the scallop punch on the front, the front and back would line up.  After using the scallop punch along the long side of the front, I used distress inks to add some color on all 4 sides of the front of the card.  I added a strip of Tim Holtz Nostalgic tissue tape along the folded side, and colored it with distress inks (LOVE the tissue tape - you've GOT to try this stuff!!).  I found that my finger was the best bet for applying ink to specific spots on the tape.  

Then I used my brand new Spellbinders Nestabilities Labels 14 - which I've been lusting after for a VERY long time and just got in on Saturday - to cut two sizes from two coordinating pieces of DCWV patterned paper.  I added some Vintage Photo distress ink around the edges of the larger one and glued it down lengthwise on the card.  I added distress ink to the smaller one, as well, all over, and then stamped my sentiment using brown Staz-on ink.  I then used my copper Adirondack Paint Dabber to go around the edges of the smaller one to highlight it.  I used foam squares to pop up the sentiment label and adhered it horizontally over the larger label.  


Finally, before I was ready to adhere my leaves to the card, I felt the bottom of the card needed something, so I used a large flourish stamp (Donna Downey for Unity) with Spiced Marmalade distress ink (masking the tissue tape so as not to stamp over it) to add a background.  I then used foam squares to adhere the leaves, using different levels of squares so the leaves are not all popped up at the same height.


You can see the incredible, vintage-feeling sparkle the distress stickles add to the leaves.  I just love them!!


I hope you feel inspired to make something inky or showing gratitude yourself!  And come join me in the Holiday Thinking Inking class - we are only starting week 3 of 8, so there are still plenty of inky techniques for you to learn and try out!

(P.S. I still have one more card to show you from week 2!!)

LinkWithin

Related Posts Plugin for WordPress, Blogger...