Showing posts with label scrapbooking. Show all posts

Tuesday, November 01, 2011

Happy Halloween!

Yeah, I know - Halloween was YESTERDAY!  It also happened to be Jeremiah's FIRST birthday...so we were a little bit busy around these parts.  :)  I cannot believe he's already a year old, and that he's been a part of our family for 7 days shy of a year!  Wow!

Even though I'm a day late (and usually a dollar short...or lots of dollars short, as the case may be!), I did want to show you a couple of Halloween projects I made using Authentique's Glowing line, for my post on Craft Test Dummies yesterday. Really, you need to go check it out, because in my post, I explain how I made everything.  Both projects were super easy, and I think a Christmas version of these cans will soon be in order!

Burlap-covered tin cans, with
Authentique Glowing line embellishments

Scrapbook layout, ready for photo, made with
Authentique Glowing line
Anyway, we took all the kids to Knotts Berry Farm on Friday - in their costumes, of course - and we had a great time.  Then yesterday, we all visited the BRAND NEW HOBBY LOBBY that just opened.  It's about 40 minutes from here, but YAY for having Hobby Lobby!  And last night we started off at our church's Hallelujah Night, but after standing in one line for 15 minutes to get a couple pieces of candy, we changed plans and went trick-or-treating back home in our neighborhood...which turned out to be a much better plan.  The twins were hilarious...this was their first year trick-or-treating, but once they got the hang of it, they were hamming it up!  Mackenzie in particular was so cute - she would get her candy, and then just keep standing there, saying "trick-or-treat" over and over, with her bag open, until the people at the door, confused as to why she wasn't leaving, gave in and gave her more candy!  She was really working the neighborhood...and by the time we got home, she was dragging her bag on the ground because it was so heavy - she ended up with almost double what the others got.  (It's all good - we always pour all the candy into one big bowl.)  The kids are satisfied with their new stash of lollipops, and mom's satisfied with the new stash of chocolate!

In other news, Julie Fei-Fan Balzer's new 30 Days In Your Journal class starts today - are you taking it?  I'm getting it as an early birthday gift from a friend.  I think it's a great deal for the amount of information she's providing.  I love all of Julie's work, and I am addicted to the stencils she designed for The Crafter's Workshop (you can see some of them in my project for the Halloween blog hop I participated in a couple weeks ago).  Anyway, I think it will help me with my art journaling...I kind of feel like I'm all over the place and need to get in a groove.

That's all for now.  I have some other projects I've made for Craft Test Dummies that I still need to show you...later this week!

Tuesday, May 24, 2011

New posts...and why I haven't been blogging...

I seriously cannot believe it's been a month since I've posted here!!  Ack!  So...I have been VERY busy creating for the Crafts Unleashed design team, and doing product reviews for Craft Test Dummies (would you believe I *still* have products from Winter CHA to review, and it's almost June?!).

Check out my scrapbook layout up at Crafts Unleashed today -


And here's a review I recently did of the Pitt Artist Pens by Faber-Castell...one of my new favorites!!


And yes, I'm still working on my online classes - Soul Restoration with Brave Girls Club and Melody Ross, and The She Art Workshop with Christy Tomlinson.  Loving them...but having a really hard time fitting them into my schedule at the moment!!  I'd show you a pic of my first She-Art canvas, but it's a birthday gift for my sister (a very belated one...because I STILL haven't put it in the mail!!).  *sigh*  I'm terrible about that!

Not sure if I shared this in my last post or not...but the other reason I haven't been blogging is that I was recently (well, a couple months ago) diagnosed with Rheumatoid Arthritis.  I've been in a lot of pain for the last several months, and it has taken the doctors a while to figure out the best medications to treat it.  It's sort of a trial-and-error method, I guess.  I just started a new medication last week - and while the jury is still sort of out on whether I'll be able to take it on a long-term basis, I *am* able to curl and uncurl my fingers when I wake up in the mornings for the first time in months, and it's not excruciatingly painful on my feet the minute I step out of bed!  I consider that a huge improvement over the way things have been.  So I'm at least hopeful that this one will work!

Obviously, all of the pain and joint stiffness has impacted my ability to create art and blog about it - so I've sort of just been doing the bare minimum...meeting my obligations and other than that, just taking time off to take care of myself, because I haven't really been able to do much more than that.  I won't sugar-coat it...it's been very disheartening and downright depressing at times, not being able to do the things I want to be able to do or feel I should be able to do.

But when it comes down to it, I have been forced to ask myself if I really believe the things I confess to believe.  Is the God I say I believe in really big enough to handle my questions, and my anger, and my hurt?  Yes.  Can I trust Him enough to believe that this path He's chosen for me is the best path FOR ME?  Yes.  Even if it includes illness and pain?  Yes.  Does that take away the pain?  No.  Does it help to know that I'm not alone in my pain?  Yes.  Does it help to know that there is some purpose to my pain?  Yes.  Does it help to remember that in life, our biggest lessons are always learned through times of pain and hurt?  Yes!  Has this brought me back to my knees, where I belong?  Yes!

And the best thing I think I've learned through all of this...repeatedly over the past couple months, in many different ways...is that rather than focusing on everything that's WRONG with ME, I need to be focusing on what's RIGHT about HIM.

So anyway, I felt like I kind of owed you all an explanation for why I've disappeared...hopefully this new med will do the trick, and I'll be back in business soon!  Right now I'm off to give my fingers a rest!! ;)

Thursday, April 28, 2011

We interrupt our regularly scheduled programming...

I'm so sorry I've been absent lately.  I just wanted to pop in and let you all know that I'm still alive!  I am in the midst of taking not one, but TWO online classes right now - both of which are COMPLETELY AWESOME - but which are consuming ALL of my time...leaving me little time for blogging!!

However, you can catch me on Fridays (sometimes it's Thursday) over at Craft Test Dummies, and every so often over at Crafts Unleashed, in the meantime.  Here's a preview of what I'll be posting this Friday on Craft Test Dummies...


And I *highly* encourage you to check out both of the classes I am taking right now!!  The first is one by Melody Ross and Brave Girls Club, called Soul Restoration I.  It is already in Week 4, of the 8 week class, but they are keeping registration open through May 1, and are keeping the classroom open for an extra 4 weeks after the 8 weeks are over to give late starters a chance to finish the class material.  It is truly a wonderful class and I cannot say enough positive things about it!  Watch Melody's video intro HERE.

The second class is the She Art Workshop by Christy Tomlinson, and I just started it a couple days ago...but I am already LOVING it!!  I was only introduced to Christy's work in the last couple months, but have admired her from the beginning and had hoped to one day be able to take her workshops.  When the opportunity presented itself, I couldn't pass it up!!  I am learning so much!

I am definitely being bombarded with art, art, art right now...but it's been so good for me.  It's been refreshing and rejuvenating...challenging and stretching...faith-building and growing.  I've been reminded of things that I'd forgotten, urged to let go of things I'd been holding on to that I needed to let go of, and have had my eyes opened to new things altogether.  (And I'm talking both literally and spiritually.)  I needed this break right now, just me and God and some art.  (If only I didn't have all these other responsibilities...right?)

So...I'll be back soon, I promise!  With all kinds of new and fun ideas to share!  In the meantime...maybe I'll see you over at Brave Girls Club or in the She Art workshop!!

Wednesday, February 23, 2011

Scrapbook Layout Using Crafter's Workshop Template

I recently had the opportunity to try out some templates from Crafter's Workshop for the first time.  Now, I know what you're thinking...templates, stencils..."Aren't those SOOOO 1980's?!"  I thought so too...until I started playing with these!  These templates (or stencils - whatever you'd like to call them) are contemporary, versatile, and affordable.  Check out my full review of them, as well as other techniques to use with them, on Craft Test Dummies tomorrow!  To see even MORE techniques and read Jenny's review (THE Craft Test Dummy!!), go here.  AND, she even includes a link to a great video full of techniques using these fabulous templates.


But today, I wanted to share this scrapbook layout I made using the 12"x12" template called Birds of a Feather.  And since I have such a hard time just showing you what I made...I'm going to do a little tutorial to show how I made the background, as well as another cool technique!


I started with a vanilla-colored piece of smooth cardstock under the template, and pulled out my Distress Embossing Ink Pad by Ranger.  I love this pad, because it's extra "juicy."  I applied the ink pad directly to the template, pushing down and "squishing" a bit in the more detailed areas.  I decided to only use 2 of the bird houses - and this is part of what I love about these templates...if you only want to use part of it, you totally can!  I removed the template and sprinkled clear embossing powder over the ink, then embossed with my heat gun.


Next, I started applying distress ink over the embossed areas - the embossed areas resist the ink and will stay vanilla.  You can use a damp cloth to wipe over the embossed areas to clean off any wet ink.


Isn't that just awesome?!  I love this technique!  I continued adding ink colors until the entire page was covered and I was happy with it.  

Distress ink colors used: Crushed Olive, Broken China,
Tumbled Glass, Stormy Sky, Wild Honey, Vintage Photo

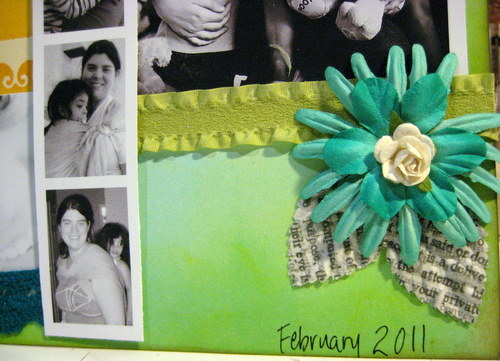
Next, I thought about what I wanted the page to be about.  I decided to scrap about ME - which I never do, and so went searching for photos of me.  Finding them was difficult - I'm always the one TAKING the pictures...but I eventually found a few and chose which to include.  I decided that since I wanted the colors of the page to really shine, I made the photos black and white.

Black & white photos show off the
colors of the page

I began adding embellishments - some of which I've had in my stash for years!  It was nice to finally be using them.  The title and butterflies are all from Marcella by K&Co.  

Title and butterflies from Marcella by K&Co.

I wanted to add some bling, and I had a sheet of Prima Say It In Crystals.  But I didn't want them to be clear - I wanted them to coordinate with my page.  Fortunately, I knew just what to do!  

First, I have been saving the plastic inserts from certain Tim Holtz Ideaology packaging...because they make great palettes for alcohol inks.  So I added just two drops of each of the three colors I wanted to use into each well of one of these plastic inserts.  I let the ink dry.  I took one of my Pentel water brushes (to see a great review of water brushes, check out this one at Craft Test Dummies) and, empty of water, filled it with some alcohol blending solution.  Then, I was able to use my brush to pick up the ink from my homemade palette, and color the bling just the way I wanted it.

Blending solution-filled water brush, picking up color
from dry alcohol ink on plastic package insert

Color your bling any color you like using alcohol inks!

Perfectly colored bling!

I added some Prima flowers, and some really fabulous newsprint leaves I found at Michael's.  For the center of the orange and blue flower, I used my Epiphany Crafts Shape Studio to make an epoxy flower center from a piece of book text.  I added some trims from my bucket-o'-trims - and have no idea what brand they are.

Flowers by Prima; newsprint leaves by
Recollections from Michael's

Flowers by Prima; epoxy center made using book text and
Shape Studio by Epiphany Crafts

Finally, I added my journaling using a dip-pen and black india ink.  I know the dip-pen may seem intimidating, but I find india ink to be the absolute best for writing over ink or paint.  

Journaling done with dip pen and india ink

I love my final result, and I especially love that I created the background paper myself!  I hope you've enjoyed my little tutorial - let me know if you have any questions!


Monday, August 16, 2010

Gotta love the everyday!!


As some of you know, I had the unbelievable privilege this past weekend of going away to a scrapbooking retreat house in the mountains with 4 other ladies - a Mother's Day gift from my AWESOME hubby!!!  I actually hadn't done any scrapbooking in a VERY long time, up until my recent weekend of fabric scrapbooking workshops with Donna Downey - so I had been wondering what I was going to work on - but after those workshops, I knew precisely what I'd be working on!  Since today's Mixed Media Monday's challenge is "Embellish It," I'm also linking up to them for my album, because there is TONS of embellishing going on throughout this album!!!  

This blog post is VERY picture-heavy, so I'll do my best to keep my comments to a minimum.  Just know that all but one front and back are canvas - I only did one paper front and back (can you spot it??).  There are LOTS of embellishments throughout - including acrylic and watercolor paints, fabric, ribbon, buttons, patterned paper, book text, stamped images, heat embossed images,wire, flowers, beads, staples, eyelets, glossy accents, embroidered canvas tags and tabs, modeling paste, and even some corrugated cardboard recycled from the coffee cup cuff (what ARE those called?) that was around my coffee cup at breakfast on the way up to the retreat!


I do have to comment on this first page - we were told to paint "landscape" colors - and almost everyone in the class painted a blue sky and green grass.  I wanted a purple sky and have no idea why I painted an orange ground - I just thought the colors were pretty together.  Anyway, when I went to put the layout together, I was just thrilled with how the tag colors and the flowers and beads all coordinated so well with my colors.  And I love the wire smoke.  Tee hee.

I used Glossy Accents on my cut-strip ladder to make it look glossy to go with the shiny red playground ladder in the picture.


This page is one of my favorites, and was also one of the hardest to photograph.  The acrylic paint on the modeling compound has quite a shine to it, so the flash on the camera glares terribly, but getting a good picture without the flash, inside, was rather difficult.  But I love the colors, I love the swirl of the modeling compound...and I also LOVE the other technique I used on this page - gel medium to transfer a photocopied picture.  I didn't know if it would work on gesso'd canvas (I had only tried it on paper before), but I was pretty happy with how it came out.  For those who don't know, Mackenzie was born with a cleft lip and palate (and we almost lost her during delivery, and she was only 2 lbs, 15 oz at birth) - so her smiles are extra special...her smiles ARE proof of everyday miracles.  


These next couple photos I took just to try to give you an idea of the texture and layers on this page - there are LOTS of them!  I love the amount of embellishing and texture going on here!


This is another of my favorite pages.  Turquoise is one of my favorite colors, and I just love everything about this page...the stamps, the flowers, the book text, the quote, the "journey" tag, the black and white photo.  Love.

But this one.  This one, I think, is my absolute favorite.  When we did the base of this page in the workshop, it was a technique teaching us how to embed book text using gel medium, and then painting over it.  Then we used the "trust your heart" stamp, and watercolored that - Donna Downey actually watercolored MINE, using it as an example - my friend Deanna got a great photo of her doing so.   Anyway, I still wasn't sure what picture I was going to put on this page, and this weekend I was rifling through my giant stack of photos from the last 5 years or so...when I came across this one.  It's a picture that is precious to me, both because breastfeeding is an issue near and dear to my heart (and one I'm passionate about), and because I really don't have many (if any other) pictures of me nursing any of my children.  I don't even know who snapped this shot of me nursing my 6-week old firstborn - probably my husband, back in the ages when he used to take pictures of me!  LOL  Now it's all about the kiddos!  Anyway, I just thought there couldn't be a more perfect picture to go with the "trust your heart" stamp than a nursing mama - because you absolutely have to trust your heart when you are a new, breastfeeding mama, and half the moms in the Western world are telling you how much "easier" it would be to just give the baby a bottle of formula!!  And then the perfect quote - "Love comes from a place so deep it defies language."  So true, especially the love between a mama and her 6-week old baby!!


And finally, the last page.  Such a happy one...the colors, the look on my son's face...even the unexpected burst of red in the third button.  I used a Tim Holtz Alterations Edges die (Sizzix) to die cut the coffee cuff and layer it under the canvas tag and photo.  I love the look!!


And finally, I love the overall theme of the album - to embrace the everyday moments of our lives!!

LinkWithin

Related Posts Plugin for WordPress, Blogger...