Showing posts with label Crafter's Workshop template. Show all posts

Tuesday, July 03, 2012

Stenciled Plate

A week and a half ago, I took one of my 4 year old twins on a mommy-daughter date.  She had been feeling left out of things for a while...her twin sister and her older brother have both been going to occupational therapy for a few months now (for their Sensory Processing Disorder), and while it truly is *work* for them, to her...well, it just looks like she's missing out on all the fun!  She peers through the glass on the door at the O.T. office, and sees the big gym, with the giant therapy balls, the multiple types of therapy swings, the rope ladder, the tunnel slides, the ball pit, the mats everywhere, all the bright colors...and she just thinks she is somehow getting the short end of the deal.


Thus her special day was born.  I love that my daughter shares my love of art, and so our first and longest stop of the day was at a local "paint your own pottery" place.  She had never done this before, and I wasn't sure how she would do.  True to her personality, she struggled with taking direction from the store owner...she is fiercely independent and wanted to do it her OWN way.  She chose to paint a 2-part cupcake - one with a top and a bottom, which she can hide her tiny treasures in.

I had a hard time choosing my own piece, but finally settled on a large plate.  I had some ideas about what I might want to do - but the owner looked at me a little bit strangely when I set my things down on the table and pulled out about 30 stencils (mostly from The Crafter's Workshop!) and started rifling through them trying to decide which to use.  She acted as if she'd never seen a stencil before!  I finally decided on my stencil, and picked my colors of paint.  Then when I told her I thought I would use a make-up sponge to apply the paint, she REALLY disagreed vehemently...practically said it just wasn't going to work.  She kept telling me how "different" this was than other kinds of painting.  And she just didn't see how I was going to manage the stencil with the plate.  She also wanted me to apply the paint to the sponge with the paint brush, rather than dipping the sponge in the paint and tapping it off, which is what I wanted to do.  Because I try to be cooperative, I gave that a try...and it did NOT work...so I went straight to the way I learned from Julie Fei-Fan Balzer...dip the sponge into the paint, then dab it off on a paper, then apply the paint to the stencil.  It worked just fine!  I thought it was so funny how she kept being so discouraging and seemed so rigid about how things had to be done!

Anyway, today I went and picked up my plate...and I just LOVE how it turned out!  When the owner asked which projects I was picking up, I told her "a plate and a cupcake."  She asked which plate it was, and I said, "The one with the peacock feathers."  There was another lady there who said, "OH, the beautiful one!"  The owner, however, said nothing...just brought it to me.  Ha ha...I think she's still holding a grudge against me for using a stencil and a makeup sponge!


The stencil I used is Peacock Feathers, a Balzer Designs stencil made by The Crafter's Workshop.  It is available in both 6"x6" and 12"x12" (which is what I used).  If you've never checked out the stencils from TCW, you MUST - they have TONS of fabulous designs...I can't stop collecting them!  Seriously, though, I used their stencils several times a week in my art journals, or on canvases, on scrapbook pages, on tags...on plates...LOL.  And they have some incredible new ones coming out really soon - check out their blog

{My daughter loved her cupcake too...so much so that the minute we got home, she rushed it up to her room before I could even get a picture of it, and now the girls are sleeping...and I'm not about to wake them up!  So hopefully I can add a pic of her cupcake later!}

Sunday, February 26, 2012

Dylusions Stamps & Stencils with Distress Markers

These tags combined some of my absolute favorite new products - Dyan Reavely's new (and old) stamps and stencils, along with Tim Holtz's new Distress Markers.  I only had a short time to play...in the midst of a HUGE reorganization and overhaul of my craft room, but I had SO MUCH FUN playing, and am completely in love!  


On this first tag, I used Distress Ink Refills (Worn Lipstick, Mustard Seed), Distress Stains (Tattered Rose, Scattered Straw, Dusty Concord), Dylusions Ranger/TCW stencil (Dotted Flowers), Dylusions stamps (Basic Backgrounds, Around the Edge, Curious Corrin, The Right Words), Distress Markers (Shabby Shutters, Peeled Paint, Stormy Sky, Broken China, Weathered Wood, Brushed Corduroy, Black Soot, Picket Fence), and Archival Ink (Basic Black).  

Let me just tell you...you are going to LOVE the Picket Fence Distress Marker!!!


On this second tag - which I adore...I just love her whimsical hair and her polka dot tights! - I got to play with more colors of the Distress Markers.  I used Distress Ink Refill (Worn Lipstick), Distress Stains (Wild Honey, Tattered Rose, Scattered Straw, Dusty Concord), Dylusions/Ranger/TCW stencil (Dotted Flowers), Dylusions stamps (Basic Backgrounds, Around the Edge, In-betweenies, The Right Words, Dooally Dorris, Curious Corrin), Distress Markers (Broken China, Tumbled Glass, Barn Red, Scattered Straw, Mustard Seed, Shabby Shutters, Picket Fence, Peeled Paint, Black Soot).  

I am planning to teach these tags at my LSS soon, so if you are in the Inland Empire area of Southern California, and would like the info, let me know.   :)

Happy creating!!

Friday, November 11, 2011

The Crafter's Workshop: "Ava" Stencil

Today over on Craft Test Dummies, I have posted my second review (here's my first) of the stencils made by The Crafter's Workshop.  You've seen me write about them here before, and I've shown you projects I've used them on...so you already know that I love them.  Today I wanted to show you one of the face stencils - Ava is her name - and just how versatile she is.  I showed you an art journal page in my last post, where I used her in her most basic form...I simply traced her lines with a Pitt Artist Pen, then went over the lines a bit with some oil pastels.  I didn't color in her face, no paint, nothing...very simple.  But today, I'm showing you my very first attempt at something completely different (no judging allowed...I just told you, this is my FIRST ever attempt...!).  

I started out in a 9x12 art journal by scribbling all over the paper with Derwent Inktense watercolor pencils, and then adding water with a brush.  I love these pencils because once the color is dissolved and dry, it is permanent and is no longer water-soluble...so you don't have to worry about it moving around on you as you work in layers over it.


Then I placed the 6"x6" Ava stencil on my page.  I decided I was only going to use the face and neck portion of the stencil, so I traced those parts with a pencil onto my page, along with just a bit of the hair as a guide for reference.  You can just barely see my pencil lines in the photo below - I wanted to keep them light so they wouldn't show through the paint.


Then came the challenging part...for me, at least.  I've *never* painted a face before.  Not ever.  Nor have I ever drawn a face.  I am clueless when it comes to shading and shadows and all of that...you know, the technical aspects of art!  (I really do want to take some actual art classes someday and learn these things!)  So I just went for it and started adding paint.  And my first attempt was a hot mess...but fortunately, it's just paint...so I added some more paint, and painted right over her, until I found a happy medium.  I knew ahead of time that I wanted to put long, flowing hair on her (though I hadn't really planned on it being *quite* so poofy...but hey...what can I say...she wanted to have poofy hair!).  So this is how she looked after I painted over the traced lines.


And then the magic happens.  I placed the stencil BACK on her, and used a cosmetic sponge with some Claudine Helmuth Black Gesso (LOVE that stuff!), and I stenciled in her eyes, nose, lips, chin, and neck lines again.  It's AMAZING what an instant transformation just that little bit gives.  That gave me a guide.  Then I used my paint brush and continued from there, adding her eyebrows completing her mouth, and filling in all the hair lines.  (I also went back in with some white to add a few highlights on her face and neck...it seemed to help.)


Now the page is all ready for me to add some other elements and do some journaling.  While I know she's no masterpiece, having never painted a face before, I am pretty happy with how she turned out...and I owe it all to my friends at The Crafter's Workshop!  

For more details on this and other great ideas for using the face stencils, be sure to check out this great post on stencil designer Julie Fei-Fan Balzer's blog!!  And make sure you hop over to Craft Test Dummies to check out all the other things I did with these great stencils for my review!

Are you a fan of The Crafter's Workshop stencils?  I'd love to see links to projects you've made using them!

Supplies Used:


BLICK ART MATERIALS: Save up to 82% on Select Items through November 16th!

Saturday, November 05, 2011

Art Journal Pages

I mentioned in my last post that I'm taking Julie Fei-Fan Balzer's online workshop, 30 Days In Your Journal.  What's so awesome about this class is that she really focuses on showing you how to fit art journaling into your life every single day...for just 10 minutes.  So you don't do a page or a spread a day - you work on a two-page spread for several days, adding a bit at a time.  In the past, I've usually done entire pages (or more) in one setting, though I have sometimes gone back and added layers - and I do have multiple pages in multiple journals that are in various stages of work.  But this idea of really limiting myself to 10 minutes a day is new to me.  And I think it could work, and I think it just might be the key to actually being able to art journal more frequently - because finding chunks of time to sit and play is usually what prevents me from doing it as much as I'd like.  So we'll see how this goes.


At any rate, after the first 5 days, I've completed this two-page spread.  It's much busier and fuller than most of my art journal pages normally are, but I'm okay with that.  I did a lot more actual journaling than I often do, which I like, and less time-consuming processes than I've used on other pages...which I'm torn about.  I really do like playing with new mediums and trying new techniques in my art journals...but maybe those should be saved for the times when I have bigger chunks of time, and my "10 minutes a day" art journaling can be a bit more basic.

I *love* the black stamped hand on the left side.  That was done with a Styrofoam stamp I made by tracing one of the hands from the Henna Hands stencil (also designed by Julie Fei-Fan Balzer) from The Crafter's Workshop and then using a technique I learned in the Random Creative Scrapple Doodle workshop by Stephanie Ackerman.  I used Claudine Helmuth's Black Gesso to stamp with, and then journaled on the hand with a white Sakura Glaze pen (new to me - totally in love!).  I also used the Punchinella stencil from The Crafter's Workshop (another one designed by Julie) to add layers of color with Distress Ink and Paint Dabbers randomly over the pages.  I am absolutely addicted to The Crafter's Workshop Stencils...I use them ALL THE TIME - seriously!  If you haven't tried them, you definitely need to check them out.  (I reviewed them earlier this year on Craft Test Dummies, and will be writing an updated review in a few weeks, covering the newer releases.)

The remainder of these pages were done some time ago - back in July/August, I believe - when I was taking Christy Tomlinson's She Had 3 Hearts workshop.  (Can you tell I love taking online workshops??  That's what happens when you're a stay at home, home-schooling mom of four children ages 6 and under!)


I did an image transfer (the row of scissors on a shelf) on this page, and played with melting some crayon wax.  I really like how the green wax blew across the page in little droplets when I used my heat gun to melt the crayon!  I also love the stack of hearts - canvas, glassine paper, fabric, and a rusty metal heart that I dipped into melted UTEE (which I had colored orange with Pan Pastel).  I used a little clip of some kind that I got in a random assortment of trinkets from this way cool store Zinnia to clip the hearts together.


I used another stencil from The Crafter's Workshop on this page - Ava - to create the girl's face.  There are SOOOO many ways to use this stencil - check out this blog post about the face stencils to see just how versatile they are!  I also used another of their stencils for the journaling.  I dripped acrylic inks on the page for drippage, and used acrylic inks to color the scallops around the edges of the page as well.  To make the scallops, I just punched circles from vintage music paper, vintage book text, vintage dictionary pages, old map pages, etc., and glued them on the page hanging off the edge and then trimmed the excess.  I love using vintage papers!!


This is another fun page.  I used Adirondack Colorwash Sprays and - surprise - The Crafter's Workshop stencils on the background (along with an alphabet stencil from...???).  And then I played with wax.  I used clear beeswax at first, and then added some blue crayon to the wax to color it a bit.  I stamped into the wax in the upper left hand corner using Unity's Giving It All Meaning stamp - what awesome texture that created!    And I love Prima's Chickenwire stamp, which I used to add texture over the wax and around the edges.  I was happy to discover that the Pitt Artist pens from Faber-Castell write easily even over cooled beeswax!  


This last page was super fun.  I can't claim credit for the idea of rolling the paper - another student in the workshop did that on a page in her journal, and then Christy actually did a piece of art on her blog inspired by it, which is when I saw the technique.  Anyway, it was my idea to roll them up and glue them to the base, then cut them out in a heart.  Then I actually did my journaling - using the Pitt Artist pen - right on the rolled paper heart!!  It wasn't anything I really needed anyone else to be able to read - and I know what it's about - and that's all that matters...so I was okay knowing that the writing was going to get covered up.  Unfortunately, my heart has gotten rather smooshed from my journal being closed - I should have taken a picture right when I made the page - not several months later!

And then...came the string gel.  Have you ever played with string gel?  Well, I hadn't, prior to this page...and boy oh boy, was it ever fun!  I fell in love with the stuff!!  Basically, it's this polymer stuff, and it starts out clear, so you need to add some paint (or acrylic ink) to color it.  And then you let it sit for a while - I want to say like 2 hours or so.  Then you take a spoon or a palette knife or whatever, and you scoop some of it up, and you basically drizzle it all over your project.  It's SO fun - makes you feel like a kid!  It's totally messy and awesome and fun.  When it dries, it still looks wet, and it's glossy and dimensional - and did I mention it's FUN?!  Seriously.  {Just don't make the same mistake I did.  I had some extra string gel - which of course, I didn't want to waste.  So I drizzled it on the page facing this one, figuring I'd play around with that page too.  I wasn't thinking...now I have to keep a piece of wax paper in there all the time, or the pages stick together because the string gel on the two pages wants to stick to each other.  Live and learn.}

Anyway, hope you enjoyed those.  If you want to learn more about art journaling, you really should check out Julie's class - she really tells you exactly what she's doing and why she's doing it, every step of the way.  It's great for beginners or for more advanced artists who just want some inspiration.


BLICK ART MATERIALS: Save up to 82% on Select Items through November 16th!

Saturday, October 08, 2011

Spooktacular Signs - The Trick-or-Treat Blog Hop


Welcome to the Trick-Or-Treat Blog Hop! 
October 8-10, 2011
 

Crafter's Workshop and Clearsnap have teamed up for the next three days to create hauntingly inspiring projects for this Halloween season. It's all tricks, treats, and techniques so join us on a fright night jaunt to remember, hopping from blog to blog. Leave your "Trick-or-treat" comment on each blog in the hop in hopes of winning candy, blog candy that is! For every 50 comments posted on this blog we're giving away a set of inks and accessories to spook up any crafter's projects!!! We'll choose the winners from the blog comments posted on all the blogs in the Hop. 

The Clearsnap prize includes Smooch Spritz in Frosted Grape, Green Olive, and Carrot Cake, ColorBox Pigment InkPad in Spooktacular, Glitter in  Grape Fizz, Design Adhesives in "Trick or Treat" and "Eeeeks!?", plus our new Design Foils in Lime Burst. That's alot of spook to go around!


Plus Crafter's Workshop is giving away this fabulous assortment of templates worth over $35!! This is some serious blog candy!!


Receive extra entries in the Hop for following Clearsnap and Crafter's Workshop on Twitter and Facebook and for tweeting or posting on Facebook about the Hop - just post here afterwards that you have followed us or posted about the Hop to increase your chances to win. 


Here are the artsy spooksters to visit:


Julie Fei-Fan Balzer - http://www.balzerdesigns.typepad.com/
Charlotte Jenkins http://suepup.blogspot.com
Mary Dawn Quirindongo -http://mypinkmexico.blogspot.com/ Karen Grunberg- http://www.karenika.com/
Jen Clark - http://mycraftyfriendjen.blogspot.com/  YOU ARE HERE

Happy Hopping!!


We recently visited our local pumpkin patch as a family, and while there, I saw a large family or possibly a group on tour - at any rate, they had some signs on wood sticks to identify their group.  I thought they were really cute, and that some similar Halloween-y signs would make super cute decorations...and that my kids would probably enjoy carrying them while out trick-or--treating (OR just around the house for the next several weeks, as is proving the case...).  So before we left the pumpkin patch, I made sure to gather several twigs - we live in the desert and certainly don't have any twigs in OUR yard!  My kids couldn't wait to see what I was going to do with them!

I started out by cutting cardstock to 5.25" wide by 6.5" long.  I ran each one through my Zutter Distrezz-it-All to distress the edges.  I used the 6x6 Crafter's Workshop trees template and the Clearsnap MetalXtra Platinum ink pad with a blending tool to apply ink to the cardstock to create just a shadow on the background.


After drying the ink, I applied some Glue Gloss to a tree stamp and stamped it over the background trees.  I rubbed some Lucky Penny and Plum Crazy Designer Foils over the Tree (you have to let it get tacky a bit, then rub a bit and apply several times since it's not really meant to be used with the Glue Gloss).  Then I re-stamped the tree using Clearsnap Pigment ink to give it more definition.


I used the Crafter's Workshop numbers template to highlight the number "31," using Clearsnap Espresso pigment ink.  I just love how easy the Queue's are to use - both the chalk ink and the pigment ink.  (Just a note - the chalk ink dries very quickly, the pigment ink a bit more slowly, but both are easy to use.)


I added a word sticker, going around the edges with Dark Brown chalk ink, and went around the edges of the entire sign with the same ink pad.  I added some accents with a Viva Pearl Pen, and my sign was complete.(I punched holes in the top and bottom to put it on a twig.)


On this one, I used the triangle plaid template to create a background, added the clocks over it using that template, and I used Glue Gloss to cover the witch in black glitter.  I *LOVE* using Glue Gloss for glitter - it ROCKS.  If you've never tried it for glitter, flocking, etc. - you are really missing out!!  I again used the MetalXtra Platinum ink pad - to ink the skull and to add highlights to the houses - I just love that ink pad!!  A little goes a long way.


On this third one, I started by using black ink with the tree template, and then used Design Adhesive flourishes in the corners with Plum Crazy foils.  You can see the shimmer somewhat - but it's really hard to see in photographs JUST how shimmery the foils really are!!  I added the skeleton and the Halloween card - inked with Lavender chalk ink - and the "spooky" word sticker.  I went around the edges of the sticker and sign with Espresso pigment ink.


Finally, the last sign.  I started by using the damask template, and sprayed using Wine Berry and Silver Foil Smooch Spritz.  Then I applied some Glue Gloss on the house, and again applied the Designer Foils, a little at a time.  While it didn't work perfectly - it sort of has a spooky, haunted look to it, which is fitting with the theme!  I finished it with a greeting.


For now, the signs are gracing our entry-way table, along with a few other Halloween decorations...though I had to fight my children off to get them to leave them be long enough for me to snap photos!  I have no doubt they will be missing soon, and there will be 3 little monsters running through the house sporting spooky signs!


Now on with the blog hop!!

Wednesday, February 23, 2011

Scrapbook Layout Using Crafter's Workshop Template

I recently had the opportunity to try out some templates from Crafter's Workshop for the first time.  Now, I know what you're thinking...templates, stencils..."Aren't those SOOOO 1980's?!"  I thought so too...until I started playing with these!  These templates (or stencils - whatever you'd like to call them) are contemporary, versatile, and affordable.  Check out my full review of them, as well as other techniques to use with them, on Craft Test Dummies tomorrow!  To see even MORE techniques and read Jenny's review (THE Craft Test Dummy!!), go here.  AND, she even includes a link to a great video full of techniques using these fabulous templates.


But today, I wanted to share this scrapbook layout I made using the 12"x12" template called Birds of a Feather.  And since I have such a hard time just showing you what I made...I'm going to do a little tutorial to show how I made the background, as well as another cool technique!


I started with a vanilla-colored piece of smooth cardstock under the template, and pulled out my Distress Embossing Ink Pad by Ranger.  I love this pad, because it's extra "juicy."  I applied the ink pad directly to the template, pushing down and "squishing" a bit in the more detailed areas.  I decided to only use 2 of the bird houses - and this is part of what I love about these templates...if you only want to use part of it, you totally can!  I removed the template and sprinkled clear embossing powder over the ink, then embossed with my heat gun.


Next, I started applying distress ink over the embossed areas - the embossed areas resist the ink and will stay vanilla.  You can use a damp cloth to wipe over the embossed areas to clean off any wet ink.


Isn't that just awesome?!  I love this technique!  I continued adding ink colors until the entire page was covered and I was happy with it.  

Distress ink colors used: Crushed Olive, Broken China,
Tumbled Glass, Stormy Sky, Wild Honey, Vintage Photo

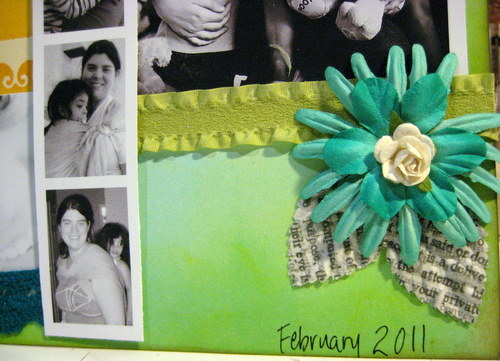
Next, I thought about what I wanted the page to be about.  I decided to scrap about ME - which I never do, and so went searching for photos of me.  Finding them was difficult - I'm always the one TAKING the pictures...but I eventually found a few and chose which to include.  I decided that since I wanted the colors of the page to really shine, I made the photos black and white.

Black & white photos show off the
colors of the page

I began adding embellishments - some of which I've had in my stash for years!  It was nice to finally be using them.  The title and butterflies are all from Marcella by K&Co.  

Title and butterflies from Marcella by K&Co.

I wanted to add some bling, and I had a sheet of Prima Say It In Crystals.  But I didn't want them to be clear - I wanted them to coordinate with my page.  Fortunately, I knew just what to do!  

First, I have been saving the plastic inserts from certain Tim Holtz Ideaology packaging...because they make great palettes for alcohol inks.  So I added just two drops of each of the three colors I wanted to use into each well of one of these plastic inserts.  I let the ink dry.  I took one of my Pentel water brushes (to see a great review of water brushes, check out this one at Craft Test Dummies) and, empty of water, filled it with some alcohol blending solution.  Then, I was able to use my brush to pick up the ink from my homemade palette, and color the bling just the way I wanted it.

Blending solution-filled water brush, picking up color
from dry alcohol ink on plastic package insert

Color your bling any color you like using alcohol inks!

Perfectly colored bling!

I added some Prima flowers, and some really fabulous newsprint leaves I found at Michael's.  For the center of the orange and blue flower, I used my Epiphany Crafts Shape Studio to make an epoxy flower center from a piece of book text.  I added some trims from my bucket-o'-trims - and have no idea what brand they are.

Flowers by Prima; newsprint leaves by
Recollections from Michael's

Flowers by Prima; epoxy center made using book text and
Shape Studio by Epiphany Crafts

Finally, I added my journaling using a dip-pen and black india ink.  I know the dip-pen may seem intimidating, but I find india ink to be the absolute best for writing over ink or paint.  

Journaling done with dip pen and india ink

I love my final result, and I especially love that I created the background paper myself!  I hope you've enjoyed my little tutorial - let me know if you have any questions!


LinkWithin

Related Posts Plugin for WordPress, Blogger...