Showing posts with label nestabilities. Show all posts

Sunday, January 02, 2011

Shabby Chic Altered Tin - Found Items


Happy New Year to everyone!!  I hope 2011 is off to a great start for you - and of course, quite importantly, a CREATIVE start!  I was able, for the first time in many years, to actually stay up for the passing into the new year...and was able to accomplish something crafty at the same time, while my hubby cooked up a huge batch of delicious seafood gumbo - YUM!

Over at Crafts Unleashed, we've been focusing on crafty organization for the last week (and this coming week, too!)...and while my crafty space is, mostly, pretty well organized, I do still have certain odds and ends that just aren't quite organized to my liking.  OR, perhaps they are organized, but I don't happen to care for the actual containers in which they are stored.  So a couple of my goals for the first part of this year are to re-fashion some of the uglier storage containers, and to create some new solutions for things that aren't working.

This project was the first "turn ugly into pretty" one for the year.  Here's what I had to start with:


This tin, with an acrylic window on top, was originally a storage tin for a Stampin' Up! punch and stamp set, I believe - if I'm not mistaken - from MANY years ago.  It has since been used to store various sets of products - everything from tools to stamps to ink pads and stickles.  But...it's weird blue color with squiggly white lines on it just weren't working for me.  So, rather than scrap it altogether, I decided to alter it.

I started out by using my Espresso colored Adirondack paint dabber around the top edges.  Bits of the blue tin showed through after one coat, but I decided to not add a second coat, because I thought the bits of blue showing through added character.

Next, I got out my matte Mod Podge and a foam paint brush.  I have several books in my craft room that are for the sole purpose of tear pages out of, so I tore several pages out of one and tore them into smaller pieces in preparation for adding to the tin.  I painted a thin layer of Mod Podge onto the tin (starting on the bottom), and gradually added piece after piece of torn paper, adding more Mod Podge as needed to glue edges down.  After covering the bottom, I also covered the sides of the tin.  I used some Tim Holtz tissue tape to cover the bottom edges of the tin, wrapping it around to cover the gap between the sides and the bottom.


Once the paper and glue had dried, I used my foam ink applicators and distress inks (in Wild Honey, Vintage Photo, and Walnut Stain) to add color to the papers.  After the ink had dried, I added a top coat of Mod Podge, also covering the area of tin which had been painted with the dabber.


Next, I used felt on my ink applicator, with alcohol inks in Mushroom and Latte, with some Blending Solution, to add some color to the window of the container.  I added the ink to both the inside and outside of the window, for added effect.

I then used Spellbinders Nestabilities Labels 14, and cut 2 pieces of Donna Salazar's Zutter cardboard, and one piece of Tim Holtz cardstock from his Lost & Found collection, all using the largest die in the set.  I inked the piece of cardstock with distress ink, then glued it to one of the cardboard pieces, and glued the entire piece to the top of the tin.  For the second piece of cardboard, I tore most of one side of the cardboard off, revealing the corrugated center.  I inked the ridges with a Clearsnap chalk ink Catseye, and inked the edges with Walnut Stain distress ink, then glued the piece down on the tin.  I added a piece of flower trim across the entire tin, gluing it down with Glossy Accents.

To make the denim flower, I used the Spellbinders Nestabilities Classic Scalloped Circles (large), and a piece of my son's old cut-off jeans which I had saved.  I cut one scalloped circle in every size except the largest and smallest sizes (so the 5 center sizes).  (Note: I had to run the sandwich through my Big Kick back and forth several times to get the denim to cut all the way through.)  For each circle, I laid down a large dollop of Fabri-tac glue on my non-stick craft mat, laid the cut circle on top of it, then used my fingers to twist the circle and work it until it had pleated and formed into the shape I wanted it.  After all five layers were done in this way, I used the Fabri-tac glue to glue all the layers together, added a vintage button (which belonged to my grandfather) on top, and glued the flower to the corner of the tin.  

Finally, to finish things off, I used my Dymo labeler (believe it or not, one of the things I bought with my Michael's gift card after Christmas!!) to make the "Found Items" label.  I *adore* the look of the old Dymo labels!!!
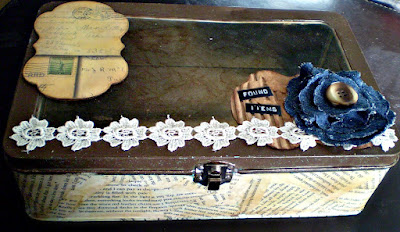

I plan to keep odds and ends like dice, vintage porcelain dolls, bingo markers, corks, dominoes, etc., in here...cool things that I definitely want to keep for projects, but which I have NO IDEA where else I would keep!!  I absolutely LOVE how this turned out, and am SO glad I did not throw out the ugly blue tin!!

I think my NEXT storage solution needs to be something for storing all of my various glimmer/shimmer/smooch mists and sprays.  The plastic basket they are currently in is no longer large enough for them, and I'd like something that fits in with my craft studio a little better...so I'm considering trying to make my own container using corrugated board and binding it at the corners with jute.  I'll let you know if I do...and if so, how that works out!

So what about YOU?  Do you have any ugly storage items in your crafty space that you'd like to attempt a makeover on?  If so, I'd love to see your finished project - so make sure to leave a link in the comments!!

handmade projects


Wednesday, December 22, 2010

Last minute Christmas gifts - handmade ornaments


If you are one of *THOSE* people, you know, the ones who have had all of their holiday shopping and gift-giving needs taken care of since July, well, then, you may just want to skip right over THIS post.  ;)

BUT, if you are anything like ME, and you are still frantically trying to finish up final handmade gifts and trying to make sure you haven't forgotten anyone on your list,...well, then, I have some really beautiful and quick last-minute ideas to share with you!

For all of these ornaments, I used vintage sheet music - which I absolute LOVE using on projects.  I think it just adds such a wonderful charm and loveliness to any project!!  

For the ornament pictured above (the inspiration for which I got here), of which I made 3 variations, I started by cutting a background from red foil cardstock using the largest of my Classic Scalloped Circles Large Nestabilities die-cutting set.  I then used my hot glue gun to attach ribbons and pieces of Christmas picks.  I used the Tim Holtz Sizzix Rosette die to cut the rosette from the sheet music, and assembled it per the instructions; then attached it with hot glue as well.  Finally, I took grunge board letters spelling "JOY," inked them with Fired Brick distress ink, and applied Fired Brick distress stickles to them.  Once dry, I glued them onto the rosette, and my ornament was complete.  (Note: you can use a heat gun to dry the ink and the distress stickles, but do NOT use a heat gun on regular stickles.)  


I think even my husband was impressed - since I saw him grab one off my craft table this morning on his way to the office to drop off Christmas gifts to the supervisors he manages!!  (That, and he wants to get some return on the "investment" he has made into my crafting supplies!!)


The second ornament also has a rosette made of vintage Christmas music - but it is much larger, and was made using the Martha Stewart Scoring Board.  The ornament has about a 6" diameter, and I had to glue two strips of music together to make it.  Once I made the rosette, I inked the edges and ridges with Fired Brick distress ink.  I then applied a line of glue around the edges and sprinkled silver glitter over it.

For the center, I again used my Classic Scalloped Circles Large Nestabilities to die cut two pieces from a pad of K&Co Christmas paper.  I inked them using distress inks and glued them to the rosette using hot glue.  Finally, I added a dimensional K&Co sticker to the center.  I punched a small hole in the top of the ornament and tied a piece of silver cord through it for hanging.  


I hope this gives you some ideas for quick but beautiful last-minute gifts.  What are your go-to crafts for last-minute gifts?

Monday, October 18, 2010

Thankful Card with Ink Bleeding Technique


I am participating in a free inking techniques class on 2 Peas given by Jennifer McGuire, called Holiday Thinking Inking.  (I actually missed the first week, though I did watch the videos, and jumped right in during the second week - so you can jump in NOW too!)  The instruction videos are posted both on Jennifer's blog and on 2 Peas, but you need to upload your challenge entries to your gallery on 2 Peas.  
Anyway, I made this card as part of the second week's challenges, using a technique called "ink bleeding."  This technique is shown here on the leaves.  I stamped a leaf (unknown brand) onto watercolor paper using distress ink, then spritzed the stamped image with water a few times to allow the ink to bleed.  Once I got the desired effect, I used my heat gun to dry it and stop the bleeding.  I repeated this two more times with different colors.  It is an especially nice effect for leaves, as it gives them a "veiny" look.
After the leaves were completed, I carefully cut them out, and used some Vintage Photo distress ink around the edges of them to give them more depth.  I also applied some Antique Linen with a foam ink applicator over them to soften the look.  Finally, I added some color-coordinating distress stickles to each one and dried  them with my heat gun.  (Note: do not heat regular Stickles with a heat gun, as it will bubble - only Distress Stickles are formulated to be able to withstand heating.)


Next, I started on the card.  I cut a piece of cardstock that was 9"x6.5" and scored it slightly off the middle lengthwise, so that when I used the scallop punch on the front, the front and back would line up.  After using the scallop punch along the long side of the front, I used distress inks to add some color on all 4 sides of the front of the card.  I added a strip of Tim Holtz Nostalgic tissue tape along the folded side, and colored it with distress inks (LOVE the tissue tape - you've GOT to try this stuff!!).  I found that my finger was the best bet for applying ink to specific spots on the tape.  

Then I used my brand new Spellbinders Nestabilities Labels 14 - which I've been lusting after for a VERY long time and just got in on Saturday - to cut two sizes from two coordinating pieces of DCWV patterned paper.  I added some Vintage Photo distress ink around the edges of the larger one and glued it down lengthwise on the card.  I added distress ink to the smaller one, as well, all over, and then stamped my sentiment using brown Staz-on ink.  I then used my copper Adirondack Paint Dabber to go around the edges of the smaller one to highlight it.  I used foam squares to pop up the sentiment label and adhered it horizontally over the larger label.  


Finally, before I was ready to adhere my leaves to the card, I felt the bottom of the card needed something, so I used a large flourish stamp (Donna Downey for Unity) with Spiced Marmalade distress ink (masking the tissue tape so as not to stamp over it) to add a background.  I then used foam squares to adhere the leaves, using different levels of squares so the leaves are not all popped up at the same height.


You can see the incredible, vintage-feeling sparkle the distress stickles add to the leaves.  I just love them!!


I hope you feel inspired to make something inky or showing gratitude yourself!  And come join me in the Holiday Thinking Inking class - we are only starting week 3 of 8, so there are still plenty of inky techniques for you to learn and try out!

(P.S. I still have one more card to show you from week 2!!)

LinkWithin

Related Posts Plugin for WordPress, Blogger...