Showing posts with label inspiration wednesday. Show all posts

Monday, October 11, 2010

Un-blogged Inspiration Journal pages

You've probably noticed that I haven't posted an Inspiration Wednesday post in a couple of weeks.  Why not?  Hmm...I don't really know, other than I've just been playing more with shipping tags and paper rosettes and distress inks than in my inspiration journal, I guess.  So it's not that I haven't been playing creatively, it just hasn't actually been in the journal.  

I did actually do a page, though, last weekend (Oct. 2), that was based on Donna's Sept. 29 video.  I just never got around to posting it!  Ha!  So...here is that page...you'll notice that again, I did almost the exact technique that Donna did.  I still don't have the same watercolor crayons as she does, so I have a very limited color palette in mine, but they still let me have the opportunity to play.  And I must say, I do love them every time I play with them...there's just something SO cool about watching those crayon lines turn into paint right before your eyes!


I did not, however, use black and white india ink for my twisty line, like Donna did.  I used black and white Galaxy markers (by American Crafts) for my line...for the finishing of it, I mean.  I started off with a charcoal pencil like she did.  I love my main quote - taken from a Tim Holtz stamp - "Not all who wander are lost."  I don't think I even own that stamp - yet - but I love the quote.  Around the twisty line, it says, "Art washes away from the soul the dust of everyday life. ~Picasso~  Be...Create...Risk....  Creativity is an endless journey where we should always take the scenic route.  Explore...Journey...Art."

***********************************************

This second entry which I never posted was one I did back in August, during a weekend when I was on bedrest for several days due to an injury.  I have spent many months on bedrest in the past - during each of my pregnancies, I was on bedrest for 3 months, due to preterm labor - but it was much easier to swallow then, given that I had a LOT at stake!  This time, with 3 young children to care for, and to be honest, a GIANT need to be downstairs in my crafting studio - NOT upstairs in bed! - I was most definitely having a pity party for myself!  Donna was on vacation that week, I believe, and had done her Inspiration Wednesday video on the road, using her india ink/pen and watercolor crayons or pencils to paint flowers in a book.  I didn't do anything that day, but over the weekend, I realized there was no reason I couldn't take MY fountain pen, watercolor crayons and my Stampin' Up! aqua painter brushes upstairs to my bed.  I already had this page in my inspiration journal with book text embedded, using gel medium, and a light wash of paint over it.  I figured it was the perfect page for me to draw some flowers and color/paint them in.


I also colored the inclusion page next to it, which happened to be a yellow envelope...and found that they tend not to take watercolor paint very well...as you can see by the muddy-sort of color.  I used my india ink to write my self-pity over it, "Bedrest sucks!  [especially when you're not even pregnant!]  Is there a flower to go with that?!"


A few days later, once I was cleared from bedrest by my doctor, I added the ribbon to the main page, as well as the black die-cut fence, since I felt like it sort of went with the pity-party theme much better than, say, a white-picket fence would.  I also added the journaling note-page with the caution, "Warning: Pity party up there."  I added a few black line-drawing rub-ons and painted them in too.  Ahh...well, it IS supposed to be part art, part JOURNAL, right?!

Wednesday, September 22, 2010

Inspiration Wednesday 09/22/2010


Oh my - I'm actually posting my Inspiration Wednesday post ON Wednesday!  And well before midnight!  LOL!!  That would be because A.) I started my page before Donna posted hers, and thus, B.) did not wait until so late in the day to start; and C.) did a more simple page this week.  That said, it was a VERY difficult page to photograph (although it does seem like MOST of my stuff is hard to photograph well with my camera)...indoors, the flash shone off the Glimmer Mist and acrylic paint of the leaves so brightly, yet outdoors in the natural light, I couldn't get the Glimmer Mist to sparkle hardly at all.  So I did my best to share some of both...so hopefully you can get a feel for just how shimmery and warm this page really is!

I was glad I didn't wait for Donna to post hers this week, since I don't actually own any Pan Pastels (or any pastels, for that matter)...so I wouldn't have been able to do that part of the technique anyway.  I just did a simple coat of Ochre Yellow fluid acrylic paint (Golden brand) for the background.  I literally just put a couple drops of it right on the page, sprayed some water on the page, and used a wide brush to spread the paint over the entire page, letting it lighten toward the left part of the page.  Then I took 3 leaves I had previously cut from book text, using my Cricut (the Wild Card cartridge), and glued them down on the page.  I painted over them using Nickel Azo Gold fluid acrylic paint, building in layers, so that it is darker on the outer part of the leaves.  I love that you can see the brush strokes and the layers in some of the pictures - and that you can still see the book text through the paint - the leaves almost seem to have a 3-dimensional look to them.  


Then, I used a mask that I had cut on my Cricut (also Wild Card cartridge), using the Tim Holtz cut-your-own-mask sheets - that's the tree branch you see near the top of the page.  It's self-adhesive, so I stuck it to the page, and used my Tim Holtz distress inks in Orange Marmalade, Barn Door, and Vintage Photo over the  mask and around the edges of the entire page, before removing the mask.  I also went around the edges of the page with a little Walnut Ink distress ink.  I stamped the clock face using an acrylic stamp I made using the  cut-your-own-stamps acrylic stamp sheets for the Cricut (using the Graphically Speaking cartridge), in brown Staz-on.  I then used the same cartridge to cut clock hands from cardstock and glued them on top of the stamped image, and covered them in Glossy Accents, and glued the Tim Holtz metal "cherish" charm in the middle.  I stamped "gratitude" at the bottom of the page, and glued down two pieces of ruler ribbon on the page.  I spritzed the page with Tiger Lily Glimmer Mist - a gorgeous shade of orange with beautiful golden shimmer to it.  Finally, I added my quote and doodled a few lines around the edges using black india ink.


I love how this last photo shows the texture of the leaves!!  They were so simple to do, but I just love them!!  They make me happy!

Thursday, September 16, 2010

Inspiration Wednesday 9/15/2010


As usual, I'm posting my Inspiration Wednesday work on Thursday - because by the time Donna gets HER video up, and I take care of all my homeschooling duties, children who need feeding, household stuff, etc...I just can't manage to get it all done (or posted) by the end of Wednesday!!  LOL  I suppose if I just did my own thing and started first thing on Wednesday mornings, I could...but what fun would THAT be?  I wanna try whatever technique Donna is demonstrating...so I wait for her to post her video and then I get to play along!!

So this week, we painted the background with fluid acrylics using a palette knife!  Totally a cool look!  I love the lines and texture it gives the background.  I didn't have the color of green I wanted, so I had to mix up some Hansa Yellow Medium, Phthalo Green (blue shade), and Yellow Ochre (all Golden fluid acrylics) to get just the right shade I was aiming for.  My pictures don't quite show it right - it's a little bit more olive-colored in real life.  My inspiration for the color was actually the shade of green in the patterned paper I used to make the flower at the bottom of the page (more on that in a bit).


I love this quote - it came from a women's devotional book I have.  I have been working with my 5-year old a LOT lately on focusing more on others' needs than on his own, and on paying more attention to giving than to getting - so this thought has been on my mind lately.


This twisted paper swirly thing - not exactly sure WHAT to call it - was something that Donna Salazar taught during her Tuesday Tutorial a couple nights ago (you should definitely check those out - free online video classes - live - every other Tuesday - there's a link on my left sidebar).  I tore three pieces of book text into about 2.5 inch-wide strips, coated them in Liquitex Gloss Medium & Varnish (she used a Beacon Fast Finish Decoupage, I believe), then gently twisted them one at a time.  I formed a peak at the top, and a sort of flattened part at the other end.  After forming all three and having curved them the way I wanted, I gently twisted all three together and smooshed the flattened bottom ends together, then laid them on my non-stick craft mat to dry.  Once they were dry (I used my heat gun to sort of speed up this process), I spritzed the now-one-piece swirly with some Tiger Lily Glimmer Mist and some homemade magenta colored shimmer mist.  It's hard to catch just how shimmery it really is, in photos - but let me tell you, it really shimmers!  I adhered it to the page using Beacon 3-in-1 Craft Glue (love that stuff!).


The bird, I cut out of the same patterned paper that I used to make this beautiful rose.  I outlined the bird using my dip pen and black india ink, just as I used for writing my quote.  Notice the eye of the bird - I added a drop of Glossy Accents to give it a dimensional look.  I also added several drops of the Glossy Accents to the flower petals to make it look like drops of dew or rain on the flower.  The Accents go on a little cloudy-looking, but dry crystal clear and very glossy, giving a very cool look.  Glossy Accents can also be used as an adhesive and will even adhere paper to metal.

Now - the flower!  This is my newest fun technique!!!  And SO easy it's ridiculous!  I still can't believe I never knew until now how to make these!  Can I just say how much I adore You-Tube?  You can really learn just about anything there - I've learned how to sew, how to knit, and many many other skills by watching videos people have posted on You-Tube.  Anyway, apparently this technique was originally a flower that Tim Holtz made using a Sizzix flower die; however, a very creative woman figured out a way to make them even faster using her Cricut and the George & Basic Shapes cartridge - which is the cartridge that comes with the orginal Cricut...the one I just happen to have.  However, I would imagine you could find a flower shape on MANY of the Cricut cartridges that would work with this technique.  THREE cut flowers is ALL it takes, a few snips of your scissors, some curling of the petals around a pencil or paintbrush, and a hot glue gun - and you've got yourself a GORGEOUS, 3-dimensional rose!  

So...that's this week Inspiration Journal entry.  I hope you enjoyed it...and I hope you do something to express your own creativity this week!  I promise you that the more you take the time to practice being creative, the more you will find your creative impulses exploding in your mind!!

Wednesday, September 15, 2010

Featured on One Pretty Thing! (again!)

Thank you, Rachel, for featuring my rock Tic-Tac-Toe game on the Daily DIY feature on One Pretty Thing this afternoon!!  Welcome, One Pretty Thing readers!!  I hope you find lots of other inspiration here as well!  Go ahead and sign up to be a "follower" of my blog - when we hit 50 followers, I'll be holding a giveaway!!  (Not telling what it'll be, but I promise it will be good!)

Guess what I'm doing right now?  Why, watching Donna's Inspiration Wednesday video, of course!!  And hopefully, later, I'll be working in my own Inspiration Journal!!  (cooperation from children and husband required...)

Go forth and be creative!

Thursday, September 09, 2010

Inspiration Wednesday (er...Thursday...9/9/10)

I really thought it was just me...so I was really relieved to hear Donna say in her video this week that she often  thinks she's going to hate her Inspiration Journal pages in the beginning, but at some point during the process, she starts to love them.  Because that almost always happens to me, it seems.  I started this weeks' technique late last night, and continued early this morning...and stopped when this is what I had:


Don't hate...I can tell you are as enthusiastic about it as I was!!  LOL  Isn't it BEAUTIFUL?!  So let me back up just a bit and explain how I got there.  I started by using matte gel medium to basically decoupage the entire two pages with pieces of torn book pages.  The look was actually pretty cool - I should've taken a pic of THAT!  I left that to dry overnight (partly because it was after 1:00 a.m. when I finished, but mostly because my hubby would've been pretty unhappy with me for running my heat gun at that hour).  This morning, I woke early enough before we had to leave for Bible study that I was able to work some more on it.  Now, in Donna's video, she used Tattered Angel's new Glimmer Glaze.  I don't have any, and I don't have any money to buy any.  BUT, I do have this: 


AND...


So...my thought was that I could attempt to create my OWN version of Glimmer Glaze.  See my experimenting?  I was definitely getting shimmer!!


Donna did drippage with hers.  She used a paintbrush...which I tried, but I didn't really get the effect I wanted.  So I decided to try something different...after all, that's what this whole Inspiration Journal experience is about, right?  First I tried sponging it on.  It didn't really give the effect I wanted either.


So then I went to the kitchen and found a frosting bottle.  I put a couple buttons in the bottom to use for mixing "balls," then poured in some of the pearlized paint, some re-inker drops, and some glazing liquid.  And I shook and mixed.  And I tested.  And I added more color.  And finally I had the color and consistency I wanted...and I did drippage.  And I sprayed water.  And I heat gunned.


And after all of THAT, my paper was falling apart...leading me to have to add some packing tape to the middle of the centerfold...and fortunately, the paint mixture adhered over the packing tape.  And all of THAT is what got me to those pictures you see above...and where I left things when I went to Bible study, wondering what on earth I was going to do next!!

But by the time I got home, after spending a wonderful time in the fellowship of true friends and in God's word, I knew exactly what my pages were going to be about.  You see, my Inspiration Journal is not just about art or about me learning new techniques.  It's also about me, as a person, and where I am in my life.  It reflects my soul, my heart, the inner parts of me that sometimes simple words in a written journal just can't do.  And over the past few months, one of the toughest things I've had to deal with and one of the things that has caused me more tears and gripping heartbreak than just about anything else in my recent past is struggling with broken friendships.  I was upset just yesterday about something, and one of my dear friends reminded me, "A true friend loves at ALL times."  (Proverbs 17:17)  Not just when it's convenient.  Not just when it's easy.  And I am SO thankful for the friendships I have with genuine, authentic women, who put forth their true selves, who DO love me all the time, who are real and authentic, who don't wear masks or put on falsehoods.  And that's how this page evolved.  :)


I don't remember where I found the quote, but I have it written in a journal where I jot down quotes that I come across that I love.  The flowers are some discontinued Prima flowers that I received in one of Donna's recent grab bags.  The quotes are cut from a Nicole Nordeman book (can't remember the name at the moment).  The writing and drawing is done in india ink.  The stems are of various ribbons and twines.  

Tuesday, September 07, 2010

Finally - last week's Inspiration Journal work!!


Seeing as TOMORROW is Inspiration Wednesday already...I figured I'd better hurry up and get LAST WEEK'S entry in my Inspiration Journal posted!!  I have been so busy being creative that I haven't had the time to sit and edit pictures or blog about them.  Hmm...must figure out better scheduling so that I can fit that in.  


So last week, Donna introduced us to her AMAZING array of watercolor crayons - hers are Caran D'Ache watercolor crayons, which look positively wonderful and I hope to try them one day soon.  I have, in my stash, two tins of Stampin' Up! watercolor crayons - so I was at least able to play with the technique, if not necessarily get the exact same quality of results (for example, mine wouldn't maintain color over gesso, like hers did).  Anyway, I loved this technique SO much - I had never used my watercolor crayons like this.  Mainly, I had used them for coloring in stamps - such a limited use!!  This was WAY more fun!!  I loved how they blended together, and I love how the crayon strokes just disappear completely when you add the water and start painting.

Like Donna did, I started out with a bit of clear embossing, to give some resist once I added the watercolor crayons.  The stamp I used ended up being too fine in detail, so much of it just looks like large areas of embossing powder - but lesson learned.  It still looks pretty cool, I think.  I also used one of my new EK Success (Michael's had them 40% off) edge punches along this side - LOVE the look!!


On the first side of the insert, I continued the color scheme and the quote (which I got off of a Tim Holtz stamp), added a Donna Downey canvas tab (using my Tim Holtz Tiny Attacher), and added a Tim Holtz acrylic tile which I backed with coordinating patterned paper.  I outlined the insert using my india ink pen (as I did most of this entire entry).


On the second side of the insert, I liked the bird idea, so I cut one from chipboard using my Cricut, glued it to the insert, and gesso'd the entire insert.  This time, for some reason, the watercolor crayons DID work (while on my main page, the gesso resisted the crayons).  I love how you can still sort of see the lines behind the paint and gesso - it was originally a receipt-tag or something like that.  I printed the word "dream" on my Brother labeler, cut the letters apart, and stuck them on the bird, then outlined everything with my india ink pen.  I added a few Prima flowers and the orange ball trim (all of which had arrived JUST THAT DAY in some AWESOME grab bags from Donna Downey's website).  (Read:  If you ever get the chance to get one - or four - of those $5 grab bags - they are so TOTALLY worth it!!!)


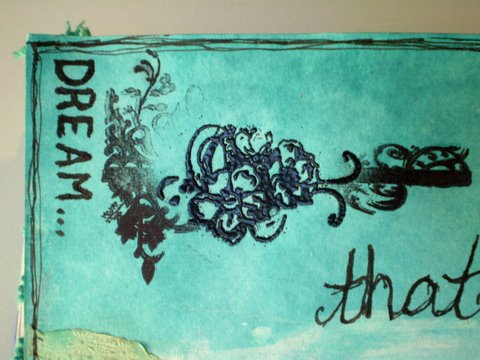
In the upper left hand of the left page, I attempted to stamp a floral-divider kind of stamp by Tim Holtz.  But despite a couple times of trying, I could not get the center of the image to stamp well.  So...I was innovative...and took a different stamp (Prima, I think?)...which was also floral and similar in look...I inked with Versamark, and heat embossed with black embossing powder.  Then I used my india ink to write "Dream" along the edge.  Overall, I ended up loving the look.  Happy accidents...they are the best!


On the lower part of the left page, I added part of a paper doily (also from a grab bag), which I had spritzed with Glimmer Mist and then rubbed over with some light brown chalk ink.  I ran the doily through my Xyron 900 to add adhesive to the entire back easily, rather than messing around with any kind of wet glue for such a delicate piece.  I stamped the umbrella man and word quote in charcoal chalk ink, but wanted the words to be bolder, so I went over them with india ink.  (Note - behind the words, you can see some of the drippage effect, from when I sprayed the page with water after I painted the watercolored areas - SO cool!!)  I, of course, had to finish up by adding a tag with the date.


So, tomorrow is another Inspiration Wednesday!  I'm just going to go ahead and say it - I probably won't get mine posted ON Wednesday!  LOL  I did do lots of creative things over the weekend, so hopefully I can get some of those things posted soon too.

Have YOU been playing and being creative???

Wednesday, August 25, 2010

Inspiration Wednesday 8/25/10


Once again, it's almost "Inspiration Thursday..." but I'm working on it, really, I am!!  :)  Today's page was a bit of a challenge for me.  I actually STARTED it last Saturday, when I was stuck on bedrest, and was playing with my watercolor crayons and watercolor pen/brush thing-a-ma-jig - in bed.  I had painted one half of the page orange and the other half pink, and planned to build on it for this weeks IW page.

Then on Monday of this week, once I got off bedrest (another story for another day), I decided I wanted to try doing some modeling compound on the page, so did a little more work.  I used Donna Downey's HUGE foam tree stamp and first stamped the trunk and branches using some Folk Art brown of some shade; dried that, then stamped the leaves using Golden fluid acrylics Phtalo Green.  After that was all dried, I used Golden  Molding Paste with the leftovers from some butterflies I had recently cut on a Cricut machine (I kept them for this purpose) and created 3 butterflies on the page - a large, medium, and small one.  I knew they would need time to dry, so I left them to dry for a couple days (it doesn't actually take that long).

Finally, today, Wednesday, the day I look forward to every week...Inspiration Wednesday.  I couldn't wait for my kids to go down for a nap.  I watched Donna's video in awe...I always love her work.  It's always inspiring.  It also made me long for fall, for some reason, and I suddenly hated the extra-bright colors on my page even more than I already had been when I woke up this morning.  So I took some Golden fluid acrylic Nickel Azo Gold to darken the orange some, and a mixture of Golden fluid acrylic Quinacridone Magenta and heavy body acrylic Ultramarine Violet, and carefully spread those over the page, making sure not to accidentally paint my butterflies before I was ready to.  I painted right over those green leaves that were just way to springy and summery for my fall-wishing self.  And still, it was all too bright.  So out came the Golden Titanium White airbrush paint - time for some drippage!!  Finally - things got toned down!!  I still wasn't sure I was going to love the outcome, but at least we were getting somewhere.  I think the next thing I did was actually to run the top of the page through my new toy, the Zutter Distrezz-it-All.  And then I added a couple lines of stitching with my sewing machine along the right side of the page, just because it felt right.


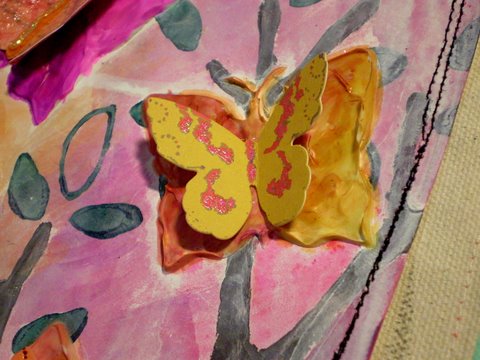
Then, finally, I was ready to paint the butterflies.  I debated over whether to use paint - and if so, what kind?  But in the end, I decided to try something new - why not?  I wasn't loving anything else really so far, so why not try something else new?  So I got out my blending pens which almost never get used, and my new Ranger alcohol inks to see if they could be used together.  I didn't actually Google it.  I just went for it.  And it seemed to work.  I actually really like how they turned out, and how I was able to mix colors.  I used Wild Plum and Butterscotch, in case anyone is wondering.  Cool thing I learned?  When the ink dried out in my little palette, I added a little denatured alcohol to it, and I was able to pick it right back up with the blending pen!!  After each of the butterflies was painted, I added a Cricut-cut paper butterfly on top - using Beacon 3-in-1 craft glue - love that stuff!!  On this top butterfly, I covered the paper one with Tim Holtz's Rock Candy crackle paint - LOVE - and when that was dry, down the center, I added some orange flocking and a line of clear Stickles. (Don't mind my inky finger - they seem to look like that a LOT these days!)  The second butterfly (the middle sized one) is above, and I just added a store-bought paper butterfly to it.


This one below is the smallest of the three molding paste butterflies, and again, I added a store-bought ephemera butterfly to it.  Loving the pink and orange.  You can see the incredible build-up and texture of the molding paste.


This next pictures shows the stitching, as well as the edge of a tag I added to the lower right part of the page.  The tag also came from my ephemera box.  I ran the edge of the tag through the Distrezz-it-All (LOVE that thing!), and stitched another paper butterfly onto the tag (also covered in Rock Candy crackle paint). I also used distressing ink around the edges of the butterfly and the tag.  


After how much I struggled with coming to LOVE this page, (which I finally did come to LOVE), and truly experimenting with new things...I couldn't think of a better quote stamp to put on this page!!  This is another Donna Downey stamp, and is in the "She Said" stamp set.  (A fabulous set if you are going to buy just ONE of her sets, though they are ALL fantastic!!)  I wanted this quote to really pop, so I used my VersaMark embossing ink pad and black embossing powder - but I also tried something totally new.  First I added a strip of some totally random black pipe tape or something to the page (really, I have no idea what kind of tape it is!).  Then, I wanted to make sure the word "BELIEVE" was on a piece of masking tape - it took a little extra work, but wasn't too hard (if you want details, let me know, and I'll explain how to do it).


A look at the entire tag.  I have a lot going on in my life right now, and a lot of it is new...so the "change is good" quote is fitting.  I have, because of my fumble fingers, pretty much quit trying to tie ribbons through holes, so I am totally loving the Tim Holtz Tiny Attacher (no, I am not getting paid by either Donna or Tim, though you would think I am by how much I mention their products, eh?!).  Seriously - this little tool is THE. BEST. TINY. STAPLER. EVER.  When someone else said that, I thought, "Come on, how good could it be?"  That good.  Really.  Get one.  You will not regret it!!  So now I use my Tiny Attacher to staple my ribbons to my tags - SO much easier than fighting to tie ribbons through holes!!  I attached the tag to my page by sewing it right to the page!!  (I was in a sewing mood today, I guess.)


The next two pictures give you a better look at the "white" mini-pom-pom fringe I glued to the bottom of the page.  I love how it turned out.  It really did start out white.  That was before I dunked it in a little bowl with some water and a few drops of Wild Plum alcohol ink, followed by some time in front of my blow-dryer (did I mention my heat gun died mid-way through this page?).  Then I spritzed it a couple times with Tiger Lily Glimmer Mist and blow-dryed it again (trust me - SO not as effective as a heat gun - I think it was still slightly damp when I glued it onto the page).  


I learned my lesson today.  Never make up your mind until your art is COMPLETELY finished!!  I was convinced I was NOT going to like this page!  And now I think it's one of my favorite so far!!  :)

Wednesday, August 11, 2010

Inspiration Wednesday


I know I'm cutting it close getting this posted - it's almost going to be an "Inspiration Thursday" post. I do have a good excuse...really, I do! :) Wanna hear it? Nah...'cause that's all it is...just an excuse.

Anyway, without further ado...today's entry for Inspiration Wednesday. Donna challenged us to use a quote today that we found, well, challenging. I also came across some stuff today...just, you know, that kind of stuff that makes you feel kind of sick inside on behalf of someone else. The stuff that we've all (as women, anyway) experienced...mostly at the hands of other women. And I was reminded, once again, of just how powerful our words really are. And of just how hard it is, at times, to control the tongue.

Once again, I was reminded that listening gets us SO much farther in life than talking. And that wisdom really does come with a closed mouth, not an open one!

As for my page, I used a combination of Golden Cobalt Teal and N5 Neutral Gray heavy body acrylics for the background, with some Golden white Airbrush Paint for drippage. I cut some flowers out of plain canvas using my Sizzix and colored them with Golden Quinacridone Magenta fluid acrylic. That top one, on the top layer, I stamped it first with a teal-colored Cat's Eye chalk paint and heat-gunned it dry before wetting and painting. I used glue and some seed beads for the center of the big flower. I used one of Donna Downey's rubber stamps with the magenta paint for the bird on the branch, and framed the bird with a metal accent. I used black india ink to write the quote, and the cobalt teal paint to stamp the word "listen." I outlined the word "listen" with a magenta colored ink using a glass dip pen (still trying to get the hang of that one). I glued a strip of crocheted trim down the right edge and added a few more flowers for embellishment. I'm pretty happy with how it turned out.

So...you really wanna hear my excuse for my late post? So yesterday morning, the kids were all getting dressed. Anthony was in his room, and I was next door in the twins' room helping them, when I heard a loud crash and that blood-curdling scream that makes a mama's heart start pounding. I go running, to find my 5-year old son UNDER his dresser, which is now front-down, on top of him!!! Images of head injuries, broken bones, etc., are flying through my head, as I she-womaned the massive 5-foot tall MDF Ikea dresser off of him by myself, and began to assess the damages. He had a long scratch across his back and a red mark on his arm, but aside from being scared, managed to escape pretty much unharmed. I consoled him, put his CD-player back on top of his dresser, and vowed to get an earthquake strap put on the dresser ASAP...and then forgot about the incident shortly thereafter.

That is, until about 12 hours later, when every muscle in my back started to clench up into a ball and I started to think, "Why on earth is my back hurting so bad???" It took me a few minutes, and then the brain cells kicked in, and I remembered. "Oh yeah!" DUH! Usually I cannot even slide that darn dresser over a few inches to get something that falls behind it! It is VERY heavy. For me to have run over and lifted it practically off the ground, with all the drawers open and full, back to an upright position, in a matter of seconds - I'm guessing I pulled about every muscle in my back! So this morning I woke up and could hardly move my head forward at all, without feeling it all the way down my spine...thus I made a trip to the doc for some muscle relaxers this afternoon.

After all, I am going on a scrapbooking retreat this weekend - with hours of sitting and crafting involved - I cannot be in pain the whole time!!! :) See? Told you I had a good excuse!

Wednesday, August 04, 2010

Inspiration Wednesday - Aug 4, 2010

So, as you read a couple posts ago, I recently had the incredible privilege of spending an entire weekend with Donna Downey, and since then, have been on, like, creative CRACK.

No, really - my husband is seriously getting tired of me getting out of bed in the middle of the night to go downstairs to my craft room. Last night when I was complaining of being in pain, he had very little sympathy, citing my many late nights lately. "Yes, honey, but when I get that creative urge, I can't help it - I just can't sleep - I just have to go down and DO something with it!!" "Well all I'm saying is that when you don't get enough sleep, your body is going to pay for it."

Fast forward twenty minutes...

Me - "So honey, I had a few different ideas for over our bed, in between the curtains (that are basically a fake headboard, as there ARE no windows behind our bed, which was what HE said when he came home to find the curtains hung there in the first place). First, I was considering some sort of vinyl wall decal, like a chandelier or something, or maybe even vinyl frames, with or without frames. Second, some sort of canvas painting BY ME, of course. Or third, a set of four smaller canvases, each covered completely in a photo, but also with one letter so all together they spelled 'LOVE' in a 2x2 format. What do YOU think?" I hear chuckling in response. "Why are you laughing at me???" No response...just more chuckling. "No, seriously, honey, why are you laughing?"

Finally, I figure it out. It's 11:45 p.m. We've just had a discussion about me NOT staying up late to craft at night. "Oh no, honey, I'm not planning to do any of this TONIGHT...I'm just saying I have these IDEAS." He's still laughing.

I think it had something to do with the fact that he was ready to fall asleep and my creative mojo was just waking up. I'm not quite sure what it is about midnight, but for some reason, that's about the time my creative mojo seems to come alive. Maybe it's because that's when everyone else in the house is ASLEEP and I can actually have peace and quiet? Or when no one interrupts me? I don't know. At any rate, I woke up this morning, knowing it was Inspiration Wednesday, DETERMINED that I would get a page done in my journal done BEFORE midnight!!!! And not only did I get it done before midnight - I had it done before I even got the kids in BED!!! Go me!

I had a LOT of fun creating this page, even though there is also a LOT of truth behind what it says. Even though I've been doing a lot of creating lately, including even selling a piece of art (really? me? I still can't believe that!), I have a tremendous fear that I have no artistic talent. I am SUCH a perfectionist, and that has always impeded my ability to even START the creative process - which is why Donna Downey is SOOOO good for me!!! She colors outside the lines. She breaks all the rules. What rules? There ARE none! Scrapbook in chronological order? Forget it! Figure out what you're doing ahead of time? Why? Just start...and go from there! I'll admit, it's still hard for me to do that...but it's getting easier with each attempt.

When I started this page, I started with some happy colors - two of my favorites (one of which Donna kept talking about at the workshops - quinacrinodone magenta - and I probably totally spelled that wrong - but LOVE it!) and yellow ochre. It was a little TOO happy, given that I knew I wanted the page to be about my fear of failure in art, so I decided to add some dark purple drippage. I thinned some dark purple paint - but even the darkest purple paint I had wasn't dark enough, so I got an idea - and I added some "elegant eggplant" re-inker ink (Stampin' Up) to the mixture and that definitely did the trick - it darkened it and it thinned it some more. So the drippage was great - I still sprayed it with water, and then added some more at the top again, but it gave a great effect.

But then I felt like it was a little TOO dark and dreary...and earlier in the day, I had been playing with making some paper flowers ALA another Donna-style (Donna Salazar - I've decided all Donna's must be fantastically creative!) and had mixed up some homemade gold shimmer mist...so I spritzed some of that over the entire page, which gave a lovely effect.

I also ended up using a couple of those paper flowers on the page, one of which you can see here. This one is double layered - the bottom layer has a mixture of Tiger Lily Glimmer Mist and my homemade gold shimmer mist, and the top layer has a mixture of some homemade purple shimmer mist and some turquoise Glimmer mist.

This side view gives you a great view of just how shimmery the page actually is from the golden shimmer mist. You can also see a rhinestone from a rub-on/rhinestone combo.

I stamped a few butterflies in black Staz-on, because I thought they lent well to my message. How does that saying go - something about just when the caterpillar thinks things are the worst, he becomes a butterfly and learns to fly? I've always liked that. Anyway, I also stamped this other quote in the lower right hand corner - a Tim Holtz stamp - which I love!! And you can see the brown circle tag that a certain person got me hooked on. Ahem.

This is the second paper flower I created. The first one, up top, was made with music score pages. This one here was made from book text pages. Both were made in the same manner, using the tutorial on the website posted above. This one uses just the Tiger Lily Glimmer Mist and homemade purple shimmer mist.

A good view of the bottom half of the page. Oh - and you should know - just the thought of free-handing the writing was hard for me. I hate my handwriting, hate free handing stuff - so even that was a big step for me!! Stamping, flowers - those are easy. Free handed writing? Not so much. The white writing was done with a ...um...can't remember the name of it now and don't want to go downstairs and find out right now...marker. Slick writer? Is that it? Then for "FEAR," I didn't actually have a stamp that said "FEAR," nor did I have an alpha set, but I was able to just paint white paint onto the F of one word, the E of another, etc, drying in between each one, until the whole word was done. And then I outline "CREATING" with my india ink fountain pen (which I finally got to work right).

And a nice view of the top half of the page. I just love the shimmer on that flower, and you can see the little rub-on with rhinestones over on the left side of the page. (I have a slight addiction to both flowers and rub-ons.)

See? Close-up of the rub-on. Isn't that a cool mix of colors in the paint behind it? It makes me happy!

So, there you have it - my first official Inspiration Wednesday!

LinkWithin

Related Posts Plugin for WordPress, Blogger...