I tell you what - I am really loving playing with this December Paper Trail kit!! First, the frame project was a blast to make, and now, these cards were SO FUN!! These papers by Lily Bee Designs are just wonderfully versatile and coordinate so well together, the kit makes it super easy to put together great projects, no matter what you're making.
This first challenge of "put a stamp on it" was not such a stretch for me - me who recently "de-stashed" by getting rid of over 100 stamp sets!!! Yep, you read that correctly!! Not to fear - I still have well over 50 stamp sets still in my stash, and somehow still manage to pick up a new one here and there - and always have more on my wish list. Actually, my papercrafting - really, my entire artsy-craftsy life - started out with rubber stamping. I went through a time period of several years when I didn't even pick up a stamp, though, and I thought I was done stamping...but then just in the past 6 months or so, I've gotten back into it. There really is SO much you can do with stamping and ink - I think that's what draws me to it...the huge variety of techniques. I'm a technique junkie, of sorts. Anyway, for this challenge, I made three different cards for you, all using different stamping techniques.
**********************************************************
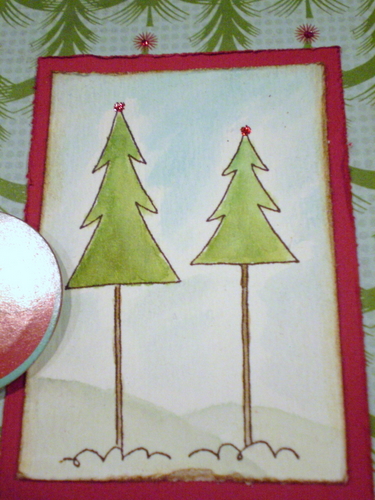
For this first card, I stamped an outline stamp of a couple trees on a small piece of watercolor paper. I like using watercolor paper for this technique because it holds up well and you can move color around nicely on it. After stamping the trees in brown permanent ink, I rubbed distress inks directly on my craft sheet, then used an aqua painter (a brush filled with water - you could also just use a paint brush and water) to pick up the ink and paint the stamped trees. I also painted some snow and a faint sky background. I used a paper distresser along the edges of both the watercolor piece and the red piece beneath it, and inked the edges with distress ink.
Finally, for a little glitz, I added some Christmas Red Stickles over each red dot at the top of the Christmas trees on the background paper.
***********************************************************
For the second card, I only did a little stamping - I stamped "Joy to the World" on one of the kit's cardstock stickers, layered it on black cardstock, and popped it up on foam squares, on the front of the card; and I stamped a greeting inside the card, as well. I layered a couple of the pattered papers from the kit, using a notebook-paper edge punch along the top of the red one. I added distress ink around the edges of both papers. I made a paper rosette with the black and white paper, using my Martha Stewart scoring board, and layered one of the chipboard buttons from the kit on top of it, placing some additional chipboard buttons beside it.
The greeting inside the second card.
**********************************************************

Finally, the third card. This was my favorite to make - I think because I love the colors, and because I absolutely LOVE this Tim Holtz Sizzix die that I used. It's called "Townscape," and I just think the miniature houses are adorable!! They have so much potential - and for every season!! Anyway, I created the houses by gluing a piece of the black cardstock to a piece of corrugated cardboard. I then ran it through my Sizzix Big Kick with the Townscape die, cutting the houses. I trimmed just a tad off the bottom, and a little off each end, to fit the card. Then I used my Snow Cap (white) Adirondack paint dabber to ink up my definition background stamp, and stamped the houses. I thought it looked really cool, with the black text on the white snowflakes on the background paper. (Note - I love using my paint dabbers on my stamps - and you will too - but make sure you wash them off right after you use paint on your stamps, or you won't be happy with your stamps the next time you go to use them!) I used the paint dabber to add a little "snow" to the roofs of the houses as well, and then glued the strip onto the card.

Then I added the 25 with Thickers from the kit, and stamped a sentiment inside.
So...there you have it. Now it's YOUR turn!! Have you grabbed your December Paper Trail kit yet? And if so, what are you creating with it? Stamping isn't just for cards, either - you can certainly use stamps on scrapbooking layouts, tags, home decor projects - most anything! Make sure you add your stamped project to our linky widget in the challenge post so that we can see what you've created and for your chance to win some of the Lily Bee papers from this kit!! You have until Saturday, December 18, at 5 pm EST to get your project linked up for your chance to win!