Showing posts with label painting. Show all posts

Tuesday, November 15, 2011

Art Journal: 30 Days, Days 11-14

Wow, it's hard to believe that we are already half-way through our class with Julie Fei-Fan Balzer, 30 Days In Your Journal.  I think I'm going to need a support group after we're through...I'm having such a good time in the class, and the accountability is awesome.  I love being able to post my pics to the Flickr group and receiving feedback from the other class participants, as well as seeing how everyone else in the class is interpreting Julie's instruction and ideas.  When I started, I wondered if I'd really be able to commit to art journaling every day for 30 days, and now, suddenly, 30 days seems like such a short time.  I find myself wishing the class was just a bit longer!

Anyway, here is my spread for days 11-14.  I am super happy with how it turned out.  The page on the right was a background I had previously completed during Christy Tomlinson's She Had 3 Hearts art journaling class...but I didn't know where to go from there.  It was really bright, and even though I loved the page, I just wasn't sure what to do with it.  The page on the left previously had a couple random stamps on it, which didn't turn out well, so I had painted some random paint over it.  Then when we prepped these pages, with Color Wash sprays, I just let the sprays cover the paint.  I used colors that would complement the colors on the right page, and then on the right page, decided to use white Golden Airbrush paint to create drippage and soften the colors.  


Once the journaling was done, I did the large writing and the doodles using a paint brush and black fluid acrylic - my first time successfully doing so!  It's really hard with my shaky, weak hands (due to my neuropathy and rheumatoid arthritis) to do detail painting, so I was super excited when I was able to successfully paint the writing and doodles!  I used fluid acrylics to paint in the painted writing and doodles.  I used oil pastels (cheap children's ones from Faber-Castell) to lighten the circles with the numbers and to darken the other circles.  

There is still plenty of time to join the class if you are thinking about it - the classroom is going to be open for 3 months.  Come on over and join us!

Friday, November 11, 2011

The Crafter's Workshop: "Ava" Stencil

Today over on Craft Test Dummies, I have posted my second review (here's my first) of the stencils made by The Crafter's Workshop.  You've seen me write about them here before, and I've shown you projects I've used them on...so you already know that I love them.  Today I wanted to show you one of the face stencils - Ava is her name - and just how versatile she is.  I showed you an art journal page in my last post, where I used her in her most basic form...I simply traced her lines with a Pitt Artist Pen, then went over the lines a bit with some oil pastels.  I didn't color in her face, no paint, nothing...very simple.  But today, I'm showing you my very first attempt at something completely different (no judging allowed...I just told you, this is my FIRST ever attempt...!).  

I started out in a 9x12 art journal by scribbling all over the paper with Derwent Inktense watercolor pencils, and then adding water with a brush.  I love these pencils because once the color is dissolved and dry, it is permanent and is no longer water-soluble...so you don't have to worry about it moving around on you as you work in layers over it.


Then I placed the 6"x6" Ava stencil on my page.  I decided I was only going to use the face and neck portion of the stencil, so I traced those parts with a pencil onto my page, along with just a bit of the hair as a guide for reference.  You can just barely see my pencil lines in the photo below - I wanted to keep them light so they wouldn't show through the paint.


Then came the challenging part...for me, at least.  I've *never* painted a face before.  Not ever.  Nor have I ever drawn a face.  I am clueless when it comes to shading and shadows and all of that...you know, the technical aspects of art!  (I really do want to take some actual art classes someday and learn these things!)  So I just went for it and started adding paint.  And my first attempt was a hot mess...but fortunately, it's just paint...so I added some more paint, and painted right over her, until I found a happy medium.  I knew ahead of time that I wanted to put long, flowing hair on her (though I hadn't really planned on it being *quite* so poofy...but hey...what can I say...she wanted to have poofy hair!).  So this is how she looked after I painted over the traced lines.


And then the magic happens.  I placed the stencil BACK on her, and used a cosmetic sponge with some Claudine Helmuth Black Gesso (LOVE that stuff!), and I stenciled in her eyes, nose, lips, chin, and neck lines again.  It's AMAZING what an instant transformation just that little bit gives.  That gave me a guide.  Then I used my paint brush and continued from there, adding her eyebrows completing her mouth, and filling in all the hair lines.  (I also went back in with some white to add a few highlights on her face and neck...it seemed to help.)


Now the page is all ready for me to add some other elements and do some journaling.  While I know she's no masterpiece, having never painted a face before, I am pretty happy with how she turned out...and I owe it all to my friends at The Crafter's Workshop!  

For more details on this and other great ideas for using the face stencils, be sure to check out this great post on stencil designer Julie Fei-Fan Balzer's blog!!  And make sure you hop over to Craft Test Dummies to check out all the other things I did with these great stencils for my review!

Are you a fan of The Crafter's Workshop stencils?  I'd love to see links to projects you've made using them!

Supplies Used:


BLICK ART MATERIALS: Save up to 82% on Select Items through November 16th!

Wednesday, August 24, 2011

Out of the Box Art Journal Page

Over on Craft Test Dummies on Monday, I am posting a review of this adhesive tape runner, Glue Tape by Plus.  It was new to me - I had never heard of it - and Jenny had sent it to me after Summer CHA to give it a try.  Make sure you go check out my review - I was pleasantly surprised by how it performed, especially since it is lower priced than many of the tape runners on the market.

Anyway, while doing my review, one of the "happy accidents" I discovered (I almost ALWAYS have accidents while arting - some are happy, some not so much...) was that this stuff makes craft foam stick really well to itself!  Why, you might ask, would I care about this?  Well, I had just seen, a couple days prior to playing with the Glue Tape, THIS tutorial, and had picked up a pack of thin, cheap (as in Dollar Tree) craft foam in the hopes of doing the same thing. The foam was super thin, and one layer wasn't going to work for the stamps - so I needed to double it up - so I was happy to find that the Glue Tape would make it easy for me to do this.


So, anyway...on my shopping trip...which was a LOOONG one...picture this: me, all four kids (my 6-year old, my twin 3-year olds, and my 10-month old).  We've already been to the bank and the post office (where I had to drag all of them inside, to stand in line, to mail 2 packages - all because I only had cash to pay for the postage...normally I print Priority Mail labels online and do Carrier Pick-up).  I was in search of miniature rolling pins, or else cheap regular-sized ones.  I called Jo-Ann's - they said they had none.  I called Michaels', and they said yes, they had them in the dollar aisle AND that they were on sale 40% off!  Score!  So off we went to Michaels.  We searched the store up and down and found ONE miniature rolling pin.  One.  And it wasn't on sale.  So we got it and headed for the Dollar Tree, in hopes of finding some regular-sized ones for a buck each.  Do you know that they carry every kitchen utensil you could possibly need at that store EXCEPT  rolling pins?!  Sigh.  

At that point, the kids were tired and hungry and getting cranky.  Or maybe it was me who was getting cranky.  It takes a lot of work to get 4 kids in and out of car seats at every single stop.  Anyway, I stopped to think for a minute.  Or five.  I wondered if perhaps I should think outside the box.  Why did it have to be rolling pins?  Wouldn't pretty much ANY long, slender cylindrical hard object work?  

So off to Home Depot we went.  I grabbed a 1" diameter, 10-foot long piece of PVC pipe off the rack, and asked a worker if he could cut it down.  He said sure, and asked how many pieces and how long.  I hadn't really thought about it, so I quickly said, "Uh, how about ten 1-foot pieces?"  He agreed, and I asked how much it would cost for the cutting.  "Nothing, just whatever the pipe itself cost."  The pipe?  Cost me a whopping $1.49 plus tax.  Now THAT'S what I'm talking about!  I was so excited about my score that I completely forgot I'd been wanting to pick up some washers and a few other trinkets to use for stamping as well...ah, well...I guess we'll need to get out of the house some other day.
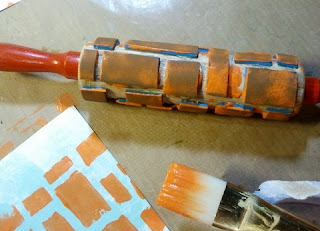

For this one, I went ahead and used the ONE miniature rolling pin we did pick up.  (However, I have already made a stamp from one of the PVC pipes, and it works great!  And I'm SO glad I have 10 of them - because this is totally addicting!)  After I cut a bunch of squares and rectangles, I used my hot glue gun to glue them to the rolling pin.  I used a brayer to lay down some paint on my journal page, and then used a paint brush to put paint on the rolling pin before rolling it across my journal page.  This is how it started out:


And after many, many layers (don't you just LOVE layers?!  I can't get enough layering!) - this is what I ended up with.  I had no idea where I was going with the page until almost all of the layers were on the page and I had worked on it over the course of almost a week.  

And then suddenly, I was inspired by the squares and rectangles to journal about how much art has changed the way I look at life and approach life.  I used to be such a "color inside the lines" kind of person, such a rule-follower.  I lived such a constrained life.  But I feel like art has freed me in so many ways - is freeing me in so many ways.  So that's what the page is about.  And I love the way the circular journaling looks in comparison to the boxed-in title.  I wasn't sure I was really loving the page until I finished the journaling, and then I loved it!


What have you been up to lately?  Leave me a link - I'd love to see.  And don't forget to come visit at Craft Test Dummies on Monday for the Glue Tape review...I'd love to have you visit over there!


Wednesday, June 08, 2011

Canvas Art

I think I mentioned a couple posts ago that one of the online workshops I'm taking is called the She Art Workshop, by Christy Tomlinson.  I just have to tell you - I cannot, cannot, cannot speak highly enough of Christy or of this workshop!!!!  Seriously.

When my friend signed the two of us up for the workshop, I was more than a little intimidated.  I thought it was a bit above my skill level.  I thought 3 weeks was not nearly long enough (even though we have access to the material for 3 months, it's still only 3 weeks of new lessons.)  I saw her art before taking this workshop, thinking to myself, "There is just NO WAY that in 3 short weeks, she is going to be able to teach ME how to do THAT."

I was wrong.

I am amazed at what an awesome teacher Christy is - the workshop is WELL worth the money.  It is very well put together, I have learned SO much, and did I mention that I'm having a total blast?

So I never showed you my first canvas.  That's because it's a birthday gift for my sister.  Whose birthday was in April.  And I still haven't mailed it.  Yeah.  I'm kind of bad about that.  Mailing stuff.  (Hides head under a bag.)  Sigh.

But.  I get to show you my SECOND canvas!!  I am SO happy with how this sweet girl turned out, and with my first attempt at a "scene."  I used a lot of products from Fancy Pants (more on this in my review of Fancy Pants on Craft Test Dummies on June 17).


This is an 8" x 10" flat canvas.


Don't you love the glittered words from Fancy Pants?


I die cut the flowers from corrugated cardboard using a Sizzix flowers die and doodled the stems/leaves.


The grass is a combination of layers of paper and paint, along with stamping and rub-ons.  Isn't it fun?!


These two little birds are rub-ons and they just crack me up...they are SO stinkin' cute!!


Can you get a load of the texture in her skirt?!  Is that awesome, or what?!  And check out those shiny red boots she's sportin'!!  Seriously cute!  (And don't get me started on the polka dots!!)


Her hair is the one thing I really need to work on.  My first canvas, the hair was better...this one, I feel like the braid needs some work.  But still, I think, not bad for my first go.  I also want to try some different styles of clothes, and try making a girl with arms showing (instead of behind her back, like this one - you thought she had no arms, didn't you!).

So...what do you think?  Worth the $45 for the workshop, yes?  I promise you, there is NO WAY I could ever have created anything like this before I took this workshop!  And so much of what makes these canvases adorable is in the details...details I never would have realized were there (or been able to figure out how to create) had I not taken this workshop.  The best part is that once you learn how to create them, they really are not that difficult, and truly are LOTS of fun to create!!  I can't wait to make more!!

Monday, March 14, 2011

Altered Frame using Plaid Crackle Medium

Altered frame using Plaid Folk Art paints and crackle medium

A couple weekends ago, I had the privilege of making this altered photo frame for the birth mother of my 4-month old son, as she needed a gift to give to her mother for her birthday.  (You can read more about that story and our weekend here.)  I had been inspired by this frame by Tammy Tutterow, and got a few of my ideas from her.  I started out with a random $5 framed print from Big Lots, which was about 12" x 12" in size.  After the backing, print, and glass were removed, the frame was painted with a base coat of Pink Balloon Folk Art acrylic paint.  Once dry, a layer of Folk Art Crackle Medium was applied and left to dry overnight (it doesn't actually NEED to dry that long...it just happened to be midnight when this happened!).  The next day, I applied the final layer of Folk Art Titanium White acrylic paint, and immediately as the paint dried, the crackle effect took place - it was very cool!

A close-up of the frame so you can
see the crackle effect - the pink paint
peeks through the white
Then I put a coat of spray adhesive on the actual print from the frame (I used it as the base for my project), and laid on a piece of Warm & Natural batting that I had cut to size.  I laid the piece batting side-down on a larger piece of plain canvas, and on the back side of the print (which was a cross between cardboard and mat board), I applied Glue Ring adhesive by Glue Arts.  (Let me just say, I had never used this before - and it totally ROCKS!  It has major sticking power!!!!)  I pulled the four sides of the canvas around to the back of the print and stuck it down onto the adhesive, and it held perfectly.  Now I had a wonderful blank canvas to work with, and it had just a touch of poofiness under it due to the batting - just the look I was going for!


I had Shelia put on the Distress Inks...Victorian Velvet, Spun Sugar, and Antique Linen.  I showed her how to apply the ink, and using an ink applicator and blending tool, she applied ink all over the canvas, starting darker at the edges and getting lighter toward the center.  I also had her cover the grunge board flourish in Spun Sugar Distress Ink, followed by Spun Sugar Distress Stickles.


I took a piece of natural-colored lace, rubbed the Antique Linen Distress Ink pad over it, then spritzed the lace with water and crumpled it so the ink would disperse a bit.  I dried it with a heat gun, and adhered it to the back sides of the canvas piece using the same Glue Ring adhesive.  At this point, the canvas piece itself was ready to go into the frame; I put a bit of Craft Krazy Glue around the lip of the back side of the frame, and pressed down, then used my glue gun to go all the way around, sealing the edge between the canvas piece and the edge of the frame.  (This was a unique frame that had no pieces to hold the piece in; the print was originally stapled into the frame.)

Shelia had a nice picture of her mom, in front of an elephant, on her phone, so I had her email that to me, and I was able to print that from my computer.  I first added some Spun Sugar ink around the edges of the photo, then distressed the edges of the photo, and finally inked the edges with Walnut Stain ink.  To color the white paper doily, I rubbed the Victorian Velvet and a bit of Vintage Photo Distress Ink pads on my craft sheet, spritzed it with water, and laid the doily on top of it.  I picked it up and laid it down again, to absorb the ink colors, and once it was saturated, I dried it with my heat gun.  

I glued the doily to the canvas using Beacon Fast Finish Decoupage.  I added a glittered cardstock frame from my stash, using the same glue.  I added the grunge board flourish, adhering it with Beacon Fabri-Tac, and added the photo to the canvas with Helmar Liquid Scrap Dots.  

Next, I cut a rosette using the Tim Holtz Rosette Sizzix die, from a sheet of My Mind's Eye paper, assembled it, and inked the edges with Vintage Photo Distress ink. I topped it with a glittered cardstock die cut from My Mind's Eye, and adhered it to the canvas with my hot glue gun.  I made a flower from crinoline using the Tim Holtz Tattered Florals Sizzix die, following Tammy Tutterow's tutorial here, and added a heart button to the center with hot glue.  I used the hot glue gun to adhere the flower to the canvas as well.


I finished the frame by adding an Artisan Element from Pink Paislee above the photo, which I inked a bit with Victorian Velvet and Vintage Photo Distress Inks.  It was self adhesive.  Finally, I tied a piece of light pink organdy ribbon through an Idea-ology word key, heated the ribbon with a heat gun so it would crumple a bit and will not fray, and adhered it to the canvas with my hot glue gun. 

And that's it.  The project was finished - and Shelia loved it...and more importantly, per her report, her mom loved it too.  And THAT makes ME happy!!

Monday, October 11, 2010

Un-blogged Inspiration Journal pages

You've probably noticed that I haven't posted an Inspiration Wednesday post in a couple of weeks.  Why not?  Hmm...I don't really know, other than I've just been playing more with shipping tags and paper rosettes and distress inks than in my inspiration journal, I guess.  So it's not that I haven't been playing creatively, it just hasn't actually been in the journal.  

I did actually do a page, though, last weekend (Oct. 2), that was based on Donna's Sept. 29 video.  I just never got around to posting it!  Ha!  So...here is that page...you'll notice that again, I did almost the exact technique that Donna did.  I still don't have the same watercolor crayons as she does, so I have a very limited color palette in mine, but they still let me have the opportunity to play.  And I must say, I do love them every time I play with them...there's just something SO cool about watching those crayon lines turn into paint right before your eyes!


I did not, however, use black and white india ink for my twisty line, like Donna did.  I used black and white Galaxy markers (by American Crafts) for my line...for the finishing of it, I mean.  I started off with a charcoal pencil like she did.  I love my main quote - taken from a Tim Holtz stamp - "Not all who wander are lost."  I don't think I even own that stamp - yet - but I love the quote.  Around the twisty line, it says, "Art washes away from the soul the dust of everyday life. ~Picasso~  Be...Create...Risk....  Creativity is an endless journey where we should always take the scenic route.  Explore...Journey...Art."

***********************************************

This second entry which I never posted was one I did back in August, during a weekend when I was on bedrest for several days due to an injury.  I have spent many months on bedrest in the past - during each of my pregnancies, I was on bedrest for 3 months, due to preterm labor - but it was much easier to swallow then, given that I had a LOT at stake!  This time, with 3 young children to care for, and to be honest, a GIANT need to be downstairs in my crafting studio - NOT upstairs in bed! - I was most definitely having a pity party for myself!  Donna was on vacation that week, I believe, and had done her Inspiration Wednesday video on the road, using her india ink/pen and watercolor crayons or pencils to paint flowers in a book.  I didn't do anything that day, but over the weekend, I realized there was no reason I couldn't take MY fountain pen, watercolor crayons and my Stampin' Up! aqua painter brushes upstairs to my bed.  I already had this page in my inspiration journal with book text embedded, using gel medium, and a light wash of paint over it.  I figured it was the perfect page for me to draw some flowers and color/paint them in.


I also colored the inclusion page next to it, which happened to be a yellow envelope...and found that they tend not to take watercolor paint very well...as you can see by the muddy-sort of color.  I used my india ink to write my self-pity over it, "Bedrest sucks!  [especially when you're not even pregnant!]  Is there a flower to go with that?!"


A few days later, once I was cleared from bedrest by my doctor, I added the ribbon to the main page, as well as the black die-cut fence, since I felt like it sort of went with the pity-party theme much better than, say, a white-picket fence would.  I also added the journaling note-page with the caution, "Warning: Pity party up there."  I added a few black line-drawing rub-ons and painted them in too.  Ahh...well, it IS supposed to be part art, part JOURNAL, right?!

Monday, October 04, 2010

Random weekend crafty fun


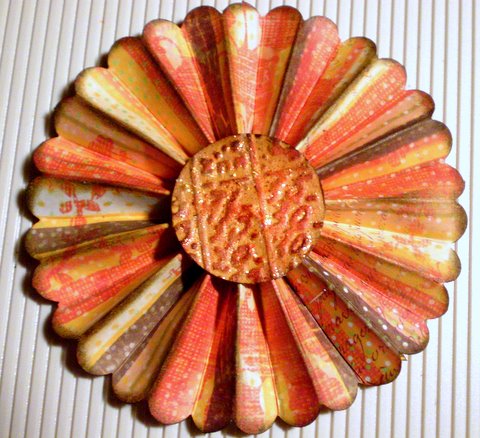
How completely GORGEOUS is this flower rosette?!  I have been admiring these paper rosettes for a while now, on other people's blogs.  I've seen tutorials on how to make them, and I've seen Tim Holtz's new Sizzix die cut that makes it super easy to make the rosettes.  My super-sweet hubby gave me a Michael's gift card this weekend, and I was able to get a few hours of ME time this weekend, so I spent some time wandering the aisles of Michaels, loving their new-and-improved selection of Tim Holtz products.  Anyway, they do not have the new rosette die...but I was thinking that I might want the Martha Stewart score board anyway, so that I could make multiple sizes of rosettes...so I got one!  Additionally, I did find a pair of Tim Holtz Sizzix embossing folders (the one with the notebook page and the numbers collage).  My first few attempts at making the rosette failed, but after watching this YouTube video, I finally got it right (AND got the idea to scallop the edge before scoring the paper, which I LOVE, anyway).


I don't remember the name of the paper pad this sheet of paper is from.  I used a scallop-edge punch from Stampin' Up!.  For the center of the rosette, I used the numbers collage embossing folder to emboss a sheet of mustard-colored cardstock.  I then used distress ink pads direct-to-paper to rub over the raised portions (colors used - Barn Door, Spiced Marmalade, Vintage Photo).  I punched out a circle, and inked around the edges with Walnut Stain, then glued it onto the rosette.  I also used Vintage Photo and Walnut Stain distress inks with a foam ink applicator to apply ink to the scalloped edges of the rosette and the raised "mountains" of the rosette.  Finally, I added some Scattered Straw and Spiced Marmalade colored Distress Stickles over the  embossed center of the rosette to give it a bit of vintage sparkle.  


Can you see that gorgeous sparkle from the distress stickles?  I LOVE them!!!  They are more matte and muted than regular stickles, and have a more vintage look to them.  They are quickly becoming a favorite of mine!!  I think I have 9 colors now...but STILL haven't found the ONE I've been searching for - Rock Candy!!  Anyway, I can't wait to make more of these rosettes and put them on some fun projects!!  (Or even make a project out of just the rosettes...can you see a rosette garland in your mind??)
*******************************************************


This next project is one I did with the kids, and I got the idea from here.  I free-hand drew the tree onto kraft paper and used removable glue dots to stick it to the slider doors.  I used recycled (i.e. the brown ones, not ones I've used!) coffee filters, and I sprayed them with water before the kids began painting them.  Rather than use watercolors (which the twins tend to really dig the paintbrushes into), I just watered down some tempera paints.  They had a blast - especially Mackenzie, who dumped the bowl of orange paint not once, but twice!  I let the coffee filters dry, and then cut various sizes and shapes of leaves out of them.  The kids then helped me stick them to the slider door...on the tree, and falling down to a "pile" near the bottom.


I love the colors of the leaves, and the way they seem to have a stained-glass effect against the outdoor light.  AND, as a bonus, while it was VERY hot all week, like magic, today it was wonderfully cloudy and cool!!  It was almost as if putting up the "fall tree" brought with it some "fall weather."  :)  If only the fall weather would stick around!!


*******************************************************


This final project is a simple little tag I made using another paper flower technique.  It was originally designed to be made using Tim Holtz's grungepaper, but not having any yet, I've been using cardstock.  I first made them on my fall banner, but since then, have learned that coating the flower pieces with Mod Podge on both sides before assembling the flowers actually helps a lot in helping the flowers keep their structure and gives them a really cool leather-like texture.  To make this tag, I started with a piece of pale yellow cardstock.  I cut the tag on my Cricut, and used an EK Success edge punch along the bottom.  I cut a 1/2" circle using a punch, out of the same paper I was using for the flower, then used a 1/4" hole punch to punch the center out of it, thus creating a "hole reinforcement" for the hole at the top of the tag - a technique I learned during one of the many tutorials I watch.  I then used 3 leaves I cut from my Cricut as masks, around which I applied several colors of distress inks and some Glimmer Mist in tiger lily.  


Finally, I stamped "gratitude" along the bottom, and tied a ribbon through the top.  I inked the edges of the flower with a little distress ink before gluing it to the tag, and that was it.  I sent the tag off with a note of thanks to a mama who had loaned a baby wrap to me for a while.


OH - I also did a page in my Inspiration Journal...I'll post that sometime this week.  And yes, I realize I didn't post an Inspiration Wednesday post last week.  I just didn't get a chance to work in my Inspiration Journal last week...but I made up for it this weekend.  :)

What about you?  Did you have a creative weekend?  I'd love links to whatever you created, if you did!!

Wednesday, September 22, 2010

Inspiration Wednesday 09/22/2010


Oh my - I'm actually posting my Inspiration Wednesday post ON Wednesday!  And well before midnight!  LOL!!  That would be because A.) I started my page before Donna posted hers, and thus, B.) did not wait until so late in the day to start; and C.) did a more simple page this week.  That said, it was a VERY difficult page to photograph (although it does seem like MOST of my stuff is hard to photograph well with my camera)...indoors, the flash shone off the Glimmer Mist and acrylic paint of the leaves so brightly, yet outdoors in the natural light, I couldn't get the Glimmer Mist to sparkle hardly at all.  So I did my best to share some of both...so hopefully you can get a feel for just how shimmery and warm this page really is!

I was glad I didn't wait for Donna to post hers this week, since I don't actually own any Pan Pastels (or any pastels, for that matter)...so I wouldn't have been able to do that part of the technique anyway.  I just did a simple coat of Ochre Yellow fluid acrylic paint (Golden brand) for the background.  I literally just put a couple drops of it right on the page, sprayed some water on the page, and used a wide brush to spread the paint over the entire page, letting it lighten toward the left part of the page.  Then I took 3 leaves I had previously cut from book text, using my Cricut (the Wild Card cartridge), and glued them down on the page.  I painted over them using Nickel Azo Gold fluid acrylic paint, building in layers, so that it is darker on the outer part of the leaves.  I love that you can see the brush strokes and the layers in some of the pictures - and that you can still see the book text through the paint - the leaves almost seem to have a 3-dimensional look to them.  


Then, I used a mask that I had cut on my Cricut (also Wild Card cartridge), using the Tim Holtz cut-your-own-mask sheets - that's the tree branch you see near the top of the page.  It's self-adhesive, so I stuck it to the page, and used my Tim Holtz distress inks in Orange Marmalade, Barn Door, and Vintage Photo over the  mask and around the edges of the entire page, before removing the mask.  I also went around the edges of the page with a little Walnut Ink distress ink.  I stamped the clock face using an acrylic stamp I made using the  cut-your-own-stamps acrylic stamp sheets for the Cricut (using the Graphically Speaking cartridge), in brown Staz-on.  I then used the same cartridge to cut clock hands from cardstock and glued them on top of the stamped image, and covered them in Glossy Accents, and glued the Tim Holtz metal "cherish" charm in the middle.  I stamped "gratitude" at the bottom of the page, and glued down two pieces of ruler ribbon on the page.  I spritzed the page with Tiger Lily Glimmer Mist - a gorgeous shade of orange with beautiful golden shimmer to it.  Finally, I added my quote and doodled a few lines around the edges using black india ink.


I love how this last photo shows the texture of the leaves!!  They were so simple to do, but I just love them!!  They make me happy!

Thursday, September 16, 2010

Inspiration Wednesday 9/15/2010


As usual, I'm posting my Inspiration Wednesday work on Thursday - because by the time Donna gets HER video up, and I take care of all my homeschooling duties, children who need feeding, household stuff, etc...I just can't manage to get it all done (or posted) by the end of Wednesday!!  LOL  I suppose if I just did my own thing and started first thing on Wednesday mornings, I could...but what fun would THAT be?  I wanna try whatever technique Donna is demonstrating...so I wait for her to post her video and then I get to play along!!

So this week, we painted the background with fluid acrylics using a palette knife!  Totally a cool look!  I love the lines and texture it gives the background.  I didn't have the color of green I wanted, so I had to mix up some Hansa Yellow Medium, Phthalo Green (blue shade), and Yellow Ochre (all Golden fluid acrylics) to get just the right shade I was aiming for.  My pictures don't quite show it right - it's a little bit more olive-colored in real life.  My inspiration for the color was actually the shade of green in the patterned paper I used to make the flower at the bottom of the page (more on that in a bit).


I love this quote - it came from a women's devotional book I have.  I have been working with my 5-year old a LOT lately on focusing more on others' needs than on his own, and on paying more attention to giving than to getting - so this thought has been on my mind lately.


This twisted paper swirly thing - not exactly sure WHAT to call it - was something that Donna Salazar taught during her Tuesday Tutorial a couple nights ago (you should definitely check those out - free online video classes - live - every other Tuesday - there's a link on my left sidebar).  I tore three pieces of book text into about 2.5 inch-wide strips, coated them in Liquitex Gloss Medium & Varnish (she used a Beacon Fast Finish Decoupage, I believe), then gently twisted them one at a time.  I formed a peak at the top, and a sort of flattened part at the other end.  After forming all three and having curved them the way I wanted, I gently twisted all three together and smooshed the flattened bottom ends together, then laid them on my non-stick craft mat to dry.  Once they were dry (I used my heat gun to sort of speed up this process), I spritzed the now-one-piece swirly with some Tiger Lily Glimmer Mist and some homemade magenta colored shimmer mist.  It's hard to catch just how shimmery it really is, in photos - but let me tell you, it really shimmers!  I adhered it to the page using Beacon 3-in-1 Craft Glue (love that stuff!).


The bird, I cut out of the same patterned paper that I used to make this beautiful rose.  I outlined the bird using my dip pen and black india ink, just as I used for writing my quote.  Notice the eye of the bird - I added a drop of Glossy Accents to give it a dimensional look.  I also added several drops of the Glossy Accents to the flower petals to make it look like drops of dew or rain on the flower.  The Accents go on a little cloudy-looking, but dry crystal clear and very glossy, giving a very cool look.  Glossy Accents can also be used as an adhesive and will even adhere paper to metal.

Now - the flower!  This is my newest fun technique!!!  And SO easy it's ridiculous!  I still can't believe I never knew until now how to make these!  Can I just say how much I adore You-Tube?  You can really learn just about anything there - I've learned how to sew, how to knit, and many many other skills by watching videos people have posted on You-Tube.  Anyway, apparently this technique was originally a flower that Tim Holtz made using a Sizzix flower die; however, a very creative woman figured out a way to make them even faster using her Cricut and the George & Basic Shapes cartridge - which is the cartridge that comes with the orginal Cricut...the one I just happen to have.  However, I would imagine you could find a flower shape on MANY of the Cricut cartridges that would work with this technique.  THREE cut flowers is ALL it takes, a few snips of your scissors, some curling of the petals around a pencil or paintbrush, and a hot glue gun - and you've got yourself a GORGEOUS, 3-dimensional rose!  

So...that's this week Inspiration Journal entry.  I hope you enjoyed it...and I hope you do something to express your own creativity this week!  I promise you that the more you take the time to practice being creative, the more you will find your creative impulses exploding in your mind!!

Thursday, September 09, 2010

Inspiration Wednesday (er...Thursday...9/9/10)

I really thought it was just me...so I was really relieved to hear Donna say in her video this week that she often  thinks she's going to hate her Inspiration Journal pages in the beginning, but at some point during the process, she starts to love them.  Because that almost always happens to me, it seems.  I started this weeks' technique late last night, and continued early this morning...and stopped when this is what I had:


Don't hate...I can tell you are as enthusiastic about it as I was!!  LOL  Isn't it BEAUTIFUL?!  So let me back up just a bit and explain how I got there.  I started by using matte gel medium to basically decoupage the entire two pages with pieces of torn book pages.  The look was actually pretty cool - I should've taken a pic of THAT!  I left that to dry overnight (partly because it was after 1:00 a.m. when I finished, but mostly because my hubby would've been pretty unhappy with me for running my heat gun at that hour).  This morning, I woke early enough before we had to leave for Bible study that I was able to work some more on it.  Now, in Donna's video, she used Tattered Angel's new Glimmer Glaze.  I don't have any, and I don't have any money to buy any.  BUT, I do have this: 


AND...


So...my thought was that I could attempt to create my OWN version of Glimmer Glaze.  See my experimenting?  I was definitely getting shimmer!!


Donna did drippage with hers.  She used a paintbrush...which I tried, but I didn't really get the effect I wanted.  So I decided to try something different...after all, that's what this whole Inspiration Journal experience is about, right?  First I tried sponging it on.  It didn't really give the effect I wanted either.


So then I went to the kitchen and found a frosting bottle.  I put a couple buttons in the bottom to use for mixing "balls," then poured in some of the pearlized paint, some re-inker drops, and some glazing liquid.  And I shook and mixed.  And I tested.  And I added more color.  And finally I had the color and consistency I wanted...and I did drippage.  And I sprayed water.  And I heat gunned.


And after all of THAT, my paper was falling apart...leading me to have to add some packing tape to the middle of the centerfold...and fortunately, the paint mixture adhered over the packing tape.  And all of THAT is what got me to those pictures you see above...and where I left things when I went to Bible study, wondering what on earth I was going to do next!!

But by the time I got home, after spending a wonderful time in the fellowship of true friends and in God's word, I knew exactly what my pages were going to be about.  You see, my Inspiration Journal is not just about art or about me learning new techniques.  It's also about me, as a person, and where I am in my life.  It reflects my soul, my heart, the inner parts of me that sometimes simple words in a written journal just can't do.  And over the past few months, one of the toughest things I've had to deal with and one of the things that has caused me more tears and gripping heartbreak than just about anything else in my recent past is struggling with broken friendships.  I was upset just yesterday about something, and one of my dear friends reminded me, "A true friend loves at ALL times."  (Proverbs 17:17)  Not just when it's convenient.  Not just when it's easy.  And I am SO thankful for the friendships I have with genuine, authentic women, who put forth their true selves, who DO love me all the time, who are real and authentic, who don't wear masks or put on falsehoods.  And that's how this page evolved.  :)


I don't remember where I found the quote, but I have it written in a journal where I jot down quotes that I come across that I love.  The flowers are some discontinued Prima flowers that I received in one of Donna's recent grab bags.  The quotes are cut from a Nicole Nordeman book (can't remember the name at the moment).  The writing and drawing is done in india ink.  The stems are of various ribbons and twines.  

LinkWithin

Related Posts Plugin for WordPress, Blogger...