Showing posts with label Sizzix. Show all posts

Saturday, December 24, 2011

Christmas Eve and Handmade Ornaments

It's Christmas Eve!  I really can't believe it myself.  This year, the Christmas season has been filled with an unusual sense of both angst and anticipation in our family, and I've tried extra hard to not over-do things, so that I could simply spend every minute possible just soaking up as much family time as possible. A year ago, we were celebrating the completely unexpected addition of a newborn baby boy, Jeremiah, to our family - via legal guardianship.  And this year, we are preparing our hearts to say goodbye to him just four days after Christmas, as he will leave our family to travel across the country to begin his new life with his birth mother. It has been a difficult process, accepting this turn of events, but in the end, love has won out, and Jeremiah is a blessed little boy to have so many people who love him so much.  Needless to say, we will be clinging together as a family, making this year as special as possible.

Since I needed to make gifts as simple as possible this year, I made ornaments for teacher gifts and gift exchanges.  I thought I'd share a few with you.  These are quick to make and could be made at the last minute if you need a gift idea for a last-minute guest.   


For these cute musical heart ornaments, I started by cutting two facing hearts from music paper.  I cut Christmas words out of some Teresa Collins ribbon and adhered it to the front heart, then added an additional sentiment with my Dymo labeler.  I put the hearts together, right sides facing out, and began stitching them together with a zig-zag stitch on my sewing machine.  I left about a 1" opening, and stuffed them with Poly-fil, then completed stitching them closed.  I trimmed around the hearts with pinking shears.  I used Distress Ink to ink around the edges - on the one above, I just used a bit of Gathered Twigs, while on the one below, I used both Festive Berries and Gathered Twigs.  I took a length of jute string and stitched it on to the back of the ornament, using a straight stitch, going back and forth a couple times (you could also just put it between the hearts when stitching them together, but I like the look of the added stitching).  Finally, I spritzed the front of the ornaments with some Biscotti Perfect Pearls spray for a bit of shimmer.


On this third ornament, I used Tim Holtz's Sizzix die, Carved Ornaments 2, to cut the ornament from grunge board, with the Noel Movers & Shapers die in the middle to cut out the word.  I painted the ornament using the Snow Cap paint dabber and let it dry.  Then I applied Denim, Pool, and Snow Cap Mixative Adirondack alcohol inks, using Blending Solution to help move the inks around, on an ink applicator tool, on the ornament.  I used a silver leafing pen to color the letters of "NOEL" and the topper piece, as well as the edges of the ornament.  I used the Movers & Shapers holly leaf to cut several leaves, and I used the Tattered Pine Cone die to cut some pine branches - all from Core'dinations cardstock.  I sanded them, used the Snow Cap paint dabber on their edges, and dabbed them with Rock Candy Distress Stickles.  I wrapped a small piece of fake greenery around the bottom of the ornament and then began arranging the branches and holly leaves on the ornament.  I topped them with a pearl from Tim Holt's Ideaology line. Finally, I tied a piece of jute string and inked seam binding through the top of the ornament, and it was complete.


What do you do for last minute gifts?  Do you have a go-to handmade gift?  

Friday, December 23, 2011

Christmas Tags

One of the treats of the Christmas season each year is Tim Holtz's 12 Tags of Christmas.  Beginning December 1, each night for 12 nights, he posts a new tag - created that day - and boy, are they ever fantastic!  He's done them for 5 years now, though this is only my 2nd year participating.  I never can keep up with doing them at the same time as him, but I try to do at least some of them before the month is over.  So far, I've got these three finished.


I love how Tim had us use the embossing pad on the embossing folder to get this cool double-embossed effect on this tag.  And the pine cone die - wow - it takes a bit of learning, but it is SO much fun once you figure it out, and it can also be used to make cute little dried roses as well.  (Check out my Sizzix embossing folders review over on Craft Test Dummies to see a cute card I made with a dried rose on it using this die!!)


Day 2's tag had us using the Picket Fence Distress Stain over some Christmas Kraft Resist paper...two of my new loves!  And I just love how when you apply some Distress Ink over the Picket Fence Distress Stain, it takes on sort of a chalky look - totally cool!  I've had that little bow from Jenni Bowlin in my stash for ages...just waiting for the perfect project...and this was definitely it!  That reindeer couldn't be cuter...the little greenery wreath and that ivory bow on his neck are just too cute!


I skipped ahead a few days to Day 6 for this one - and I swapped out techniques, too, for one he showed us a couple years ago.  While the metal tape, embossing, coloring and clear embossing powder on top are from this year, I decided to color the metal with alcohol inks instead of paint dabbers (though I did paint the wreath with paint dabbers).  I absolutely LOVE the look of the clear embossing powder over the embossed,  colored and sanded metal - my first time trying this - but definitely NOT my last!  Totally in love with this look!

And I especially love how you can add the Distress Ink over the alcohol ink, and because of the clear embossing powder, the Distress is sealed in and gives the tag a vintage feel.  


I'm still hoping to get a few more tags done before December is over.  I also have a couple handmade ornaments to show you in another post!

Monday, March 28, 2011

Elmer's Craft & Tell Party - Altered Cricut Cartridge Boxes

While I was at Winter CHA 2011, I had the opportunity to meet Meghann Heft from Elmer's and learned of their new Craft & Tell program.  Basically, Elmer's wanted to send some crafty bloggers like me a big box of crafty goodness to use for hosting a craft party, and then tell the world all about it!  Since I am certainly not one to turn down free craft products, I signed on the dotted line right away!

I decided to invite my friends over for a craft night this past Friday, and planned a project involving altering old Cricut cartridge boxes.  I prepared an example box, and I incorporated a few flowers that some of my friends had been wanting to learn how to make so that I could demonstrate how to make them.  (And check out these GORGEOUS new Pink Paislee House of Three papers - from the Daily Junque line!!)

My sample - an altered Cricut cartridge box

And boy oh boy did Elmer's send the crafty goodness!!  Check out my friend Shelia and me setting up for my party...there were circle cutters, craft knives, swivel knives, scissors, corner punches, glue pens, glue sticks, glue dots, adhesive runners, scrapbooking tape, adhesive squares, photo corners, decorative scissors, gel pens, paint markers, gel pens, foam board, liquid glue, and paper cutters.  There were even a few extras thrown in...some scrapbooking paper, ribbon, sequins, pom-poms...so much fun!

My island looked like an Elmer's and X-acto store display!!

Sheila helping to pack the VERY full swag bags

When my friends arrived, I had everything set up for them - an empty Cricut cartridge box for each person, a huge stack of scrapbooking paper and cardstock, paper punches, flowers of every kind, my Big Kick and Sizzix dies, and all of the Elmer's and X-acto products.  We got so busy crafting that we almost forgot to take very many photos!  Everyone wanted to learn how to make the rosettes using the Sizzix dies, so I demonstrated that, and almost everyone added one to their boxes.  Everyone also wanted to learn how to make the crinoline rose from my box, and I had received prior permission from Tammy Tutterow to use her tutorial to teach them how to make the rose.  It was fun watching my friend Monica, who thought the rose would be "impossible" to make, actually make one of her own for her box - and then take several more die cut crinoline flowers home with her to make more at home!  

Me demonstrating the crinoline rose and new Distress Stains

Kathye covering her box with paper

Allison's box - rosettes, crinoline rose, and layered butterflies

Shelia punched the top layer of her butterflies
from a soda can

My kiddos were appreciative of the sturdy
boxes the goodies arrived in!

All of my friends had a GREAT time - and so did I!  It had been a while since I'd hosted a craft night (I used to hold them regularly, though they used to be "everyone bring your own project" types of craft nights).  All present were in agreement that I needed to start hosting a monthly craft night again, but they'd like them to be more project-based like this one was, so that they could continue to learn new techniques and how to use different tools.  They want next month to be a spring banner!

I'm SOOO thankful to the folks at Elmer's for the fantastic products they sent - and because they were SO generous, I actually have some extra goodies to give away here on my blog!  So...this being the last week of National Crafting Month, you just might want to check back here TOMORROW to see what's in store!!  Just sayin'...

Monday, March 14, 2011

Altered Frame using Plaid Crackle Medium

Altered frame using Plaid Folk Art paints and crackle medium

A couple weekends ago, I had the privilege of making this altered photo frame for the birth mother of my 4-month old son, as she needed a gift to give to her mother for her birthday.  (You can read more about that story and our weekend here.)  I had been inspired by this frame by Tammy Tutterow, and got a few of my ideas from her.  I started out with a random $5 framed print from Big Lots, which was about 12" x 12" in size.  After the backing, print, and glass were removed, the frame was painted with a base coat of Pink Balloon Folk Art acrylic paint.  Once dry, a layer of Folk Art Crackle Medium was applied and left to dry overnight (it doesn't actually NEED to dry that long...it just happened to be midnight when this happened!).  The next day, I applied the final layer of Folk Art Titanium White acrylic paint, and immediately as the paint dried, the crackle effect took place - it was very cool!

A close-up of the frame so you can
see the crackle effect - the pink paint
peeks through the white
Then I put a coat of spray adhesive on the actual print from the frame (I used it as the base for my project), and laid on a piece of Warm & Natural batting that I had cut to size.  I laid the piece batting side-down on a larger piece of plain canvas, and on the back side of the print (which was a cross between cardboard and mat board), I applied Glue Ring adhesive by Glue Arts.  (Let me just say, I had never used this before - and it totally ROCKS!  It has major sticking power!!!!)  I pulled the four sides of the canvas around to the back of the print and stuck it down onto the adhesive, and it held perfectly.  Now I had a wonderful blank canvas to work with, and it had just a touch of poofiness under it due to the batting - just the look I was going for!


I had Shelia put on the Distress Inks...Victorian Velvet, Spun Sugar, and Antique Linen.  I showed her how to apply the ink, and using an ink applicator and blending tool, she applied ink all over the canvas, starting darker at the edges and getting lighter toward the center.  I also had her cover the grunge board flourish in Spun Sugar Distress Ink, followed by Spun Sugar Distress Stickles.


I took a piece of natural-colored lace, rubbed the Antique Linen Distress Ink pad over it, then spritzed the lace with water and crumpled it so the ink would disperse a bit.  I dried it with a heat gun, and adhered it to the back sides of the canvas piece using the same Glue Ring adhesive.  At this point, the canvas piece itself was ready to go into the frame; I put a bit of Craft Krazy Glue around the lip of the back side of the frame, and pressed down, then used my glue gun to go all the way around, sealing the edge between the canvas piece and the edge of the frame.  (This was a unique frame that had no pieces to hold the piece in; the print was originally stapled into the frame.)

Shelia had a nice picture of her mom, in front of an elephant, on her phone, so I had her email that to me, and I was able to print that from my computer.  I first added some Spun Sugar ink around the edges of the photo, then distressed the edges of the photo, and finally inked the edges with Walnut Stain ink.  To color the white paper doily, I rubbed the Victorian Velvet and a bit of Vintage Photo Distress Ink pads on my craft sheet, spritzed it with water, and laid the doily on top of it.  I picked it up and laid it down again, to absorb the ink colors, and once it was saturated, I dried it with my heat gun.  

I glued the doily to the canvas using Beacon Fast Finish Decoupage.  I added a glittered cardstock frame from my stash, using the same glue.  I added the grunge board flourish, adhering it with Beacon Fabri-Tac, and added the photo to the canvas with Helmar Liquid Scrap Dots.  

Next, I cut a rosette using the Tim Holtz Rosette Sizzix die, from a sheet of My Mind's Eye paper, assembled it, and inked the edges with Vintage Photo Distress ink. I topped it with a glittered cardstock die cut from My Mind's Eye, and adhered it to the canvas with my hot glue gun.  I made a flower from crinoline using the Tim Holtz Tattered Florals Sizzix die, following Tammy Tutterow's tutorial here, and added a heart button to the center with hot glue.  I used the hot glue gun to adhere the flower to the canvas as well.


I finished the frame by adding an Artisan Element from Pink Paislee above the photo, which I inked a bit with Victorian Velvet and Vintage Photo Distress Inks.  It was self adhesive.  Finally, I tied a piece of light pink organdy ribbon through an Idea-ology word key, heated the ribbon with a heat gun so it would crumple a bit and will not fray, and adhered it to the canvas with my hot glue gun. 

And that's it.  The project was finished - and Shelia loved it...and more importantly, per her report, her mom loved it too.  And THAT makes ME happy!!

Thursday, December 23, 2010

The (Paper) Trailmakers Challenge Blog - Guest Design Team Project (and Tim tag #10!)


The second challenge for this month at The (Paper) Trailmaker Challenge blog was to somehow incorporate a tag, using the December Paper Trail kit.  Since I have been trying my best to work on Tim Holtz's 12 Tags of Christmas (I am soooo behind, not to mention doing them totally out of order!)...I decided to try using the Paper Trail kit to make one of the Tim Holtz tags, and this is what I came up with.  

I chose day 10 to work with the kit papers, because I thought the snowflake paper went perfectly with this tag - it is SUCH a cool technique!!  You can see Tim's original tag here.  I started out by tracing a standard size 8 manila tag onto the light blue snowflake paper and cutting it out. I glued the paper to the tag, and punched a hole at the top.  I used my  white Adirondack paint dabber along the edges.  Then I randomly dabbed some paint all over the paper, and quickly, before it dried, sprinkled some glass glitter over it - the paint acts as a glue for the glitter.  In the lower right corner, I also added some Glossy Accents, so I could add a LOT of the glitter, to make it appear as if there was a snowdrift.


Then, following Tim's instructions on his blog, I made my snowman out of grungepaper.  I cut the holly leaves for the snowman's hat out of the same paper - but showing the green "Merry Christmas" side, and used a hole punch to punch out berries from the red cardstock in the kit.  I used a cardstock sticker from the kit on the snowman's belly.  


I used the red organdy ribbon from the kit for the snowman's scarf.  I tied it in a knot, but was having a hard time getting it to stay down, so used my Tiny Attacher to put a little staple in it when I adhered the snowman to the tag.  I used my heat gun on the tails of the "scarf," which melted it a little and gave it a sort of wrinkly, more scarf-looking appearance.  I thought it was pretty cool!!


Then, following Tim's instructions, I cut a piece of clear packaging material (yes, PACKAGING!!) I had saved from one of his products, to the size of the tag, and embossed it with my snowflake embossing folder.  I punched a whole in the top, and then used my Cropadile to punch holes in all four corners to use copper brads to adhere the embossed tag over the snowman tag.  I attached the gorgeous shimmery white ribbon from the kit through the top of the tag.  Finally, I took three of the little cardstock banner stickers, edged them with distress ink, wrote "Fa la la" on them, and adhered them to the embossed tag.  


I hope you've enjoyed this tag as much as I enjoyed making it!  And you should definitely check out Tim's other 11 tags for more awesome inspiration!!  And if you've been inspired to make some tags, or to add a tag or two to a project of your own, be sure to link up to the challenge post here.

I want to take a minute to thank Karen and the entire design team at The Paper Trail team for letting me play along with them this month - it's been a true pleasure working with them!!  Even after all of these projects I've made this month, I still have TONS of product left from this awesome December kit - so if you still haven't ordered your December Paper Trail kit, you really should do so ASAP!!  You'll be wanting it to scrap all of your Christmas photos after the holidays, for sure!!  

Wednesday, December 22, 2010

Last minute Christmas gifts - handmade ornaments


If you are one of *THOSE* people, you know, the ones who have had all of their holiday shopping and gift-giving needs taken care of since July, well, then, you may just want to skip right over THIS post.  ;)

BUT, if you are anything like ME, and you are still frantically trying to finish up final handmade gifts and trying to make sure you haven't forgotten anyone on your list,...well, then, I have some really beautiful and quick last-minute ideas to share with you!

For all of these ornaments, I used vintage sheet music - which I absolute LOVE using on projects.  I think it just adds such a wonderful charm and loveliness to any project!!  

For the ornament pictured above (the inspiration for which I got here), of which I made 3 variations, I started by cutting a background from red foil cardstock using the largest of my Classic Scalloped Circles Large Nestabilities die-cutting set.  I then used my hot glue gun to attach ribbons and pieces of Christmas picks.  I used the Tim Holtz Sizzix Rosette die to cut the rosette from the sheet music, and assembled it per the instructions; then attached it with hot glue as well.  Finally, I took grunge board letters spelling "JOY," inked them with Fired Brick distress ink, and applied Fired Brick distress stickles to them.  Once dry, I glued them onto the rosette, and my ornament was complete.  (Note: you can use a heat gun to dry the ink and the distress stickles, but do NOT use a heat gun on regular stickles.)  


I think even my husband was impressed - since I saw him grab one off my craft table this morning on his way to the office to drop off Christmas gifts to the supervisors he manages!!  (That, and he wants to get some return on the "investment" he has made into my crafting supplies!!)


The second ornament also has a rosette made of vintage Christmas music - but it is much larger, and was made using the Martha Stewart Scoring Board.  The ornament has about a 6" diameter, and I had to glue two strips of music together to make it.  Once I made the rosette, I inked the edges and ridges with Fired Brick distress ink.  I then applied a line of glue around the edges and sprinkled silver glitter over it.

For the center, I again used my Classic Scalloped Circles Large Nestabilities to die cut two pieces from a pad of K&Co Christmas paper.  I inked them using distress inks and glued them to the rosette using hot glue.  Finally, I added a dimensional K&Co sticker to the center.  I punched a small hole in the top of the ornament and tied a piece of silver cord through it for hanging.  


I hope this gives you some ideas for quick but beautiful last-minute gifts.  What are your go-to crafts for last-minute gifts?

Sunday, December 12, 2010

12 Tags of Christmas - Day 12!!! (only a few missing!)


So...I'm not admitting I have a problem...or a crafting addiction or anything.  But I did stay up 'til midnight last night just to see the 12th and final tag of Tim's 12 Tags of Christmas.  Oh - and then, I was so inspired by HIS tag, and his wonderful videos, that I may have stayed up all night long creating MY version of tag #12.  But I don't think I have a problem.  Just sayin'....


So, once again, I was completely and totally inspired by Tim.  Did I have the products he used on his tag?  Nope...hardly any of them.  I think the only two products HE had that I used were the Brick Red distress ink and the Rock Candy crackle paint.  Well, those, and I had my own version of some evergreen and pine cones.  Other than that - it was ALL creative improvising.  Which is what I think I love most about this whole experience...it totally stretches me creatively, and forces me to think outside the box.  I have to go through my stash (and seriously, folks - while my Tim stash is minimal, my crafting stash?  is not.  I have a craft room SMOOSHED full of crafting supplies and stash!) and figure out what I can use in new ways that I wouldn't have thought of before.  I LOVE THAT!

So...how did I do it?  
  • The background - I used a piece of pattered paper from a K&Co Christmas paper pad, which I've been loving.  It has wonderful vintage appeal.  

  • The ornament?  I found a pack of chipboard ornaments and snowflakes in my stash.  It wasn't *quite* the shape I wanted, so I cut it with scissors a bit to re-shape it.  It obviously doesn't have the word "JOY" cut out of it - and I definitely would still LOVE to have Tim's ornament die and the word shapers - as well as the magnetic tray - SO versatile - but for now, I was totally stoked about finding this ornament in my stash!  And I love the way the Rock Candy crackle paint blends with the distress ink - so cool!!  Isn't that shiny crackle just beautiful?!
  • The corners?  I don't have any of Tim's awesome corners.  But I did find some copper 1/4 inch metal tape in my stash.  I decided to experiment.  I put three strips of tape down on a piece of scrap cardstock.  Then I ran it through Tim's postcard embossing folder with my Sizzix Big Kick, to give it texture.  I applied a bit of Glossy Accents to the back, and wrapped it around the corners - and voila - my homemade metal corners!
  • The calendar?  I don't have a December calendar stamp.  But I do have a package of Maya Road mini calendar sheers.  It didn't really take the distress ink very well, so I inked a scrap piece of manila cardstock, then glued the sheer to the cardstock, and distressed the edge.  I love that it shows 2010 on it, so that I will always know what year this was made!


  • I used a gorgeous, lightly glittered evergreen leaf, rather than pine needles, for my greenery.  I added a few red berries and a few miniature pine cones, attaching all of them with my hot glue gun.  I would be LOST without my hot glue gun!!
  • I finished it off with a piece of green ribbon on the top.

So, there you have it.  My version of the 12th tag.  I love how clean and fresh it is.  It really is a lovely finish to  the 12 tags, I think.  Don't worry - I still plan to go back and complete the 8 I have missed...I just have to find the time!!  (I can't stay up all night, every night...I *do* have four children who need me to be in an upright position and somewhat coherent during the day!)  The four I have finished do look beautiful on our mantel!!

Saturday, December 11, 2010

12 Tags of Christmas - Day 9!! (yes - out of order)


I had the grandest of plans to keep up with Tim's 12 tags...well, actually, I didn't...I knew better.  That's why I was surprised when I got the first 2 done!!  LOL!  Not only is it hard to find adequate time, but I'm working with a limited "Tim" stash, which thus requires an extra amount of ingenuity - which is also time consuming.  Not that I don't enjoy the challenge - really, I do - it totally stretches me creatively - but between trying to finish up the semester of homeschooling, taking care of a newborn, getting ready for Christmas, and participating on two design teams for the first time ever this month...my extra creative time has been very limited.

Anyway, all that said, I decided to quit thinking I needed to "catch up," and just pick up where I felt like it.  Tim is actually finishing up tonight with his 12th and final tag.  I was able to find the time to do tag #9 a couple nights ago, and am really happy with how it came out, so I wanted to share it with you.  I do still hope to get the rest of them done in the next couple weeks...so we'll see!!


You can see Tim's tag #9 here, if you'd like to compare mine to his.  


I can't wait to see what he comes up with for the 12th and final tag for this year's series.  What a treat it's been to watch his mastermind creativity at work!!

Thursday, December 09, 2010

The (Paper) Trailmakers Challenge Blog - Guest Design Team project


I tell you what - I am really loving playing with this December Paper Trail kit!! First, the frame project was a blast to make, and now, these cards were SO FUN!! These papers by Lily Bee Designs are just wonderfully versatile and coordinate so well together, the kit makes it super easy to put together great projects, no matter what you're making.

This first challenge of "put a stamp on it" was not such a stretch for me - me who recently "de-stashed" by getting rid of over 100 stamp sets!!! Yep, you read that correctly!! Not to fear - I still have well over 50 stamp sets still in my stash, and somehow still manage to pick up a new one here and there - and always have more on my wish list. Actually, my papercrafting - really, my entire artsy-craftsy life - started out with rubber stamping. I went through a time period of several years when I didn't even pick up a stamp, though, and I thought I was done stamping...but then just in the past 6 months or so, I've gotten back into it. There really is SO much you can do with stamping and ink - I think that's what draws me to it...the huge variety of techniques. I'm a technique junkie, of sorts. Anyway, for this challenge, I made three different cards for you, all using different stamping techniques.

**********************************************************


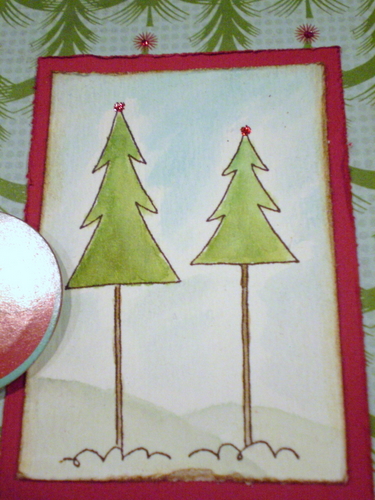
For this first card, I stamped an outline stamp of a couple trees on a small piece of watercolor paper. I like using watercolor paper for this technique because it holds up well and you can move color around nicely on it. After stamping the trees in brown permanent ink, I rubbed distress inks directly on my craft sheet, then used an aqua painter (a brush filled with water - you could also just use a paint brush and water) to pick up the ink and paint the stamped trees. I also painted some snow and a faint sky background. I used a paper distresser along the edges of both the watercolor piece and the red piece beneath it, and inked the edges with distress ink.


Finally, for a little glitz, I added some Christmas Red Stickles over each red dot at the top of the Christmas trees on the background paper. 


***********************************************************

For the second card, I only did a little stamping - I stamped "Joy to the World" on one of the kit's cardstock stickers, layered it on black cardstock, and popped it up on foam squares, on the front of the card; and I stamped a greeting inside the card, as well. I layered a couple of the pattered papers from the kit, using a notebook-paper edge punch along the top of the red one. I added distress ink around the edges of both papers. I made a paper rosette with the black and white paper, using my Martha Stewart scoring board, and layered one of the chipboard buttons from the kit on top of it, placing some additional chipboard buttons beside it. 

The greeting inside the second card.

**********************************************************


Finally, the third card. This was my favorite to make - I think because I love the colors, and because I absolutely LOVE this Tim Holtz Sizzix die that I used. It's called "Townscape," and I just think the miniature houses are adorable!! They have so much potential - and for every season!! Anyway, I created the houses by gluing a piece of the black cardstock to a piece of corrugated cardboard. I then ran it through my Sizzix Big Kick with the Townscape die, cutting the houses. I trimmed just a tad off the bottom, and a little off each end, to fit the card. Then I used my Snow Cap (white) Adirondack paint dabber to ink up my definition background stamp, and stamped the houses. I thought it looked really cool, with the black text on the white snowflakes on the background paper. (Note - I love using my paint dabbers on my stamps - and you will too - but make sure you wash them off right after you use paint on your stamps, or you won't be happy with your stamps the next time you go to use them!) I used the paint dabber to add a little "snow" to the roofs of the houses as well, and then glued the strip onto the card.


Then I added the 25 with Thickers from the kit, and stamped a sentiment inside.


So...there you have it. Now it's YOUR turn!! Have you grabbed your December Paper Trail kit yet? And if so, what are you creating with it? Stamping isn't just for cards, either - you can certainly use stamps on scrapbooking layouts, tags, home decor projects - most anything! Make sure you add your stamped project to our linky widget in the challenge post so that we can see what you've created and for your chance to win some of the Lily Bee papers from this kit!!  You have until Saturday, December 18, at 5 pm EST to get your project linked up for your chance to win!

LinkWithin

Related Posts Plugin for WordPress, Blogger...