Showing posts with label rosettes. Show all posts

Tuesday, November 01, 2011

Happy Halloween!

Yeah, I know - Halloween was YESTERDAY!  It also happened to be Jeremiah's FIRST birthday...so we were a little bit busy around these parts.  :)  I cannot believe he's already a year old, and that he's been a part of our family for 7 days shy of a year!  Wow!

Even though I'm a day late (and usually a dollar short...or lots of dollars short, as the case may be!), I did want to show you a couple of Halloween projects I made using Authentique's Glowing line, for my post on Craft Test Dummies yesterday. Really, you need to go check it out, because in my post, I explain how I made everything.  Both projects were super easy, and I think a Christmas version of these cans will soon be in order!

Burlap-covered tin cans, with
Authentique Glowing line embellishments

Scrapbook layout, ready for photo, made with
Authentique Glowing line
Anyway, we took all the kids to Knotts Berry Farm on Friday - in their costumes, of course - and we had a great time.  Then yesterday, we all visited the BRAND NEW HOBBY LOBBY that just opened.  It's about 40 minutes from here, but YAY for having Hobby Lobby!  And last night we started off at our church's Hallelujah Night, but after standing in one line for 15 minutes to get a couple pieces of candy, we changed plans and went trick-or-treating back home in our neighborhood...which turned out to be a much better plan.  The twins were hilarious...this was their first year trick-or-treating, but once they got the hang of it, they were hamming it up!  Mackenzie in particular was so cute - she would get her candy, and then just keep standing there, saying "trick-or-treat" over and over, with her bag open, until the people at the door, confused as to why she wasn't leaving, gave in and gave her more candy!  She was really working the neighborhood...and by the time we got home, she was dragging her bag on the ground because it was so heavy - she ended up with almost double what the others got.  (It's all good - we always pour all the candy into one big bowl.)  The kids are satisfied with their new stash of lollipops, and mom's satisfied with the new stash of chocolate!

In other news, Julie Fei-Fan Balzer's new 30 Days In Your Journal class starts today - are you taking it?  I'm getting it as an early birthday gift from a friend.  I think it's a great deal for the amount of information she's providing.  I love all of Julie's work, and I am addicted to the stencils she designed for The Crafter's Workshop (you can see some of them in my project for the Halloween blog hop I participated in a couple weeks ago).  Anyway, I think it will help me with my art journaling...I kind of feel like I'm all over the place and need to get in a groove.

That's all for now.  I have some other projects I've made for Craft Test Dummies that I still need to show you...later this week!

Monday, March 28, 2011

Elmer's Craft & Tell Party - Altered Cricut Cartridge Boxes

While I was at Winter CHA 2011, I had the opportunity to meet Meghann Heft from Elmer's and learned of their new Craft & Tell program.  Basically, Elmer's wanted to send some crafty bloggers like me a big box of crafty goodness to use for hosting a craft party, and then tell the world all about it!  Since I am certainly not one to turn down free craft products, I signed on the dotted line right away!

I decided to invite my friends over for a craft night this past Friday, and planned a project involving altering old Cricut cartridge boxes.  I prepared an example box, and I incorporated a few flowers that some of my friends had been wanting to learn how to make so that I could demonstrate how to make them.  (And check out these GORGEOUS new Pink Paislee House of Three papers - from the Daily Junque line!!)

My sample - an altered Cricut cartridge box

And boy oh boy did Elmer's send the crafty goodness!!  Check out my friend Shelia and me setting up for my party...there were circle cutters, craft knives, swivel knives, scissors, corner punches, glue pens, glue sticks, glue dots, adhesive runners, scrapbooking tape, adhesive squares, photo corners, decorative scissors, gel pens, paint markers, gel pens, foam board, liquid glue, and paper cutters.  There were even a few extras thrown in...some scrapbooking paper, ribbon, sequins, pom-poms...so much fun!

My island looked like an Elmer's and X-acto store display!!

Sheila helping to pack the VERY full swag bags

When my friends arrived, I had everything set up for them - an empty Cricut cartridge box for each person, a huge stack of scrapbooking paper and cardstock, paper punches, flowers of every kind, my Big Kick and Sizzix dies, and all of the Elmer's and X-acto products.  We got so busy crafting that we almost forgot to take very many photos!  Everyone wanted to learn how to make the rosettes using the Sizzix dies, so I demonstrated that, and almost everyone added one to their boxes.  Everyone also wanted to learn how to make the crinoline rose from my box, and I had received prior permission from Tammy Tutterow to use her tutorial to teach them how to make the rose.  It was fun watching my friend Monica, who thought the rose would be "impossible" to make, actually make one of her own for her box - and then take several more die cut crinoline flowers home with her to make more at home!  

Me demonstrating the crinoline rose and new Distress Stains

Kathye covering her box with paper

Allison's box - rosettes, crinoline rose, and layered butterflies

Shelia punched the top layer of her butterflies
from a soda can

My kiddos were appreciative of the sturdy
boxes the goodies arrived in!

All of my friends had a GREAT time - and so did I!  It had been a while since I'd hosted a craft night (I used to hold them regularly, though they used to be "everyone bring your own project" types of craft nights).  All present were in agreement that I needed to start hosting a monthly craft night again, but they'd like them to be more project-based like this one was, so that they could continue to learn new techniques and how to use different tools.  They want next month to be a spring banner!

I'm SOOO thankful to the folks at Elmer's for the fantastic products they sent - and because they were SO generous, I actually have some extra goodies to give away here on my blog!  So...this being the last week of National Crafting Month, you just might want to check back here TOMORROW to see what's in store!!  Just sayin'...

Monday, March 14, 2011

Altered Frame using Plaid Crackle Medium

Altered frame using Plaid Folk Art paints and crackle medium

A couple weekends ago, I had the privilege of making this altered photo frame for the birth mother of my 4-month old son, as she needed a gift to give to her mother for her birthday.  (You can read more about that story and our weekend here.)  I had been inspired by this frame by Tammy Tutterow, and got a few of my ideas from her.  I started out with a random $5 framed print from Big Lots, which was about 12" x 12" in size.  After the backing, print, and glass were removed, the frame was painted with a base coat of Pink Balloon Folk Art acrylic paint.  Once dry, a layer of Folk Art Crackle Medium was applied and left to dry overnight (it doesn't actually NEED to dry that long...it just happened to be midnight when this happened!).  The next day, I applied the final layer of Folk Art Titanium White acrylic paint, and immediately as the paint dried, the crackle effect took place - it was very cool!

A close-up of the frame so you can
see the crackle effect - the pink paint
peeks through the white
Then I put a coat of spray adhesive on the actual print from the frame (I used it as the base for my project), and laid on a piece of Warm & Natural batting that I had cut to size.  I laid the piece batting side-down on a larger piece of plain canvas, and on the back side of the print (which was a cross between cardboard and mat board), I applied Glue Ring adhesive by Glue Arts.  (Let me just say, I had never used this before - and it totally ROCKS!  It has major sticking power!!!!)  I pulled the four sides of the canvas around to the back of the print and stuck it down onto the adhesive, and it held perfectly.  Now I had a wonderful blank canvas to work with, and it had just a touch of poofiness under it due to the batting - just the look I was going for!


I had Shelia put on the Distress Inks...Victorian Velvet, Spun Sugar, and Antique Linen.  I showed her how to apply the ink, and using an ink applicator and blending tool, she applied ink all over the canvas, starting darker at the edges and getting lighter toward the center.  I also had her cover the grunge board flourish in Spun Sugar Distress Ink, followed by Spun Sugar Distress Stickles.


I took a piece of natural-colored lace, rubbed the Antique Linen Distress Ink pad over it, then spritzed the lace with water and crumpled it so the ink would disperse a bit.  I dried it with a heat gun, and adhered it to the back sides of the canvas piece using the same Glue Ring adhesive.  At this point, the canvas piece itself was ready to go into the frame; I put a bit of Craft Krazy Glue around the lip of the back side of the frame, and pressed down, then used my glue gun to go all the way around, sealing the edge between the canvas piece and the edge of the frame.  (This was a unique frame that had no pieces to hold the piece in; the print was originally stapled into the frame.)

Shelia had a nice picture of her mom, in front of an elephant, on her phone, so I had her email that to me, and I was able to print that from my computer.  I first added some Spun Sugar ink around the edges of the photo, then distressed the edges of the photo, and finally inked the edges with Walnut Stain ink.  To color the white paper doily, I rubbed the Victorian Velvet and a bit of Vintage Photo Distress Ink pads on my craft sheet, spritzed it with water, and laid the doily on top of it.  I picked it up and laid it down again, to absorb the ink colors, and once it was saturated, I dried it with my heat gun.  

I glued the doily to the canvas using Beacon Fast Finish Decoupage.  I added a glittered cardstock frame from my stash, using the same glue.  I added the grunge board flourish, adhering it with Beacon Fabri-Tac, and added the photo to the canvas with Helmar Liquid Scrap Dots.  

Next, I cut a rosette using the Tim Holtz Rosette Sizzix die, from a sheet of My Mind's Eye paper, assembled it, and inked the edges with Vintage Photo Distress ink. I topped it with a glittered cardstock die cut from My Mind's Eye, and adhered it to the canvas with my hot glue gun.  I made a flower from crinoline using the Tim Holtz Tattered Florals Sizzix die, following Tammy Tutterow's tutorial here, and added a heart button to the center with hot glue.  I used the hot glue gun to adhere the flower to the canvas as well.


I finished the frame by adding an Artisan Element from Pink Paislee above the photo, which I inked a bit with Victorian Velvet and Vintage Photo Distress Inks.  It was self adhesive.  Finally, I tied a piece of light pink organdy ribbon through an Idea-ology word key, heated the ribbon with a heat gun so it would crumple a bit and will not fray, and adhered it to the canvas with my hot glue gun. 

And that's it.  The project was finished - and Shelia loved it...and more importantly, per her report, her mom loved it too.  And THAT makes ME happy!!

Wednesday, December 22, 2010

Last minute Christmas gifts - handmade ornaments


If you are one of *THOSE* people, you know, the ones who have had all of their holiday shopping and gift-giving needs taken care of since July, well, then, you may just want to skip right over THIS post.  ;)

BUT, if you are anything like ME, and you are still frantically trying to finish up final handmade gifts and trying to make sure you haven't forgotten anyone on your list,...well, then, I have some really beautiful and quick last-minute ideas to share with you!

For all of these ornaments, I used vintage sheet music - which I absolute LOVE using on projects.  I think it just adds such a wonderful charm and loveliness to any project!!  

For the ornament pictured above (the inspiration for which I got here), of which I made 3 variations, I started by cutting a background from red foil cardstock using the largest of my Classic Scalloped Circles Large Nestabilities die-cutting set.  I then used my hot glue gun to attach ribbons and pieces of Christmas picks.  I used the Tim Holtz Sizzix Rosette die to cut the rosette from the sheet music, and assembled it per the instructions; then attached it with hot glue as well.  Finally, I took grunge board letters spelling "JOY," inked them with Fired Brick distress ink, and applied Fired Brick distress stickles to them.  Once dry, I glued them onto the rosette, and my ornament was complete.  (Note: you can use a heat gun to dry the ink and the distress stickles, but do NOT use a heat gun on regular stickles.)  


I think even my husband was impressed - since I saw him grab one off my craft table this morning on his way to the office to drop off Christmas gifts to the supervisors he manages!!  (That, and he wants to get some return on the "investment" he has made into my crafting supplies!!)


The second ornament also has a rosette made of vintage Christmas music - but it is much larger, and was made using the Martha Stewart Scoring Board.  The ornament has about a 6" diameter, and I had to glue two strips of music together to make it.  Once I made the rosette, I inked the edges and ridges with Fired Brick distress ink.  I then applied a line of glue around the edges and sprinkled silver glitter over it.

For the center, I again used my Classic Scalloped Circles Large Nestabilities to die cut two pieces from a pad of K&Co Christmas paper.  I inked them using distress inks and glued them to the rosette using hot glue.  Finally, I added a dimensional K&Co sticker to the center.  I punched a small hole in the top of the ornament and tied a piece of silver cord through it for hanging.  


I hope this gives you some ideas for quick but beautiful last-minute gifts.  What are your go-to crafts for last-minute gifts?

Saturday, December 11, 2010

12 Tags of Christmas - Day 9!! (yes - out of order)


I had the grandest of plans to keep up with Tim's 12 tags...well, actually, I didn't...I knew better.  That's why I was surprised when I got the first 2 done!!  LOL!  Not only is it hard to find adequate time, but I'm working with a limited "Tim" stash, which thus requires an extra amount of ingenuity - which is also time consuming.  Not that I don't enjoy the challenge - really, I do - it totally stretches me creatively - but between trying to finish up the semester of homeschooling, taking care of a newborn, getting ready for Christmas, and participating on two design teams for the first time ever this month...my extra creative time has been very limited.

Anyway, all that said, I decided to quit thinking I needed to "catch up," and just pick up where I felt like it.  Tim is actually finishing up tonight with his 12th and final tag.  I was able to find the time to do tag #9 a couple nights ago, and am really happy with how it came out, so I wanted to share it with you.  I do still hope to get the rest of them done in the next couple weeks...so we'll see!!


You can see Tim's tag #9 here, if you'd like to compare mine to his.  


I can't wait to see what he comes up with for the 12th and final tag for this year's series.  What a treat it's been to watch his mastermind creativity at work!!

Thursday, December 09, 2010

The (Paper) Trailmakers Challenge Blog - Guest Design Team project


I tell you what - I am really loving playing with this December Paper Trail kit!! First, the frame project was a blast to make, and now, these cards were SO FUN!! These papers by Lily Bee Designs are just wonderfully versatile and coordinate so well together, the kit makes it super easy to put together great projects, no matter what you're making.

This first challenge of "put a stamp on it" was not such a stretch for me - me who recently "de-stashed" by getting rid of over 100 stamp sets!!! Yep, you read that correctly!! Not to fear - I still have well over 50 stamp sets still in my stash, and somehow still manage to pick up a new one here and there - and always have more on my wish list. Actually, my papercrafting - really, my entire artsy-craftsy life - started out with rubber stamping. I went through a time period of several years when I didn't even pick up a stamp, though, and I thought I was done stamping...but then just in the past 6 months or so, I've gotten back into it. There really is SO much you can do with stamping and ink - I think that's what draws me to it...the huge variety of techniques. I'm a technique junkie, of sorts. Anyway, for this challenge, I made three different cards for you, all using different stamping techniques.

**********************************************************


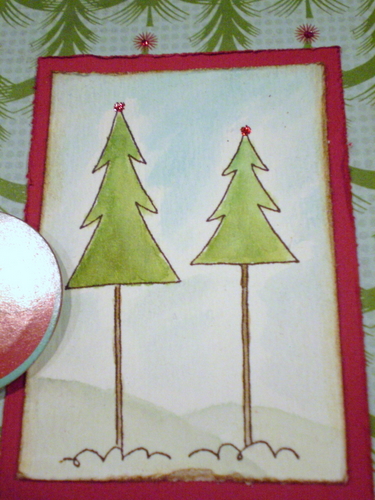
For this first card, I stamped an outline stamp of a couple trees on a small piece of watercolor paper. I like using watercolor paper for this technique because it holds up well and you can move color around nicely on it. After stamping the trees in brown permanent ink, I rubbed distress inks directly on my craft sheet, then used an aqua painter (a brush filled with water - you could also just use a paint brush and water) to pick up the ink and paint the stamped trees. I also painted some snow and a faint sky background. I used a paper distresser along the edges of both the watercolor piece and the red piece beneath it, and inked the edges with distress ink.


Finally, for a little glitz, I added some Christmas Red Stickles over each red dot at the top of the Christmas trees on the background paper. 


***********************************************************

For the second card, I only did a little stamping - I stamped "Joy to the World" on one of the kit's cardstock stickers, layered it on black cardstock, and popped it up on foam squares, on the front of the card; and I stamped a greeting inside the card, as well. I layered a couple of the pattered papers from the kit, using a notebook-paper edge punch along the top of the red one. I added distress ink around the edges of both papers. I made a paper rosette with the black and white paper, using my Martha Stewart scoring board, and layered one of the chipboard buttons from the kit on top of it, placing some additional chipboard buttons beside it. 

The greeting inside the second card.

**********************************************************


Finally, the third card. This was my favorite to make - I think because I love the colors, and because I absolutely LOVE this Tim Holtz Sizzix die that I used. It's called "Townscape," and I just think the miniature houses are adorable!! They have so much potential - and for every season!! Anyway, I created the houses by gluing a piece of the black cardstock to a piece of corrugated cardboard. I then ran it through my Sizzix Big Kick with the Townscape die, cutting the houses. I trimmed just a tad off the bottom, and a little off each end, to fit the card. Then I used my Snow Cap (white) Adirondack paint dabber to ink up my definition background stamp, and stamped the houses. I thought it looked really cool, with the black text on the white snowflakes on the background paper. (Note - I love using my paint dabbers on my stamps - and you will too - but make sure you wash them off right after you use paint on your stamps, or you won't be happy with your stamps the next time you go to use them!) I used the paint dabber to add a little "snow" to the roofs of the houses as well, and then glued the strip onto the card.


Then I added the 25 with Thickers from the kit, and stamped a sentiment inside.


So...there you have it. Now it's YOUR turn!! Have you grabbed your December Paper Trail kit yet? And if so, what are you creating with it? Stamping isn't just for cards, either - you can certainly use stamps on scrapbooking layouts, tags, home decor projects - most anything! Make sure you add your stamped project to our linky widget in the challenge post so that we can see what you've created and for your chance to win some of the Lily Bee papers from this kit!!  You have until Saturday, December 18, at 5 pm EST to get your project linked up for your chance to win!

Monday, November 01, 2010

Art-Full Horizons Jolly Jumpstart Blog Hop!!


Welcome to the Art-Full Horizons 
Jolly Jumpstart
 Blog Hop!


Check out all of the fabulous holiday-themed projects, gift ideas, and more from our wonderful Blog Hop Contributors from around the world!!
  1. Art-Full Horizons http://art-fullhorizons.blogspot.com
  2. Tammy Inman http://tammyi.com
  3. Nan Paturzo http://scrappynan.blogspot.com
  4. Robyn Weatherspoon http://herebygrace.typepad.com/
  5. Mykle Parker http://scrapbohemia.blogspot.com
  6. Sherry Mendoza http://sherryscreations.typepad.com/
  7. Robin Redd http://robinredd.typepad.com/west_coast_scrapper/
  8. April Meeker www.suaviloquy.blogspot.com
  9. Erin Bassett www.erinbassett.com
  10. Jennifer Clark http://jenspartyof5.blogspot.com
  11. Jennifer Edwardson http://frommypapercraftstudio.blogspot.com/
Here's how it works:
  1. Hop through each of the blogs listed above to get fabulous holiday inspiration. If you are starting at a blog in the middle of the Hop, please start back at the Art-Full Horizons blog.  You should be arriving here from Erin's blog.
  2. Leave a comment on each blog hop post in the list above between now and November 7, 2010.
  3. Enter to win our giveaway by doing any of the following. For each thing you do, you will be entered into the drawing one more time:
  • Leave a comment on the Art-Full Horizons blog hop post between now and November 7, 2010.
  • Join the Art-full Horizons email list (fill out the form in the left hand column on the A-H blog).
  • Become a follower of the Art-full Horizons blog! Just click the "Follow" button in the lower right column on the A-H blog.
  • "Like" the Art-Full Horizons Facebook Page.
  • Join the Art-Full Horizons Facebook Group.
  • Share about this Blog Hop on your own blog, posting a link to the Art-full Horizons blog.
  • Share about this Blog Hop on Facebook, posting a link to the Art-full Horizons blog.
  • Share about this Blog Hop on a message board or forum, posting a link to the Art-full Horizons blog.
  • U.S. entries only please

To let us know you've done these things, please return to the first Art-full Horizons Jolly Jumpstart Blog Hop post and leave a comment for each thing you did, i.e. one comment for posting on each blog, another comment for posting on facebook, and another comment for joining our email newsletter. Please note: if you post it all in one comment, it will only count as one entry, so be sure to post EACH ENTRY as a separate comment.

On November 8, 2010 we'll choose the winners using the Random Integer Generator from random.org. U.S. entries only please.

****************************

Today, on Party of Five, I'm sharing with you a simple, beautiful holiday project using the new Tim Holtz Sizzix rosette die.  This die is all the rage right now (isn't EVERYTHING Tim all the rage?!), but I've seen many people with questions on how to use it...so I'm going to demonstrate not only how simple it is to use, but how you can create a wonderful garland of these gorgeous rosettes!  Keep in mind that while I used Christmas papers for mine, you could use ANY papers to make this garland, and it would jazz things up for any occasion - holidays, birthdays, baby showers, etc.

Start off by selecting several pieces of coordinating 12x12 cardstock.  Be sure to use double-sided cardstock, as the rosettes tend to twist and turn on the cord, so you will want both sides looking pretty!


Next, cut the cardstock into 2" wide strips.  I used my heavy-duty paper cutter to make this task quick.


Now you should have a stack of 2"x12" strips of cardstock.  Aren't they pretty?


Now you'll need your rosette die.


My die-cutting machine is a Sizzix Big Kick.  Depending on what machine you have, the "sandwich" may be slightly different than mine, so always check the specific instructions for your machine.  The rosette die is a long (13") Sizzlets die - i.e. it is a thin die - so for the Big Kick, I first need a 13" long spacer, then a 13" long cutting mat, then I place the die with the blades up, then I place a strip of cardstock on the die, and finally, I place the second cutting mat on top.  This is what it looks like from the side.


Next, run the "sandwich" through your machine, per your machine's instructions.  I found that with this particular set-up, the die tended to slide on my bottom cutting mat, so I used a bit of scotch tape to hold the die in place on the cutting mat. 


This is what you will have when it has run through the machine - one center piece, and a long strip with one scalloped edge, one straight edge, and perforations every 1/4 inch or so.


To assemble the rosette, start with one end of the long piece, and begin accordion-folding it, back and forth.  Be gentle - remember, there are perforations, which are basically small cuts, in the cardstock, so you don't want to be too rough.

After folding the entire piece, you will need to join the two ends together, to form a cylinder.  The die cuts the cardstock so that after folding, a valley will fit into a peak perfectly.  After making LOTS of these rosettes, I can say that Glossy Accents is my adhesive of choice for joining the ends together.  It dries quickly and holds very well.  

Before continuing the assembly process, you will need one additional piece of cardstock - a circle for the back of the rosette.  The die does not provide this for you, but any paper punch will work just fine.  I used a 1 1/4" circle punch and some solid red scraps of cardstock for my back pieces, but you could also use the same cardstock you are using for the rosettes.  You could even run small pieces through the die-cutting machine on the die, just placing the scrap over the center piece - and then your rosette would be completely reversible.


While Glossy Accents works GREAT for the first part of assembling the rosette - for the rest of assembly, you will need to pull out your...wait for it...you might have to go digging in your garage for it...HOT GLUE GUN!  Yes, that's right.  I know that for some of you, the hot glue gun is a thing of the WAAAY distant past...and you may not even know where yours is.  But I promise you, if you you want your rosettes to turn out well, and to stick the first time and STAY, you will need a hot glue gun.  (Note - even Tim Holtz himself has now said that the hot glue gun is the way to go for this part, so I'm not actually alone in my strong feelings about this. ;p)

So, now that you've found it, take your back circle of cardstock, and put a big glop of hot glue on it.  (Tip: I am working here on a craft sheet - if you don't own one, you NEED one!  Nothing sticks to them - you can pour paint right on them and use as a palette - they are heat resistant, so they are great for things like hot glue guns and melt art, and there are tons of fun inky things you can do with them.)


Next, you will put your cylinder of folded cardstock around your circle of hot glue, with the scalloped side DOWN.  With your fingers, gently squeeze on either side of the cylinder, gathering the folds, and push the entire center of the cylinder down onto the glop of hot glue.  Hold it down with your finger for a couple seconds to make sure the glue has grabbed onto the cardstock.  (Tip: If you find that you've pushed your rosette down, and it's wonky, or the back is WAY off center, you can use a heat gun on the back to re-melt the glue to give you some play-time, to move the backing around or re-arrange the folds.  Trust me.)


Next, apply some hot glue to the back of your center piece, and place it on the front of your rosette, and you now have a completed, beautiful rosette!


Lather, rinse, repeat...and you, too, can have a whole platter of beautiful rosettes!


Don't they just look so yummy?!  I LOVE them!  (Wait - did you notice what's UNDER the gold platter? Yes, that right there, my friends, is a copy of Donna Salazar's AWESOME Musical Memories.  WHAT?!  You don't know about Musical Memories?!  For shame!  Keep reading...and wait 'til we get to the prizes!)

That stripey rosette is one of my favorites, I think - I ended up with a lot of pictures of it!!


After making your rosettes, you can either leave them as they are, or you can choose to embellish them in any number of ways.  I chose to just add some highlights to a few rosettes - some got a touch of silver using my silver Adirondack Paint Dabber, and some got a bit of vintage shimmer with my Rock Candy Distress Stickles (one of my absolute faves!).  


Okay, next, after you've made oodles of rosettes and embellished them as you see fit...you'll need to decide how you plan to hang them.  There are plenty of ways to do so...and here are some of the things I considered...red hemp, red embroidery floss, natural hemp, white paper twine...but I eventually settled on silver cord.  It seemed the most festive to me, and added a bit of sparkle to the garland.  If I had gone with more grunge-looking rosettes, I would have chosen something different, probably.


In order to hang the rosettes, you'll need to punch two holes on each rosette, one on either side opposite each other.  I used a paper-punching mat and a paper-piercing tool to make my holes.  The Tim Holtz Retractable Craft Pick would work great for this as well.  A regular hole punch doesn't work so well, as it is difficult to get into the right place, and it sort of smooshes the folds in the rosette (I tried).


Then, string your cord through the front of one hole, and back up through the second hole, so that the cord goes behind the rosette.


At one end, after leaving a long enough tail to be able to use for hanging your garland (12-18 inches should be  good), tie a double knot, to prevent the rosettes from sliding off.  Then, start positioning your rosettes as close or far apart from each other as you desire.  I allowed about 1/2" of cord in between each of my rosettes. 


Once you start getting your rosettes positioned along the garland, you can choose to either let them be "free," (to slide around), or you can secure them in place.  I chose to add a small piece of transparent scotch tape to the backs of each of my rosettes, holding the rosette to the cord so they would not slide and would remain evenly spaced.  


Once your garland is as long as you'd like it to be, tie a knot at the other end, and remember to leave enough cord at that end for hanging, as well.  And...you're finished!  For my garland, I used 26 rosettes, and the garland is about 75" of rosettes, plus another 25" or so combined at the ends - making it perfect for a mantle or entry-way.  Here, I'm demonstrating on a railing...(as I obviously have no other Christmas decorations up yet...tee hee...).  


So there you have it - the Tim Holtz rosette garland!  I hope you've enjoyed this, and if you make one of your own, I'd love a link so I can see it!  

Now...I know you're wondering...


So what are the prizes?!?


10 Holiday Card Kit from Hydrangea Hippo


Vintage Christmas Embellishment Assortment from Hydrangea Hippo


A Handmade Journal by Donna Salazar 


Musical Memories from Donna Salazar's paper collection (REMEMBER - I told you above that you'd see this again!)


An assortment of Glittered Chipboard Embellishments and Alphabets from Desert Scrappers Retreats

Just follow the instructions above to find out how to enter for your chance to win one of these great prizes from Art-full Horizons!!

***Additionally...here at Party of Five, I will also be having a giveaway at the end of the week!!  I will be posting throughout the week, from now through November 7, various posts about holiday projects, recipes, traditions, and memories.  On November 8, I will choose TWO winners of surprise grab bags filled with goodies to get you in the holiday spirit.  How do you enter?  Several ways!  You will get one entry for each comment you leave (one per blog post).  You will get another entry by becoming a follower of my blog (if you are already following, just let me know) and leaving a comment letting me know you are following.  You can get another entry by posting about this tutorial on YOUR blog, and leaving me a comment with a link to your blog.  Make sure you check back on November 8 to see if YOU are a winner!!***


Happy Hopping!!

The next blog on your hop will be Jennifer Edwardson http://frommypapercraftstudio.blogspot.com/.


Thank you for participating - comments have been disabled and winners will be announced soon!!

LinkWithin

Related Posts Plugin for WordPress, Blogger...