Showing posts with label paint dabbers. Show all posts

Saturday, December 24, 2011

Christmas Eve and Handmade Ornaments

It's Christmas Eve!  I really can't believe it myself.  This year, the Christmas season has been filled with an unusual sense of both angst and anticipation in our family, and I've tried extra hard to not over-do things, so that I could simply spend every minute possible just soaking up as much family time as possible. A year ago, we were celebrating the completely unexpected addition of a newborn baby boy, Jeremiah, to our family - via legal guardianship.  And this year, we are preparing our hearts to say goodbye to him just four days after Christmas, as he will leave our family to travel across the country to begin his new life with his birth mother. It has been a difficult process, accepting this turn of events, but in the end, love has won out, and Jeremiah is a blessed little boy to have so many people who love him so much.  Needless to say, we will be clinging together as a family, making this year as special as possible.

Since I needed to make gifts as simple as possible this year, I made ornaments for teacher gifts and gift exchanges.  I thought I'd share a few with you.  These are quick to make and could be made at the last minute if you need a gift idea for a last-minute guest.   


For these cute musical heart ornaments, I started by cutting two facing hearts from music paper.  I cut Christmas words out of some Teresa Collins ribbon and adhered it to the front heart, then added an additional sentiment with my Dymo labeler.  I put the hearts together, right sides facing out, and began stitching them together with a zig-zag stitch on my sewing machine.  I left about a 1" opening, and stuffed them with Poly-fil, then completed stitching them closed.  I trimmed around the hearts with pinking shears.  I used Distress Ink to ink around the edges - on the one above, I just used a bit of Gathered Twigs, while on the one below, I used both Festive Berries and Gathered Twigs.  I took a length of jute string and stitched it on to the back of the ornament, using a straight stitch, going back and forth a couple times (you could also just put it between the hearts when stitching them together, but I like the look of the added stitching).  Finally, I spritzed the front of the ornaments with some Biscotti Perfect Pearls spray for a bit of shimmer.


On this third ornament, I used Tim Holtz's Sizzix die, Carved Ornaments 2, to cut the ornament from grunge board, with the Noel Movers & Shapers die in the middle to cut out the word.  I painted the ornament using the Snow Cap paint dabber and let it dry.  Then I applied Denim, Pool, and Snow Cap Mixative Adirondack alcohol inks, using Blending Solution to help move the inks around, on an ink applicator tool, on the ornament.  I used a silver leafing pen to color the letters of "NOEL" and the topper piece, as well as the edges of the ornament.  I used the Movers & Shapers holly leaf to cut several leaves, and I used the Tattered Pine Cone die to cut some pine branches - all from Core'dinations cardstock.  I sanded them, used the Snow Cap paint dabber on their edges, and dabbed them with Rock Candy Distress Stickles.  I wrapped a small piece of fake greenery around the bottom of the ornament and then began arranging the branches and holly leaves on the ornament.  I topped them with a pearl from Tim Holt's Ideaology line. Finally, I tied a piece of jute string and inked seam binding through the top of the ornament, and it was complete.


What do you do for last minute gifts?  Do you have a go-to handmade gift?  

Wednesday, March 02, 2011

LaBlanche Stamps - UTEE Tag

While at CHA, I discovered a brand-new-to-the-U.S. stamp company, LaBlanche stamps.  At first, I looked at them and sort of started walking right on by - they LOOKED like foam stamps, and I just wasn't interested.  And then I stopped, as I saw a woman demonstrating the stamps - I saw the detail of the stamp she was demonstrating, and I immediately knew these were NOT your ordinary foam stamps!  So I took a closer look.  As it turns out, while the top part, where you hold the stamp, is actually foam, the bottom part - the stamp itself - is NOT foam, but is SILICONE!!  Who knew?!  And of course, we all know one of the unique and fun features of silicone is that it is remarkably heat resistant...which means that these stamps can be used particularly well with melted UTEE!

Now, to read my full review of these stamps, head on over to Craft Test Dummies and check it out!  But I wanted to share with you here today the tag I made while playing around with my stamp.

Products I used:


To start off, I took a size 8 manila tag.  I took my four colors of Glimmer Mist, and in the order listed above, I sprayed a bit of mist, on the craft mat. I then laid the tag down on top of the mist, pressing gently all around so it would soak up the Glimmer Mist.  I picked up my tag, turned it over, and used a heat gun to dry it.  I laid it back down a second time in the mist that remained on the mat (don't worry that it's all mixed together at this point), and repeated the process.

Next, I took my Distress Embossing ink pad (I prefer this one because it's extra juicy) and pressed it down all over my tag, making sure to cover the entire tag with ink.  Then I poured UTEE over the inked tag, tapped off the excess, and melted it with my heat gun.  Now, I've read in various places that it's possible to pour on more UTEE while the first layer is still hot, and to continue building layers this way.  Those people must be extremely fast.  Because I've never gotten that method to work for me.  So, I repeated the process of inking the tag with embossing ink, pouring on the UTEE, and melting it with the heat gun.  After about three layers, I decided to add a bit of Snow Cap paint dabber around the top edge and down the sides of the tag before proceeding with more UTEE.  The UTEE stuck to the paint just as it did to the ink, and as I continued melting, the white paint moved and shifted in really cool ways so that it no longer stayed just on the edges.

Finally, after about 6 layers of UTEE, I inked my LaBlanche stamp with Timber Brown Staz-on ink, made sure my UTEE was nice and melted, and stamped it onto the top part of the tag.  I repeated for the lower part of the tag.  This was my first time stamping into UTEE and I absolutely LOVED the incredible texture that was immediately created!  But I wanted to emphasize the texture even more...so I got out my inks.

Check out the Snow Cap paint dabber paint around
the top and sides of the tag, as it drifted into the melted UTEE
On the top part of the tag, I used the dark brown chalk ink and rubbed it into the crevices created by the stamped flourish.  On the bottom, I used the turquoise chalk and then the brown.    I also intentionally bent the tag to create cracks in the UTEE all over the tag, and then used my ink blending tool with some Walnut Stain Distress Ink and rubbed it into the cracks.  I went around the edges of the entire tag with the distress ink as well.

Incredible texture created from stamping into melted UTEE; tissue paper
flower created with just tissue, Glimmer Mist, glue, and filigree center

To embellish the tag, I first stamped the word "create" onto a relatively smooth portion of the tag using Staz-on, with a stamp from the newly-released Art & Soul set from Unity Stamps.  (LOVING this set - will review it on Craft Test Dummies soon!!)  I created a layered tissue-paper flower using Glimmer Mist and a filigree gem center, and added it to the lower right corner of the tag.  I found some ribbon that was almost the right color, just a bit too bright - so I dulled it with a bit of Distress Ink, and it was perfect.  I put the ribbon through the hole on the tag, and I added a jump ring to the ribbon so that I could hang a leaf charm from the Industrial Chic collection (available only at Michael's).


And that's it.  My tag is complete.  It was a new experience for me, and I had fun playing!  I will definitely be playing with UTEE again - and I most certainly see a melting pot in my future!!

What's YOUR favorite thing to do with UTEE?  Do you enjoy stamping into UTEE?  Or is there something else you enjoy more?  I'd love to hear - or see links to your projects!  And have you tried LaBlanche stamps?  What do you think?

Sunday, January 02, 2011

Shabby Chic Altered Tin - Found Items


Happy New Year to everyone!!  I hope 2011 is off to a great start for you - and of course, quite importantly, a CREATIVE start!  I was able, for the first time in many years, to actually stay up for the passing into the new year...and was able to accomplish something crafty at the same time, while my hubby cooked up a huge batch of delicious seafood gumbo - YUM!

Over at Crafts Unleashed, we've been focusing on crafty organization for the last week (and this coming week, too!)...and while my crafty space is, mostly, pretty well organized, I do still have certain odds and ends that just aren't quite organized to my liking.  OR, perhaps they are organized, but I don't happen to care for the actual containers in which they are stored.  So a couple of my goals for the first part of this year are to re-fashion some of the uglier storage containers, and to create some new solutions for things that aren't working.

This project was the first "turn ugly into pretty" one for the year.  Here's what I had to start with:


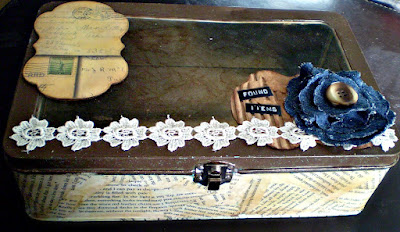
This tin, with an acrylic window on top, was originally a storage tin for a Stampin' Up! punch and stamp set, I believe - if I'm not mistaken - from MANY years ago.  It has since been used to store various sets of products - everything from tools to stamps to ink pads and stickles.  But...it's weird blue color with squiggly white lines on it just weren't working for me.  So, rather than scrap it altogether, I decided to alter it.

I started out by using my Espresso colored Adirondack paint dabber around the top edges.  Bits of the blue tin showed through after one coat, but I decided to not add a second coat, because I thought the bits of blue showing through added character.

Next, I got out my matte Mod Podge and a foam paint brush.  I have several books in my craft room that are for the sole purpose of tear pages out of, so I tore several pages out of one and tore them into smaller pieces in preparation for adding to the tin.  I painted a thin layer of Mod Podge onto the tin (starting on the bottom), and gradually added piece after piece of torn paper, adding more Mod Podge as needed to glue edges down.  After covering the bottom, I also covered the sides of the tin.  I used some Tim Holtz tissue tape to cover the bottom edges of the tin, wrapping it around to cover the gap between the sides and the bottom.


Once the paper and glue had dried, I used my foam ink applicators and distress inks (in Wild Honey, Vintage Photo, and Walnut Stain) to add color to the papers.  After the ink had dried, I added a top coat of Mod Podge, also covering the area of tin which had been painted with the dabber.


Next, I used felt on my ink applicator, with alcohol inks in Mushroom and Latte, with some Blending Solution, to add some color to the window of the container.  I added the ink to both the inside and outside of the window, for added effect.

I then used Spellbinders Nestabilities Labels 14, and cut 2 pieces of Donna Salazar's Zutter cardboard, and one piece of Tim Holtz cardstock from his Lost & Found collection, all using the largest die in the set.  I inked the piece of cardstock with distress ink, then glued it to one of the cardboard pieces, and glued the entire piece to the top of the tin.  For the second piece of cardboard, I tore most of one side of the cardboard off, revealing the corrugated center.  I inked the ridges with a Clearsnap chalk ink Catseye, and inked the edges with Walnut Stain distress ink, then glued the piece down on the tin.  I added a piece of flower trim across the entire tin, gluing it down with Glossy Accents.

To make the denim flower, I used the Spellbinders Nestabilities Classic Scalloped Circles (large), and a piece of my son's old cut-off jeans which I had saved.  I cut one scalloped circle in every size except the largest and smallest sizes (so the 5 center sizes).  (Note: I had to run the sandwich through my Big Kick back and forth several times to get the denim to cut all the way through.)  For each circle, I laid down a large dollop of Fabri-tac glue on my non-stick craft mat, laid the cut circle on top of it, then used my fingers to twist the circle and work it until it had pleated and formed into the shape I wanted it.  After all five layers were done in this way, I used the Fabri-tac glue to glue all the layers together, added a vintage button (which belonged to my grandfather) on top, and glued the flower to the corner of the tin.  

Finally, to finish things off, I used my Dymo labeler (believe it or not, one of the things I bought with my Michael's gift card after Christmas!!) to make the "Found Items" label.  I *adore* the look of the old Dymo labels!!!


I plan to keep odds and ends like dice, vintage porcelain dolls, bingo markers, corks, dominoes, etc., in here...cool things that I definitely want to keep for projects, but which I have NO IDEA where else I would keep!!  I absolutely LOVE how this turned out, and am SO glad I did not throw out the ugly blue tin!!

I think my NEXT storage solution needs to be something for storing all of my various glimmer/shimmer/smooch mists and sprays.  The plastic basket they are currently in is no longer large enough for them, and I'd like something that fits in with my craft studio a little better...so I'm considering trying to make my own container using corrugated board and binding it at the corners with jute.  I'll let you know if I do...and if so, how that works out!

So what about YOU?  Do you have any ugly storage items in your crafty space that you'd like to attempt a makeover on?  If so, I'd love to see your finished project - so make sure to leave a link in the comments!!

handmade projects


Thursday, December 23, 2010

The (Paper) Trailmakers Challenge Blog - Guest Design Team Project (and Tim tag #10!)


The second challenge for this month at The (Paper) Trailmaker Challenge blog was to somehow incorporate a tag, using the December Paper Trail kit.  Since I have been trying my best to work on Tim Holtz's 12 Tags of Christmas (I am soooo behind, not to mention doing them totally out of order!)...I decided to try using the Paper Trail kit to make one of the Tim Holtz tags, and this is what I came up with.  

I chose day 10 to work with the kit papers, because I thought the snowflake paper went perfectly with this tag - it is SUCH a cool technique!!  You can see Tim's original tag here.  I started out by tracing a standard size 8 manila tag onto the light blue snowflake paper and cutting it out. I glued the paper to the tag, and punched a hole at the top.  I used my  white Adirondack paint dabber along the edges.  Then I randomly dabbed some paint all over the paper, and quickly, before it dried, sprinkled some glass glitter over it - the paint acts as a glue for the glitter.  In the lower right corner, I also added some Glossy Accents, so I could add a LOT of the glitter, to make it appear as if there was a snowdrift.


Then, following Tim's instructions on his blog, I made my snowman out of grungepaper.  I cut the holly leaves for the snowman's hat out of the same paper - but showing the green "Merry Christmas" side, and used a hole punch to punch out berries from the red cardstock in the kit.  I used a cardstock sticker from the kit on the snowman's belly.  


I used the red organdy ribbon from the kit for the snowman's scarf.  I tied it in a knot, but was having a hard time getting it to stay down, so used my Tiny Attacher to put a little staple in it when I adhered the snowman to the tag.  I used my heat gun on the tails of the "scarf," which melted it a little and gave it a sort of wrinkly, more scarf-looking appearance.  I thought it was pretty cool!!


Then, following Tim's instructions, I cut a piece of clear packaging material (yes, PACKAGING!!) I had saved from one of his products, to the size of the tag, and embossed it with my snowflake embossing folder.  I punched a whole in the top, and then used my Cropadile to punch holes in all four corners to use copper brads to adhere the embossed tag over the snowman tag.  I attached the gorgeous shimmery white ribbon from the kit through the top of the tag.  Finally, I took three of the little cardstock banner stickers, edged them with distress ink, wrote "Fa la la" on them, and adhered them to the embossed tag.  


I hope you've enjoyed this tag as much as I enjoyed making it!  And you should definitely check out Tim's other 11 tags for more awesome inspiration!!  And if you've been inspired to make some tags, or to add a tag or two to a project of your own, be sure to link up to the challenge post here.

I want to take a minute to thank Karen and the entire design team at The Paper Trail team for letting me play along with them this month - it's been a true pleasure working with them!!  Even after all of these projects I've made this month, I still have TONS of product left from this awesome December kit - so if you still haven't ordered your December Paper Trail kit, you really should do so ASAP!!  You'll be wanting it to scrap all of your Christmas photos after the holidays, for sure!!  

Saturday, December 11, 2010

12 Tags of Christmas - Day 9!! (yes - out of order)


I had the grandest of plans to keep up with Tim's 12 tags...well, actually, I didn't...I knew better.  That's why I was surprised when I got the first 2 done!!  LOL!  Not only is it hard to find adequate time, but I'm working with a limited "Tim" stash, which thus requires an extra amount of ingenuity - which is also time consuming.  Not that I don't enjoy the challenge - really, I do - it totally stretches me creatively - but between trying to finish up the semester of homeschooling, taking care of a newborn, getting ready for Christmas, and participating on two design teams for the first time ever this month...my extra creative time has been very limited.

Anyway, all that said, I decided to quit thinking I needed to "catch up," and just pick up where I felt like it.  Tim is actually finishing up tonight with his 12th and final tag.  I was able to find the time to do tag #9 a couple nights ago, and am really happy with how it came out, so I wanted to share it with you.  I do still hope to get the rest of them done in the next couple weeks...so we'll see!!


You can see Tim's tag #9 here, if you'd like to compare mine to his.  


I can't wait to see what he comes up with for the 12th and final tag for this year's series.  What a treat it's been to watch his mastermind creativity at work!!

Thursday, December 09, 2010

The (Paper) Trailmakers Challenge Blog - Guest Design Team project


I tell you what - I am really loving playing with this December Paper Trail kit!! First, the frame project was a blast to make, and now, these cards were SO FUN!! These papers by Lily Bee Designs are just wonderfully versatile and coordinate so well together, the kit makes it super easy to put together great projects, no matter what you're making.

This first challenge of "put a stamp on it" was not such a stretch for me - me who recently "de-stashed" by getting rid of over 100 stamp sets!!! Yep, you read that correctly!! Not to fear - I still have well over 50 stamp sets still in my stash, and somehow still manage to pick up a new one here and there - and always have more on my wish list. Actually, my papercrafting - really, my entire artsy-craftsy life - started out with rubber stamping. I went through a time period of several years when I didn't even pick up a stamp, though, and I thought I was done stamping...but then just in the past 6 months or so, I've gotten back into it. There really is SO much you can do with stamping and ink - I think that's what draws me to it...the huge variety of techniques. I'm a technique junkie, of sorts. Anyway, for this challenge, I made three different cards for you, all using different stamping techniques.

**********************************************************


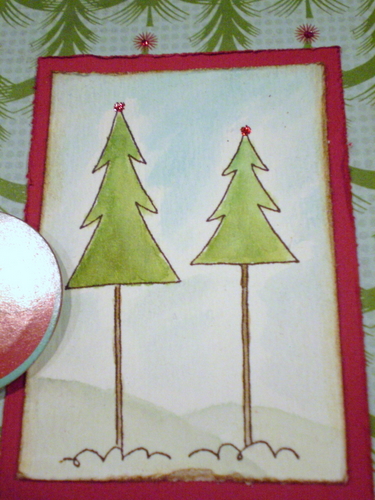
For this first card, I stamped an outline stamp of a couple trees on a small piece of watercolor paper. I like using watercolor paper for this technique because it holds up well and you can move color around nicely on it. After stamping the trees in brown permanent ink, I rubbed distress inks directly on my craft sheet, then used an aqua painter (a brush filled with water - you could also just use a paint brush and water) to pick up the ink and paint the stamped trees. I also painted some snow and a faint sky background. I used a paper distresser along the edges of both the watercolor piece and the red piece beneath it, and inked the edges with distress ink.


Finally, for a little glitz, I added some Christmas Red Stickles over each red dot at the top of the Christmas trees on the background paper. 


***********************************************************

For the second card, I only did a little stamping - I stamped "Joy to the World" on one of the kit's cardstock stickers, layered it on black cardstock, and popped it up on foam squares, on the front of the card; and I stamped a greeting inside the card, as well. I layered a couple of the pattered papers from the kit, using a notebook-paper edge punch along the top of the red one. I added distress ink around the edges of both papers. I made a paper rosette with the black and white paper, using my Martha Stewart scoring board, and layered one of the chipboard buttons from the kit on top of it, placing some additional chipboard buttons beside it. 

The greeting inside the second card.

**********************************************************


Finally, the third card. This was my favorite to make - I think because I love the colors, and because I absolutely LOVE this Tim Holtz Sizzix die that I used. It's called "Townscape," and I just think the miniature houses are adorable!! They have so much potential - and for every season!! Anyway, I created the houses by gluing a piece of the black cardstock to a piece of corrugated cardboard. I then ran it through my Sizzix Big Kick with the Townscape die, cutting the houses. I trimmed just a tad off the bottom, and a little off each end, to fit the card. Then I used my Snow Cap (white) Adirondack paint dabber to ink up my definition background stamp, and stamped the houses. I thought it looked really cool, with the black text on the white snowflakes on the background paper. (Note - I love using my paint dabbers on my stamps - and you will too - but make sure you wash them off right after you use paint on your stamps, or you won't be happy with your stamps the next time you go to use them!) I used the paint dabber to add a little "snow" to the roofs of the houses as well, and then glued the strip onto the card.


Then I added the 25 with Thickers from the kit, and stamped a sentiment inside.


So...there you have it. Now it's YOUR turn!! Have you grabbed your December Paper Trail kit yet? And if so, what are you creating with it? Stamping isn't just for cards, either - you can certainly use stamps on scrapbooking layouts, tags, home decor projects - most anything! Make sure you add your stamped project to our linky widget in the challenge post so that we can see what you've created and for your chance to win some of the Lily Bee papers from this kit!!  You have until Saturday, December 18, at 5 pm EST to get your project linked up for your chance to win!

Wednesday, December 01, 2010

It's Beginning to Look a Lot Like Christmas - Paper Trail Blog Hop


Welcome, hoppers, to the 2010 Paper Trails "It's Beginning to Look a Lot Like Christmas" blog hop!!  I am SO excited to be the December Guest Design Team member for The (Paper) Trailmakers Challenge Blog!! 

The blog hop will run from Dec. 1 - Dec. 4, and on Dec. 5, each blog owner will pick a winner for a small giveaway or RAK from those who've left comments!!  Here are the blog hop participants, in case you've started in the middle, so you can make sure to catch all of  us:

4. Jen - you're here!
6.. Karen

Without further ado...here is my first project for the month, using the December Paper Trails kit:


First off, let me just say - I am *LOVING* the December Paper Trails kit!!!!  The papers, the embellishments - they are all STUNNING!  And SO versatile - I am finding that they allow me to create something more on the elegant side, like this piece of home decor, or something more on the whimsical side - which you'll see with the first Trailmakers Challenge.  ;)  (Interested??) 


For this project, I used all of the papers in the December kit, with the exception of the solid red cardstock.  I started with a plain-jane burdundy-red wooden 8x10 photo frame.  I sanded it a bit, using my Tim Holtz sanding block, and then painted it black using a black Adirondack paint dabber.  Once it was dry, I sanded it again, giving it a slightly worn look and allowing some of the underlying red to show through.  

Then I cut a sheet of the black cardstock from the kit, to fit inside the frame.  I then used a 1 3/8" square paper punch to punch out lots of squares from the patterned papers, as well as a few from the white cardstock.  I went around the edges of the squares with a white Adirondack paint dabber, to help the squares stand out against the black background, and once dry, I adhered the squares to the black cardstock using adhesive.  I then put the piece in the frame and closed it up.  


I adore Thickers, so I was thrilled to get some in this kit, and I thought they would look great on TOP of the glass in this project - and I was right - I love the effect!!  I placed the letters for "JOY" over three of the plain white squares, and then placed one of the gorgeous chipboard buttons over the fourth white square - again, on top of the glass.  

I used my Tim Holtz Tiny Attacher (one of my absolute NECESSITY scrapbooking and crafting tools!) to make pleats in the red and black ribbon from the kit - a gorgeous piece of ribbon, I might add!  I then used my hot glue gun to attach the ribbon, Prima vine, and Prima poinsettia (all from the kit - seriously, this kit is LOADED!) to the frame.  Finally, I added the "Merry Christmas" cardstock sticker, over the ribbon, and my project was complete.  (And I have TONS of kit product left over, I have to add!)


I supposed you would like to see a picture of everything that's actually included in this kit, right?  Well, here you go:


I promise you that there is no way you could buy this kit at retail for what the kit is selling for!

Whether you need to make cards, scrapbooking layouts, home decor projects, gifts, or whatever else your imagination can create - you cannot go wrong with the December Paper Trails kit!!  Hurry - go get yours right now!!  But don't forget to leave a comment first, for your chance to win a little something!

And keep an eye 0ut - I will have a couple more projects later in the month using the same kit!!

The next stop on your hop is Krystle's blog!  Happy hopping!

Wednesday, November 03, 2010

Art-Full Horizons Jolly Jumpstart Blog Hop - Day 3 (and CCC #20)


Welcome to the Art-Full Horizons 
Jolly Jumpstart
 Blog Hop!


Check out all of the fabulous holiday-themed projects, gift ideas, and more from our wonderful Blog Hop Contributors from around the world!!
  1. Art-Full Horizons http://art-fullhorizons.blogspot.com
  2. Tammy Inman http://tammyi.com
  3. Nan Paturzo http://scrappynan.blogspot.com
  4. Robyn Weatherspoon http://herebygrace.typepad.com/
  5. Mykle Parker http://scrapbohemia.blogspot.com
  6. Sherry Mendoza http://sherryscreations.typepad.com/
  7. Robin Redd http://robinredd.typepad.com/west_coast_scrapper/
  8. April Meeker www.suaviloquy.blogspot.com
  9. Erin Bassett www.erinbassett.com
  10. Jennifer Clark http://jenspartyof5.blogspot.com
  11. Jennifer Edwardson http://frommypapercraftstudio.blogspot.com/

Here's how it works:
  1. Hop through each of the blogs listed above to get fabulous holiday inspiration. If you are starting at a blog in the middle of the Hop, please start back at the Art-Full Horizons blog.  You should be arriving here from Erin's blog.
  2. Leave a comment on each blog hop post in the list above between now and November 7, 2010.
  3. Enter to win our giveaway by doing any of the following. For each thing you do, you will be entered into the drawing one more time:
  • Leave a comment on the Art-Full Horizons blog hop post between now and November 7, 2010.
  • Join the Art-full Horizons email list (fill out the form in the left hand column on the A-H blog).
  • Become a follower of the Art-full Horizons blog! Just click the "Follow" button in the lower right column on the A-H blog.
  • "Like" the Art-Full Horizons Facebook Page.
  • Join the Art-Full Horizons Facebook Group.
  • Share about this Blog Hop on your own blog, posting a link to the Art-full Horizons blog.
  • Share about this Blog Hop on Facebook, posting a link to the Art-full Horizons blog.
  • Share about this Blog Hop on a message board or forum, posting a link to the Art-full Horizons blog.
  • U.S. entries only please

To let us know you've done these things, please return to the first Art-full Horizons Jolly Jumpstart Blog Hop post and leave a comment for each thing you did, i.e. one comment for posting on each blog, another comment for posting on facebook, and another comment for joining our email newsletter. Please note: if you post it all in one comment, it will only count as one entry, so be sure to post EACH ENTRY as a separate comment.

On November 8, 2010 we'll choose the winners using the Random Integer Generator from random.org. U.S. entries only please.


**************************************************
Today, here on Party of Five (and if you stay tuned...we may need to change the name of this blog soon...just sayin'...), I am sharing with you a holiday wall hanging made from a simple, ONE DOLLAR wooden picture frame from Michael's craft store.  


Seeing as I finished it VERY late tonight, I didn't get a chance to actually HANG it for you...so sorry for the pics of it just laying down with the ribbon on the table!!  But trust me, the ribbon is staple-gunned to the back, and it will hang nicely!!


I started out by using gel medium to cover the front of the frame with some gorgeous Donna Salazar cardstock.  I sanded the edges, and then added some Tim Holtz Tidings tissue tape around the outside and inside edges, making sure to push it all down well.  I then used distress inks (Pine Needles, Peeled Paint, and Barn Red) to ink around the edges of the frame, and used my fingers to add a layer of gel medium over the tissue tape to be sure it stays in place well over time.  Next, I covered the two strips of what looked like lace, on the cardstock, with a thin layer of Rock Candy distress stickles.  You can see the shimmer over on the left side of the frame.  If you can only get ONE color of distress stickles, I guarantee you will never regret going with the Rock Candy!!!


Next, I took a holiday pick and cut a couple things off of it - a small piece of evergreen, and a leaf.  I covered the leaf with a copper Adirondack Acrylic Paint Dabber, and then I used hot glue to attach both pieces to the frame.  I cut a tree out of grungepaper, using my Winter Woodland Cricut cartridge.  I then ran it through my Sizzix, using my Tim Holtz sheet music embossing folder.  I inked it with distress inks, and then applied Peeled Paint distress stickles on it.  I attached it to the frame using foam squares.


Next, I made the snowflakes.  Because I am using this pieces for the Compendium of Curiosities Challenge for this week (you should totally check that out!), I can't explain just how I made the snowflakes.  ;)  Just know that I used a technique explained by Tim Holtz in his awesome book, A Compendium of Curiosities.  I attached the snowflakes in layers, so that they would pop off the frame a little at a time, with the biggest one being popped out the most.


Finally, for the center...I started by simply using the cardboard filler that came in the frame as a foundation.  That way I would know for sure that my center would fit perfectly.  I covered the back with a scrap piece of coordinating green cardstock.  The front, I covered with a piece of vintage Christmas music from a songbook.  Then, using the same Cricut cartridge as above, I cut out the word "Joy" from another sheet of Donna Salazar's cardstock, and a shadow from a sheet of coordinating green cardstock.  I glued the two together, and glued them to the music, then replaced the center into the frame.  I used a staple gun to attach a length of dark red, 7/8" wide grosgrain ribbon to the frame so it can be hung, and I was finished!


I hope you've enjoyed today's holiday inspiration!  I know that I am going to pick up a few more of these dollar frames the next time I am at Michaels, because this was a fun project!!

Remember that you have through November 7 to complete the Jolly Jumpstart blog hop.

***Additionally...here at Party of Five, I will also be having a giveaway at the end of the week!!  I will be posting throughout the week, from now through November 7, various posts about holiday projects, recipes, traditions, and memories.  On November 8, I will choose TWO winners of surprise grab bags filled with goodies to get you in the holiday spirit.  How do you enter?  Several ways!  You will get one entry for each comment you leave (one per Jolly Jumpstart blog post).  You will get another entry by becoming a follower of my blog (if you are already following, just let me know) and leaving a comment letting me know you are following.  You can get another entry by posting about this project on YOUR blog, and leaving me a comment with a link to your blog.  Make sure you check back on November 8 to see if YOU are a winner!!***

Thank you for participating!!  Comments are now disabled, and winners will be announced soon!!

LinkWithin

Related Posts Plugin for WordPress, Blogger...