Showing posts with label Cricut. Show all posts

Tuesday, January 25, 2011

LOVE Banner Tutorial - Valentine's Home Decor

I have really great memories of Valentine’s Day from my childhood.  My mom really went all-out for the holiday…from decorating the house with hanging tissue-paper hearts and banners, to breakfast on a table covered in red and pink decorations, and dinner with more surprises and fancy decorations…she really out-did herself.  As a mom now, I wonder how she did it all.  After all, she was a working mom; and as a stay-at-home mom, I am ashamed to admit that I, um, have NEVER put up a single Valentine’s decoration, or really done anything spectacular for my kids for the day.  I think I *did* buy some “x” and “o” shaped pancake molds one year, and they were a flop.  Anyway, this year, I am resolving to start doing a little more – and THIS banner is my start!
To create this banner, you’ll need these things:
First, you need to prepare your corrugated cardboard backing pieces.  Cut 4 pieces of cardboard, about 5″ x 7″.  Then, peel the front off one side, revealing most of the corrugation inside.  Take the white ink pad, and rub it directly over the corrugated cardboard, so that the bumps of the corrugations are highlighted with the white ink.  Set the cardboard pieces aside to dry.
Love Banner corrugated cardboard
Peel most of the facing off the cardboard
Next, take a sheet of black text paper from the Core’dinations paper pad, and lightly sand the surface of it using a sanding block, revealing the contrasting color beneath the black.  Cut four pieces of paper, 4″ x 6″, and adhere one to each piece of cardboard using Fabri-tac (I like using this glue due to its great grab and ability to use with wet applications).  Next, place your pieces in a protective spray box (I have a homemade one), and spritz each piece with a homemade Perfect Pearl spray (instructions to come!) or your choice of shimmery mist.
Background misted with homemade Perfect Pearl mist
Now you will cut take a sheet of the ivory-colored large dotted paper from the Core’dinations paper pad, and sand the dots, revealing the lighter color.  Then, you will use the largest die from the Nestabilities Labels 4 set to die cut a label shape for each of the four banner pieces.  Glue them onto the foundation pieces.
Adhere Nestabilities Label 4 to background
Using the Cricut font cartridge of your choice (I used Alphalicious), cut the letters to spell “LOVE,” at about 3″ size (depending on their width, you may need to adjust, to fit on the label), out of a sheet of the damask Core’dinations paper in red, sanding it before cutting.  Use Distress Ink and an ink blending tool with foam pad to add ink around the edges of the letters, and then glue the letters to the labels.
Using the Sweethearts cartridge (or any cartridge with a heart shape), cut several hearts in 1.25″ and 2″ sizes, also from the red damask paper.  These will be used for embellishing.
Cut four 1.75″ x 12″ strips of the red damask Core’dinations paper and lightly sand them.  Take a strip of the paper, and lightly spritz both sides of the paper with water to make it more pliable.  Begin folding the paper to make pleats in it.  Put a strip of Fabri-tac adhesive down across the very bottom of one of the banner pieces, and lay the pleated red cardstock across it, pushing down and holding for a short time until the glue grabs and holds the pleats in place.  Lay another bead of  Fabri-tac down on top of the pleated cardstock, at the very top of the pleats, and cover it with a 1/2″ wide strip of the ivory dotted Core’dinations paper.  Trim both the red and ivory cardstocks even at the sides of the banner piece, and then use scissors to cut a slight wave pattern in the pleated cardstock at the bottom.  Repeat for all of the banner pieces.
Begin embellishing the banner pieces with the red hearts, hot-fix rhinestones, and handmade tulle flowers as desired.   Use Glossy Accents to add a glossy, dimensional accent to areas of cardstock or entire pieces of cardstock.  I used it on embossed (raised) areas of some hearts, or on entire hearts, and on the dots of the strips at the bottoms of the banner pieces.
Use Paper Glaze to accent embossing or add dimension
Use Glossy Accents to accent embossing or add dimension
Twisted tulle flower with hot fix rhinestone and cardstock heart center
You can get creative with Fabri-tac and tulle in making flowers.  In the above flower, I covered a piece of cardstock with adhesive, then took a length of tulle and began twisting it and laying it down on the glue, going round and round until I covered the cardstock.  Below, I also covered a piece of cardstock in adhesive, but rather than twist the tulle, I simply gathered some between my fingers and pushed it down into the adhesive, then repeated over and over until I had a nice, floofy flower and the cardstock was covered.
Bunched tulle flower and distress-ink heart
You can see above that I rubbed a distress ink pad directly over my heart, so the ink hit only the raised, embossed areas.  I also inked the edges of the heart.
Continue to embellish the banner pieces as desired until you are satisfied.  Once completed, punch holes in the top corners of each piece, and thread twine through the holes of each piece, leaving about 3-4 inches between each banner piece and about 18 inches at each end for hanging.  Cut pieces of tulle and ribbon approximately 5 inches long and tie them around the twine all along the twine, as few or as many as desired, until you reach the look you desire.
Love Banner Completed
Now…isn’t that LOVE-ly?!
*****
Note: This project was made for the Crafts Unleashed blog, as part of a "LOVE" home decor competition amongst the Crafts Unleashed design team this month.  Go check out the other projects, and vote for your favorite (hint, hint!!) here!!

Wednesday, November 03, 2010

Art-Full Horizons Jolly Jumpstart Blog Hop - Day 3 (and CCC #20)


Welcome to the Art-Full Horizons 
Jolly Jumpstart
 Blog Hop!


Check out all of the fabulous holiday-themed projects, gift ideas, and more from our wonderful Blog Hop Contributors from around the world!!
  1. Art-Full Horizons http://art-fullhorizons.blogspot.com
  2. Tammy Inman http://tammyi.com
  3. Nan Paturzo http://scrappynan.blogspot.com
  4. Robyn Weatherspoon http://herebygrace.typepad.com/
  5. Mykle Parker http://scrapbohemia.blogspot.com
  6. Sherry Mendoza http://sherryscreations.typepad.com/
  7. Robin Redd http://robinredd.typepad.com/west_coast_scrapper/
  8. April Meeker www.suaviloquy.blogspot.com
  9. Erin Bassett www.erinbassett.com
  10. Jennifer Clark http://jenspartyof5.blogspot.com
  11. Jennifer Edwardson http://frommypapercraftstudio.blogspot.com/

Here's how it works:
  1. Hop through each of the blogs listed above to get fabulous holiday inspiration. If you are starting at a blog in the middle of the Hop, please start back at the Art-Full Horizons blog.  You should be arriving here from Erin's blog.
  2. Leave a comment on each blog hop post in the list above between now and November 7, 2010.
  3. Enter to win our giveaway by doing any of the following. For each thing you do, you will be entered into the drawing one more time:
  • Leave a comment on the Art-Full Horizons blog hop post between now and November 7, 2010.
  • Join the Art-full Horizons email list (fill out the form in the left hand column on the A-H blog).
  • Become a follower of the Art-full Horizons blog! Just click the "Follow" button in the lower right column on the A-H blog.
  • "Like" the Art-Full Horizons Facebook Page.
  • Join the Art-Full Horizons Facebook Group.
  • Share about this Blog Hop on your own blog, posting a link to the Art-full Horizons blog.
  • Share about this Blog Hop on Facebook, posting a link to the Art-full Horizons blog.
  • Share about this Blog Hop on a message board or forum, posting a link to the Art-full Horizons blog.
  • U.S. entries only please

To let us know you've done these things, please return to the first Art-full Horizons Jolly Jumpstart Blog Hop post and leave a comment for each thing you did, i.e. one comment for posting on each blog, another comment for posting on facebook, and another comment for joining our email newsletter. Please note: if you post it all in one comment, it will only count as one entry, so be sure to post EACH ENTRY as a separate comment.

On November 8, 2010 we'll choose the winners using the Random Integer Generator from random.org. U.S. entries only please.


**************************************************
Today, here on Party of Five (and if you stay tuned...we may need to change the name of this blog soon...just sayin'...), I am sharing with you a holiday wall hanging made from a simple, ONE DOLLAR wooden picture frame from Michael's craft store.  


Seeing as I finished it VERY late tonight, I didn't get a chance to actually HANG it for you...so sorry for the pics of it just laying down with the ribbon on the table!!  But trust me, the ribbon is staple-gunned to the back, and it will hang nicely!!


I started out by using gel medium to cover the front of the frame with some gorgeous Donna Salazar cardstock.  I sanded the edges, and then added some Tim Holtz Tidings tissue tape around the outside and inside edges, making sure to push it all down well.  I then used distress inks (Pine Needles, Peeled Paint, and Barn Red) to ink around the edges of the frame, and used my fingers to add a layer of gel medium over the tissue tape to be sure it stays in place well over time.  Next, I covered the two strips of what looked like lace, on the cardstock, with a thin layer of Rock Candy distress stickles.  You can see the shimmer over on the left side of the frame.  If you can only get ONE color of distress stickles, I guarantee you will never regret going with the Rock Candy!!!


Next, I took a holiday pick and cut a couple things off of it - a small piece of evergreen, and a leaf.  I covered the leaf with a copper Adirondack Acrylic Paint Dabber, and then I used hot glue to attach both pieces to the frame.  I cut a tree out of grungepaper, using my Winter Woodland Cricut cartridge.  I then ran it through my Sizzix, using my Tim Holtz sheet music embossing folder.  I inked it with distress inks, and then applied Peeled Paint distress stickles on it.  I attached it to the frame using foam squares.


Next, I made the snowflakes.  Because I am using this pieces for the Compendium of Curiosities Challenge for this week (you should totally check that out!), I can't explain just how I made the snowflakes.  ;)  Just know that I used a technique explained by Tim Holtz in his awesome book, A Compendium of Curiosities.  I attached the snowflakes in layers, so that they would pop off the frame a little at a time, with the biggest one being popped out the most.


Finally, for the center...I started by simply using the cardboard filler that came in the frame as a foundation.  That way I would know for sure that my center would fit perfectly.  I covered the back with a scrap piece of coordinating green cardstock.  The front, I covered with a piece of vintage Christmas music from a songbook.  Then, using the same Cricut cartridge as above, I cut out the word "Joy" from another sheet of Donna Salazar's cardstock, and a shadow from a sheet of coordinating green cardstock.  I glued the two together, and glued them to the music, then replaced the center into the frame.  I used a staple gun to attach a length of dark red, 7/8" wide grosgrain ribbon to the frame so it can be hung, and I was finished!


I hope you've enjoyed today's holiday inspiration!  I know that I am going to pick up a few more of these dollar frames the next time I am at Michaels, because this was a fun project!!

Remember that you have through November 7 to complete the Jolly Jumpstart blog hop.

***Additionally...here at Party of Five, I will also be having a giveaway at the end of the week!!  I will be posting throughout the week, from now through November 7, various posts about holiday projects, recipes, traditions, and memories.  On November 8, I will choose TWO winners of surprise grab bags filled with goodies to get you in the holiday spirit.  How do you enter?  Several ways!  You will get one entry for each comment you leave (one per Jolly Jumpstart blog post).  You will get another entry by becoming a follower of my blog (if you are already following, just let me know) and leaving a comment letting me know you are following.  You can get another entry by posting about this project on YOUR blog, and leaving me a comment with a link to your blog.  Make sure you check back on November 8 to see if YOU are a winner!!***

Thank you for participating!!  Comments are now disabled, and winners will be announced soon!!

Tuesday, October 26, 2010

Patterned Cardstock - just for scrapbooking? Not!

Not so long ago, I would wander into a scrapbook store or a craft store, and look at the beautiful scrapbooking papers or patterned papers, and think to myself, "Wow, these are SO lovely, but I really do NOT scrapbook often enough to justify spending the money..."  But over the past few years, I have come to learn just how many projects these beautiful papers can be used for - OFF the scrapbook page!  And not only off the page, but in bits and pieces!  You would be AMAZED at just how much you can do with a sheet (or few sheets) of some gorgeous paper!

Back in July, while at a scrapbooking store several hours from where I live, for a weekend of workshops with Donna Downey, I fell in love - I mean head over heels - with My Minds Eye's Lost & Found collection.  And not just one line in the collection - but the ENTIRE collection.  Every piece of paper in the collection is glittered, the title tags are glittered, the stickers are glittered, the layered rosette flower stickers are just gorgeous, the buttons, the brads, the trims, the chipboard album covers...I mean, MME really hit it out of the park with this collection!  I resisted, though, and didn't buy any at the time.  But when a friend recently asked me to make baby shower invitations for a mutual friend, due to have a little boy in December, I knew within seconds exactly what papers I wanted to use!!  So without further ado...I present...my MME Portobello Road baby shower invitations.  I wish I would have taken photos along the way, but alas, I didn't...so I'll do my best to describe the process to you.


For starters, I began with just two patterned papers - Portobello Road "Party," and Portobello Road "You and Me."  I also used the Portobello Road stamp set.  Addtionally, I used plain vanilla 12x12 cardstock (Stampin' Up!), my computer word-processing program, the Graphically Speaking Cricut cartridge, a Tim Holtz Alterations -On The Edge "Brackets",  some white Maya Road crocheted trim, some Stampin' Up! light blue narrow organdy ribbon, a Brown Staz-on ink pad,  Vintage Photo distress ink, an Ink Blending Foam Applicator, and a sepia Martha Stewart marker.


  1. I started by cutting my vanilla cardstock into 6"x12" pieces, and then cut the base tag shapes on my Cricut using the Graphically Speaking cartridge, at 5.5" size.  
  2. I inked all the edges of my tags using Vintage Photo distress ink with an ink applicator.
  3. I used the "You and Me" paper to cut 1"x5.5" strips of paper, then ran them through my Sizzix with the Brackets Alterations die to give the fun edge.
  4. I cut the banner off the tops of all of the pieces of my "Party" papers, and then cut the rest of the paper (using the back side) into 3"x5.5" strips to use for the centers of my invitations.  
  5. On my computer, in a word processing program, I typed out the information regarding the baby shower.  I printed it on regular paper, and made sure it would fit on the center strip of patterned paper.  Once I had it sized as desired, I used temporary adhesive to adhere the strips of patterned paper to the same sheet of paper I had already printed on, and ran it through my printer again, so that the information would print on the patterned paper rather than the plain paper.  I repeated this process until all of my invitations had been printed.
  6. I inked the edges of the center, printed strips, with the distress ink.
  7. I adhered the die cut strips to the tag bases, and then adhered the center strips over the side strips, centering them on the tag bases.  I punched a hole to line up with the hole in the tag which the Cricut had cut.
  8. I used my distress ink and foam applicator to apply distress ink to the crocheted trim, and then glued the trim to the bottoms of all of the invitations.
  9. I carefully cut apart the banner pieces from the tops of the "Party" papers.  I chose to cut apart each individual triangle piece.  I had 15 invitations to make, and there were 9 triangles on each page, which meant I used 5 pieces of paper.
  10. Using the word "BOY" from the stamp set, I cut apart the letters very carefully.  Using the brown Staz-on ink, I stamped one letter from the word on each of three banner triangles for each invitation.
  11. After stamping the banner pieces, I used a foam pop dot to adhere the banner pieces to the invitations.
  12. I used the airplane from the same stamp set and, again with the brown Staz-on, stamped the airplane above the banner pieces on each invitation.
  13. Using the sepia colored Martha Stewart marker, I hand-drew in a loopy line from the tail of the airplane to the end of the banner, to make it look as if the airplane was pulling the banner.
  14. I tied a piece of light blue organdy ribbon through the hole of the tag invitation to complete it.


I'm very happy with how the invitations turned out, and am even surprised myself at how much precious, gorgeous, glittery cardstock I have leftover even after making 15 invitations!  I was sure to save the area above the banner on the "Party" paper, with the beautiful birds, as I am certain I will be able to use those pieces for something lovely.  And I still have several good sized-pieces of the "You and Me" paper left as well.  Cutting these special papers apart not only allows you to use them in unique ways, but it also helps you to maximize your "bang for the buck," so to speak.

What about YOU?  Have you cut apart any beautiful patterned papers or cardstocks to use for special projects or to save money?

Monday, October 04, 2010

Random weekend crafty fun


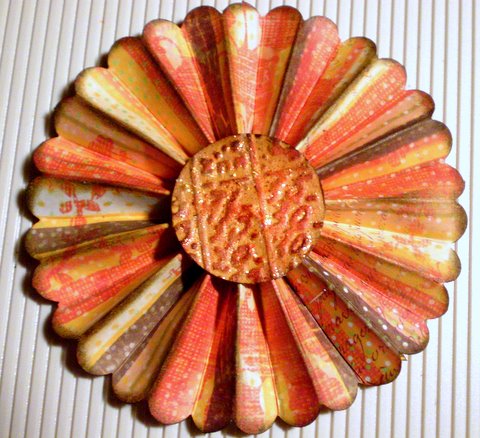
How completely GORGEOUS is this flower rosette?!  I have been admiring these paper rosettes for a while now, on other people's blogs.  I've seen tutorials on how to make them, and I've seen Tim Holtz's new Sizzix die cut that makes it super easy to make the rosettes.  My super-sweet hubby gave me a Michael's gift card this weekend, and I was able to get a few hours of ME time this weekend, so I spent some time wandering the aisles of Michaels, loving their new-and-improved selection of Tim Holtz products.  Anyway, they do not have the new rosette die...but I was thinking that I might want the Martha Stewart score board anyway, so that I could make multiple sizes of rosettes...so I got one!  Additionally, I did find a pair of Tim Holtz Sizzix embossing folders (the one with the notebook page and the numbers collage).  My first few attempts at making the rosette failed, but after watching this YouTube video, I finally got it right (AND got the idea to scallop the edge before scoring the paper, which I LOVE, anyway).


I don't remember the name of the paper pad this sheet of paper is from.  I used a scallop-edge punch from Stampin' Up!.  For the center of the rosette, I used the numbers collage embossing folder to emboss a sheet of mustard-colored cardstock.  I then used distress ink pads direct-to-paper to rub over the raised portions (colors used - Barn Door, Spiced Marmalade, Vintage Photo).  I punched out a circle, and inked around the edges with Walnut Stain, then glued it onto the rosette.  I also used Vintage Photo and Walnut Stain distress inks with a foam ink applicator to apply ink to the scalloped edges of the rosette and the raised "mountains" of the rosette.  Finally, I added some Scattered Straw and Spiced Marmalade colored Distress Stickles over the  embossed center of the rosette to give it a bit of vintage sparkle.  


Can you see that gorgeous sparkle from the distress stickles?  I LOVE them!!!  They are more matte and muted than regular stickles, and have a more vintage look to them.  They are quickly becoming a favorite of mine!!  I think I have 9 colors now...but STILL haven't found the ONE I've been searching for - Rock Candy!!  Anyway, I can't wait to make more of these rosettes and put them on some fun projects!!  (Or even make a project out of just the rosettes...can you see a rosette garland in your mind??)
*******************************************************


This next project is one I did with the kids, and I got the idea from here.  I free-hand drew the tree onto kraft paper and used removable glue dots to stick it to the slider doors.  I used recycled (i.e. the brown ones, not ones I've used!) coffee filters, and I sprayed them with water before the kids began painting them.  Rather than use watercolors (which the twins tend to really dig the paintbrushes into), I just watered down some tempera paints.  They had a blast - especially Mackenzie, who dumped the bowl of orange paint not once, but twice!  I let the coffee filters dry, and then cut various sizes and shapes of leaves out of them.  The kids then helped me stick them to the slider door...on the tree, and falling down to a "pile" near the bottom.


I love the colors of the leaves, and the way they seem to have a stained-glass effect against the outdoor light.  AND, as a bonus, while it was VERY hot all week, like magic, today it was wonderfully cloudy and cool!!  It was almost as if putting up the "fall tree" brought with it some "fall weather."  :)  If only the fall weather would stick around!!


*******************************************************


This final project is a simple little tag I made using another paper flower technique.  It was originally designed to be made using Tim Holtz's grungepaper, but not having any yet, I've been using cardstock.  I first made them on my fall banner, but since then, have learned that coating the flower pieces with Mod Podge on both sides before assembling the flowers actually helps a lot in helping the flowers keep their structure and gives them a really cool leather-like texture.  To make this tag, I started with a piece of pale yellow cardstock.  I cut the tag on my Cricut, and used an EK Success edge punch along the bottom.  I cut a 1/2" circle using a punch, out of the same paper I was using for the flower, then used a 1/4" hole punch to punch the center out of it, thus creating a "hole reinforcement" for the hole at the top of the tag - a technique I learned during one of the many tutorials I watch.  I then used 3 leaves I cut from my Cricut as masks, around which I applied several colors of distress inks and some Glimmer Mist in tiger lily.  


Finally, I stamped "gratitude" along the bottom, and tied a ribbon through the top.  I inked the edges of the flower with a little distress ink before gluing it to the tag, and that was it.  I sent the tag off with a note of thanks to a mama who had loaned a baby wrap to me for a while.


OH - I also did a page in my Inspiration Journal...I'll post that sometime this week.  And yes, I realize I didn't post an Inspiration Wednesday post last week.  I just didn't get a chance to work in my Inspiration Journal last week...but I made up for it this weekend.  :)

What about you?  Did you have a creative weekend?  I'd love links to whatever you created, if you did!!

LinkWithin

Related Posts Plugin for WordPress, Blogger...