Showing posts with label alcohol ink. Show all posts

Saturday, December 24, 2011

Christmas Eve and Handmade Ornaments

It's Christmas Eve!  I really can't believe it myself.  This year, the Christmas season has been filled with an unusual sense of both angst and anticipation in our family, and I've tried extra hard to not over-do things, so that I could simply spend every minute possible just soaking up as much family time as possible. A year ago, we were celebrating the completely unexpected addition of a newborn baby boy, Jeremiah, to our family - via legal guardianship.  And this year, we are preparing our hearts to say goodbye to him just four days after Christmas, as he will leave our family to travel across the country to begin his new life with his birth mother. It has been a difficult process, accepting this turn of events, but in the end, love has won out, and Jeremiah is a blessed little boy to have so many people who love him so much.  Needless to say, we will be clinging together as a family, making this year as special as possible.

Since I needed to make gifts as simple as possible this year, I made ornaments for teacher gifts and gift exchanges.  I thought I'd share a few with you.  These are quick to make and could be made at the last minute if you need a gift idea for a last-minute guest.   


For these cute musical heart ornaments, I started by cutting two facing hearts from music paper.  I cut Christmas words out of some Teresa Collins ribbon and adhered it to the front heart, then added an additional sentiment with my Dymo labeler.  I put the hearts together, right sides facing out, and began stitching them together with a zig-zag stitch on my sewing machine.  I left about a 1" opening, and stuffed them with Poly-fil, then completed stitching them closed.  I trimmed around the hearts with pinking shears.  I used Distress Ink to ink around the edges - on the one above, I just used a bit of Gathered Twigs, while on the one below, I used both Festive Berries and Gathered Twigs.  I took a length of jute string and stitched it on to the back of the ornament, using a straight stitch, going back and forth a couple times (you could also just put it between the hearts when stitching them together, but I like the look of the added stitching).  Finally, I spritzed the front of the ornaments with some Biscotti Perfect Pearls spray for a bit of shimmer.


On this third ornament, I used Tim Holtz's Sizzix die, Carved Ornaments 2, to cut the ornament from grunge board, with the Noel Movers & Shapers die in the middle to cut out the word.  I painted the ornament using the Snow Cap paint dabber and let it dry.  Then I applied Denim, Pool, and Snow Cap Mixative Adirondack alcohol inks, using Blending Solution to help move the inks around, on an ink applicator tool, on the ornament.  I used a silver leafing pen to color the letters of "NOEL" and the topper piece, as well as the edges of the ornament.  I used the Movers & Shapers holly leaf to cut several leaves, and I used the Tattered Pine Cone die to cut some pine branches - all from Core'dinations cardstock.  I sanded them, used the Snow Cap paint dabber on their edges, and dabbed them with Rock Candy Distress Stickles.  I wrapped a small piece of fake greenery around the bottom of the ornament and then began arranging the branches and holly leaves on the ornament.  I topped them with a pearl from Tim Holt's Ideaology line. Finally, I tied a piece of jute string and inked seam binding through the top of the ornament, and it was complete.


What do you do for last minute gifts?  Do you have a go-to handmade gift?  

Friday, December 23, 2011

Christmas Tags

One of the treats of the Christmas season each year is Tim Holtz's 12 Tags of Christmas.  Beginning December 1, each night for 12 nights, he posts a new tag - created that day - and boy, are they ever fantastic!  He's done them for 5 years now, though this is only my 2nd year participating.  I never can keep up with doing them at the same time as him, but I try to do at least some of them before the month is over.  So far, I've got these three finished.


I love how Tim had us use the embossing pad on the embossing folder to get this cool double-embossed effect on this tag.  And the pine cone die - wow - it takes a bit of learning, but it is SO much fun once you figure it out, and it can also be used to make cute little dried roses as well.  (Check out my Sizzix embossing folders review over on Craft Test Dummies to see a cute card I made with a dried rose on it using this die!!)


Day 2's tag had us using the Picket Fence Distress Stain over some Christmas Kraft Resist paper...two of my new loves!  And I just love how when you apply some Distress Ink over the Picket Fence Distress Stain, it takes on sort of a chalky look - totally cool!  I've had that little bow from Jenni Bowlin in my stash for ages...just waiting for the perfect project...and this was definitely it!  That reindeer couldn't be cuter...the little greenery wreath and that ivory bow on his neck are just too cute!


I skipped ahead a few days to Day 6 for this one - and I swapped out techniques, too, for one he showed us a couple years ago.  While the metal tape, embossing, coloring and clear embossing powder on top are from this year, I decided to color the metal with alcohol inks instead of paint dabbers (though I did paint the wreath with paint dabbers).  I absolutely LOVE the look of the clear embossing powder over the embossed,  colored and sanded metal - my first time trying this - but definitely NOT my last!  Totally in love with this look!

And I especially love how you can add the Distress Ink over the alcohol ink, and because of the clear embossing powder, the Distress is sealed in and gives the tag a vintage feel.  


I'm still hoping to get a few more tags done before December is over.  I also have a couple handmade ornaments to show you in another post!

Wednesday, June 08, 2011

Reversible Decoupaged and Embossed Metal Monogrammed Necklace

Whew...that's quite a title, eh?  Maybe it should say...one ONE side, the pendant is decoupaged, and on the OTHER side, it's an embossed metal monogram!  At any rate, you should definitely run over to Crafts Unleashed today to check out my tutorial for how to create this super easy necklace!!


And what I did NOT show on Crafts Unleashed is that on the reverse side, you can add a piece of cardstock, cardboard, or grungeboard (which is what I happened to use here), and then dress it up to your heart's desire.  I used E-6000 to adhere a rectangle piece of grungeboard, then used a paint dabber to paint it white.  I went over it with a chalk queue to add just a bit of ink to it, and then added my girl-image with Mod Podge (the girl and the words are from Cosmo Cricket's Odds & Ends line - SOOOO cute!).  Then I cut out all the words and added them with Mod Podge as well, and added a couple top coats of Mod Podge over the entire piece.  Final result - LOVE!  And what makes this piece SO easy is that the actual necklace part comes prepared (ribbon, beads, clasp and all)...all you have to do is make the pendant, add a couple jump rings to attach it to the necklace, and you're done!


Enjoy!  This entire month is jewelry month over at Crafts Unleashed...so if jewelry is your thing, you might want to keep checking in over there for lots of inspiration and giveaways!!

Tuesday, March 15, 2011

Alcohol Inks and PolyShrink - Just playing around!

Stamp by Stampin' Up!

Just wanted to post these really quick - I've been playing around with some clear PolyShrink (by Lucky Squirrel) and alcohol inks.  This one, I stamped with Jet Black Staz-on on one side, then colored using alcohol inks and a water-brush filled with blending solution on the other side; once dry, I heated using my heat gun to shrink it.  I just love the outcome!! 


This one, I colored using alcohol inks and an ink blending tool with felt; then I flipped the piece over and used a fine-tipped black Sharpie to draw lines in to make it look like a stained-glass window.


When they are held up to the window, you can see that the ink remains translucent.  You can also see that I got a few finger prints on the bottom one, because I touched it before it was completely cool.  I need to perfect my heating method and figure out exactly what to use to press them down after I heat them (when they heat, they curl up, and while they mostly straighten back out, they need to be flattened with a block or something to get completely flat after heating) to avoid unintended impressions.

Not really sure what I will do with these (if anything); just playing for now, because I've never played with these before...but I can see some really cool embellishment ideas in the future!!

Wednesday, February 23, 2011

Scrapbook Layout Using Crafter's Workshop Template

I recently had the opportunity to try out some templates from Crafter's Workshop for the first time.  Now, I know what you're thinking...templates, stencils..."Aren't those SOOOO 1980's?!"  I thought so too...until I started playing with these!  These templates (or stencils - whatever you'd like to call them) are contemporary, versatile, and affordable.  Check out my full review of them, as well as other techniques to use with them, on Craft Test Dummies tomorrow!  To see even MORE techniques and read Jenny's review (THE Craft Test Dummy!!), go here.  AND, she even includes a link to a great video full of techniques using these fabulous templates.


But today, I wanted to share this scrapbook layout I made using the 12"x12" template called Birds of a Feather.  And since I have such a hard time just showing you what I made...I'm going to do a little tutorial to show how I made the background, as well as another cool technique!


I started with a vanilla-colored piece of smooth cardstock under the template, and pulled out my Distress Embossing Ink Pad by Ranger.  I love this pad, because it's extra "juicy."  I applied the ink pad directly to the template, pushing down and "squishing" a bit in the more detailed areas.  I decided to only use 2 of the bird houses - and this is part of what I love about these templates...if you only want to use part of it, you totally can!  I removed the template and sprinkled clear embossing powder over the ink, then embossed with my heat gun.


Next, I started applying distress ink over the embossed areas - the embossed areas resist the ink and will stay vanilla.  You can use a damp cloth to wipe over the embossed areas to clean off any wet ink.


Isn't that just awesome?!  I love this technique!  I continued adding ink colors until the entire page was covered and I was happy with it.  

Distress ink colors used: Crushed Olive, Broken China,
Tumbled Glass, Stormy Sky, Wild Honey, Vintage Photo

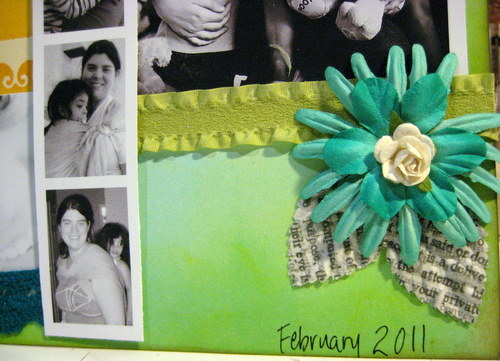
Next, I thought about what I wanted the page to be about.  I decided to scrap about ME - which I never do, and so went searching for photos of me.  Finding them was difficult - I'm always the one TAKING the pictures...but I eventually found a few and chose which to include.  I decided that since I wanted the colors of the page to really shine, I made the photos black and white.

Black & white photos show off the
colors of the page

I began adding embellishments - some of which I've had in my stash for years!  It was nice to finally be using them.  The title and butterflies are all from Marcella by K&Co.  

Title and butterflies from Marcella by K&Co.

I wanted to add some bling, and I had a sheet of Prima Say It In Crystals.  But I didn't want them to be clear - I wanted them to coordinate with my page.  Fortunately, I knew just what to do!  

First, I have been saving the plastic inserts from certain Tim Holtz Ideaology packaging...because they make great palettes for alcohol inks.  So I added just two drops of each of the three colors I wanted to use into each well of one of these plastic inserts.  I let the ink dry.  I took one of my Pentel water brushes (to see a great review of water brushes, check out this one at Craft Test Dummies) and, empty of water, filled it with some alcohol blending solution.  Then, I was able to use my brush to pick up the ink from my homemade palette, and color the bling just the way I wanted it.

Blending solution-filled water brush, picking up color
from dry alcohol ink on plastic package insert

Color your bling any color you like using alcohol inks!

Perfectly colored bling!

I added some Prima flowers, and some really fabulous newsprint leaves I found at Michael's.  For the center of the orange and blue flower, I used my Epiphany Crafts Shape Studio to make an epoxy flower center from a piece of book text.  I added some trims from my bucket-o'-trims - and have no idea what brand they are.

Flowers by Prima; newsprint leaves by
Recollections from Michael's

Flowers by Prima; epoxy center made using book text and
Shape Studio by Epiphany Crafts

Finally, I added my journaling using a dip-pen and black india ink.  I know the dip-pen may seem intimidating, but I find india ink to be the absolute best for writing over ink or paint.  

Journaling done with dip pen and india ink

I love my final result, and I especially love that I created the background paper myself!  I hope you've enjoyed my little tutorial - let me know if you have any questions!


Thursday, February 17, 2011

Valentine's Mini-Book


Valentine's Day was fast approaching, and I still didn't have a card or a gift for my husband...so I was thrilled to see the little mini-book that Tim Holtz posted on his blog on the 11th.  What a wonderful creation, made from just one sheet of 12x12 paper!  This is my version of the mini-book, and I'm pleased to say that my hubs loved it!

Grungeboard heart covered in Fired Brick
Crackle Paint, then Walnut Stain distress ink

Maya Road calendar sheer; Vintage Valentine printed
from TammyTutterow.typepad.com
Three tags (7 Gypsies) for the pockets of the mini-book
Mini-alpha stickers inked with distress ink
Prima flower inked w/ distress ink then covered with
Rock Candy distress stickles; button colored with
alcohol inks
Metal Philosophy Tag colored with alcohol ink
Mini-alphas colored with alcohol inks, then covered
with Rock Candy distress stickles; Epoxy bingo marker
made using Epiphany Crafts Shape Studio
School-yard Valentine page printed from SisBloom.com/blog
and covered in Rock Candy distress stickles
Embossed chipboard from IOD inked with distress ink
then "LOVE" covered with copper Perfect Pearls
LOVE my labeler!!  
Back side; Grungeboard hinge attached with brads
What did you do for YOUR special someone for Valentine's day?

P.S.  You may have noticed the epoxy bingo marker I made using the Epiphany Crafts Shape Studio - be sure to check out my review of this awesome tool tomorrow over on Craft Test Dummies!!

Sunday, January 02, 2011

Shabby Chic Altered Tin - Found Items


Happy New Year to everyone!!  I hope 2011 is off to a great start for you - and of course, quite importantly, a CREATIVE start!  I was able, for the first time in many years, to actually stay up for the passing into the new year...and was able to accomplish something crafty at the same time, while my hubby cooked up a huge batch of delicious seafood gumbo - YUM!

Over at Crafts Unleashed, we've been focusing on crafty organization for the last week (and this coming week, too!)...and while my crafty space is, mostly, pretty well organized, I do still have certain odds and ends that just aren't quite organized to my liking.  OR, perhaps they are organized, but I don't happen to care for the actual containers in which they are stored.  So a couple of my goals for the first part of this year are to re-fashion some of the uglier storage containers, and to create some new solutions for things that aren't working.

This project was the first "turn ugly into pretty" one for the year.  Here's what I had to start with:


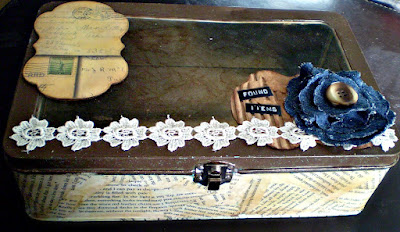
This tin, with an acrylic window on top, was originally a storage tin for a Stampin' Up! punch and stamp set, I believe - if I'm not mistaken - from MANY years ago.  It has since been used to store various sets of products - everything from tools to stamps to ink pads and stickles.  But...it's weird blue color with squiggly white lines on it just weren't working for me.  So, rather than scrap it altogether, I decided to alter it.

I started out by using my Espresso colored Adirondack paint dabber around the top edges.  Bits of the blue tin showed through after one coat, but I decided to not add a second coat, because I thought the bits of blue showing through added character.

Next, I got out my matte Mod Podge and a foam paint brush.  I have several books in my craft room that are for the sole purpose of tear pages out of, so I tore several pages out of one and tore them into smaller pieces in preparation for adding to the tin.  I painted a thin layer of Mod Podge onto the tin (starting on the bottom), and gradually added piece after piece of torn paper, adding more Mod Podge as needed to glue edges down.  After covering the bottom, I also covered the sides of the tin.  I used some Tim Holtz tissue tape to cover the bottom edges of the tin, wrapping it around to cover the gap between the sides and the bottom.


Once the paper and glue had dried, I used my foam ink applicators and distress inks (in Wild Honey, Vintage Photo, and Walnut Stain) to add color to the papers.  After the ink had dried, I added a top coat of Mod Podge, also covering the area of tin which had been painted with the dabber.


Next, I used felt on my ink applicator, with alcohol inks in Mushroom and Latte, with some Blending Solution, to add some color to the window of the container.  I added the ink to both the inside and outside of the window, for added effect.

I then used Spellbinders Nestabilities Labels 14, and cut 2 pieces of Donna Salazar's Zutter cardboard, and one piece of Tim Holtz cardstock from his Lost & Found collection, all using the largest die in the set.  I inked the piece of cardstock with distress ink, then glued it to one of the cardboard pieces, and glued the entire piece to the top of the tin.  For the second piece of cardboard, I tore most of one side of the cardboard off, revealing the corrugated center.  I inked the ridges with a Clearsnap chalk ink Catseye, and inked the edges with Walnut Stain distress ink, then glued the piece down on the tin.  I added a piece of flower trim across the entire tin, gluing it down with Glossy Accents.

To make the denim flower, I used the Spellbinders Nestabilities Classic Scalloped Circles (large), and a piece of my son's old cut-off jeans which I had saved.  I cut one scalloped circle in every size except the largest and smallest sizes (so the 5 center sizes).  (Note: I had to run the sandwich through my Big Kick back and forth several times to get the denim to cut all the way through.)  For each circle, I laid down a large dollop of Fabri-tac glue on my non-stick craft mat, laid the cut circle on top of it, then used my fingers to twist the circle and work it until it had pleated and formed into the shape I wanted it.  After all five layers were done in this way, I used the Fabri-tac glue to glue all the layers together, added a vintage button (which belonged to my grandfather) on top, and glued the flower to the corner of the tin.  

Finally, to finish things off, I used my Dymo labeler (believe it or not, one of the things I bought with my Michael's gift card after Christmas!!) to make the "Found Items" label.  I *adore* the look of the old Dymo labels!!!


I plan to keep odds and ends like dice, vintage porcelain dolls, bingo markers, corks, dominoes, etc., in here...cool things that I definitely want to keep for projects, but which I have NO IDEA where else I would keep!!  I absolutely LOVE how this turned out, and am SO glad I did not throw out the ugly blue tin!!

I think my NEXT storage solution needs to be something for storing all of my various glimmer/shimmer/smooch mists and sprays.  The plastic basket they are currently in is no longer large enough for them, and I'd like something that fits in with my craft studio a little better...so I'm considering trying to make my own container using corrugated board and binding it at the corners with jute.  I'll let you know if I do...and if so, how that works out!

So what about YOU?  Do you have any ugly storage items in your crafty space that you'd like to attempt a makeover on?  If so, I'd love to see your finished project - so make sure to leave a link in the comments!!

handmade projects


Tuesday, November 02, 2010

The Art-Full Horizons Jolly Jumpstart Blog Hop - Day 2


Welcome to the Art-Full Horizons 
Jolly Jumpstart
 Blog Hop!


Check out all of the fabulous holiday-themed projects, gift ideas, and more from our wonderful Blog Hop Contributors from around the world!!
  1. Art-Full Horizons http://art-fullhorizons.blogspot.com
  2. Tammy Inman http://tammyi.com
  3. Nan Paturzo http://scrappynan.blogspot.com
  4. Robyn Weatherspoon http://herebygrace.typepad.com/
  5. Mykle Parker http://scrapbohemia.blogspot.com
  6. Sherry Mendoza http://sherryscreations.typepad.com/
  7. Robin Redd http://robinredd.typepad.com/west_coast_scrapper/
  8. April Meeker www.suaviloquy.blogspot.com
  9. Erin Bassett www.erinbassett.com
  10. Jennifer Clark http://jenspartyof5.blogspot.com
  11. Jennifer Edwardson http://frommypapercraftstudio.blogspot.com/
Here's how it works:
  1. Hop through each of the blogs listed above to get fabulous holiday inspiration. If you are starting at a blog in the middle of the Hop, please start back at the Art-Full Horizons blog.  You should be arriving here from Erin's blog.
  2. Leave a comment on each blog hop post in the list above between now and November 7, 2010.
  3. Enter to win our giveaway by doing any of the following. For each thing you do, you will be entered into the drawing one more time:
  • Leave a comment on the Art-Full Horizons blog hop post between now and November 7, 2010.
  • Join the Art-full Horizons email list (fill out the form in the left hand column on the A-H blog).
  • Become a follower of the Art-full Horizons blog! Just click the "Follow" button in the lower right column on the A-H blog.
  • "Like" the Art-Full Horizons Facebook Page.
  • Join the Art-Full Horizons Facebook Group.
  • Share about this Blog Hop on your own blog, posting a link to the Art-full Horizons blog.
  • Share about this Blog Hop on Facebook, posting a link to the Art-full Horizons blog.
  • Share about this Blog Hop on a message board or forum, posting a link to the Art-full Horizons blog.
  • U.S. entries only please

To let us know you've done these things, please return to the first Art-full Horizons Jolly Jumpstart Blog Hop post and leave a comment for each thing you did, i.e. one comment for posting on each blog, another comment for posting on facebook, and another comment for joining our email newsletter. Please note: if you post it all in one comment, it will only count as one entry, so be sure to post EACH ENTRY as a separate comment.

On November 8, 2010 we'll choose the winners using the Random Integer Generator from random.org. U.S. entries only please.

*****************************************

Today, here on Party of Five, I'm sharing with you a Christmas tag I made using a fun masking technique described in Tim Holtz's book, Compendium of Curiosities.  If you haven't picked up a copy, I highly recommend it - LOTS of fun inspiration!!


Products used:
  • Masks - homemade; snowman using Tim Holtz Sizzix die; snowflakes using Cricut
  • Distress inks - Pine Needles, Weathered Wood, Peeled Paint, Shabby Shutters, Vintage Photo
  • Stamps - Donna Salazar, Tim Holtz, Inkadinkadoo
  • Zutter Distrezz-it-All
  • Quote - Musical Memories by Donna Salazar
  • Flower - made from vintage Christmas music songbook; large scalloped circle Sizzix die
  • Glimmer mist - Chalkboard Evergreen
  • Distress Stickles - Rock Candy
  • Tim Holtz fragment, image from vintage Christmas music
  • Glossy Accents - as adhesive
  • Fibers - Basic Grey
  • Pearls - unknown brand; colored using alcohol inks Lettuce and Stream mixed
  • Shipping tag, safety pin, charm from craft supply


I hope you are being wonderfully inspired by all of the holiday projects in the Jolly Jumpstart Blog Hop!!  Remember, you have until November 7 to complete all of your opportunities to enter to win!

Also, remember that I will be having a surprise giveaway to TWO winners right here on Party of Five!!

How do you enter?  Several ways!  You will get one entry for each comment you leave (one per blog post).  You will get another entry by becoming a follower of my blog (if you are already following, just let me know) and leaving a comment letting me know you are following.  You can get another entry by posting about this project on YOUR blog, and leaving me a comment with a link to your blog.  Make sure you check back on November 8 to see if YOU are a winner!!***

Thank you for participating!  Comments are now disabled, and winners will be announced soon!!

LinkWithin

Related Posts Plugin for WordPress, Blogger...