Showing posts with label Distrezz-it-All. Show all posts

Saturday, October 08, 2011

Spooktacular Signs - The Trick-or-Treat Blog Hop


Welcome to the Trick-Or-Treat Blog Hop! 
October 8-10, 2011
 

Crafter's Workshop and Clearsnap have teamed up for the next three days to create hauntingly inspiring projects for this Halloween season. It's all tricks, treats, and techniques so join us on a fright night jaunt to remember, hopping from blog to blog. Leave your "Trick-or-treat" comment on each blog in the hop in hopes of winning candy, blog candy that is! For every 50 comments posted on this blog we're giving away a set of inks and accessories to spook up any crafter's projects!!! We'll choose the winners from the blog comments posted on all the blogs in the Hop. 

The Clearsnap prize includes Smooch Spritz in Frosted Grape, Green Olive, and Carrot Cake, ColorBox Pigment InkPad in Spooktacular, Glitter in  Grape Fizz, Design Adhesives in "Trick or Treat" and "Eeeeks!?", plus our new Design Foils in Lime Burst. That's alot of spook to go around!


Plus Crafter's Workshop is giving away this fabulous assortment of templates worth over $35!! This is some serious blog candy!!


Receive extra entries in the Hop for following Clearsnap and Crafter's Workshop on Twitter and Facebook and for tweeting or posting on Facebook about the Hop - just post here afterwards that you have followed us or posted about the Hop to increase your chances to win. 


Here are the artsy spooksters to visit:


Julie Fei-Fan Balzer - http://www.balzerdesigns.typepad.com/
Charlotte Jenkins http://suepup.blogspot.com
Mary Dawn Quirindongo -http://mypinkmexico.blogspot.com/ Karen Grunberg- http://www.karenika.com/
Jen Clark - http://mycraftyfriendjen.blogspot.com/  YOU ARE HERE

Happy Hopping!!


We recently visited our local pumpkin patch as a family, and while there, I saw a large family or possibly a group on tour - at any rate, they had some signs on wood sticks to identify their group.  I thought they were really cute, and that some similar Halloween-y signs would make super cute decorations...and that my kids would probably enjoy carrying them while out trick-or--treating (OR just around the house for the next several weeks, as is proving the case...).  So before we left the pumpkin patch, I made sure to gather several twigs - we live in the desert and certainly don't have any twigs in OUR yard!  My kids couldn't wait to see what I was going to do with them!

I started out by cutting cardstock to 5.25" wide by 6.5" long.  I ran each one through my Zutter Distrezz-it-All to distress the edges.  I used the 6x6 Crafter's Workshop trees template and the Clearsnap MetalXtra Platinum ink pad with a blending tool to apply ink to the cardstock to create just a shadow on the background.


After drying the ink, I applied some Glue Gloss to a tree stamp and stamped it over the background trees.  I rubbed some Lucky Penny and Plum Crazy Designer Foils over the Tree (you have to let it get tacky a bit, then rub a bit and apply several times since it's not really meant to be used with the Glue Gloss).  Then I re-stamped the tree using Clearsnap Pigment ink to give it more definition.


I used the Crafter's Workshop numbers template to highlight the number "31," using Clearsnap Espresso pigment ink.  I just love how easy the Queue's are to use - both the chalk ink and the pigment ink.  (Just a note - the chalk ink dries very quickly, the pigment ink a bit more slowly, but both are easy to use.)


I added a word sticker, going around the edges with Dark Brown chalk ink, and went around the edges of the entire sign with the same ink pad.  I added some accents with a Viva Pearl Pen, and my sign was complete.(I punched holes in the top and bottom to put it on a twig.)


On this one, I used the triangle plaid template to create a background, added the clocks over it using that template, and I used Glue Gloss to cover the witch in black glitter.  I *LOVE* using Glue Gloss for glitter - it ROCKS.  If you've never tried it for glitter, flocking, etc. - you are really missing out!!  I again used the MetalXtra Platinum ink pad - to ink the skull and to add highlights to the houses - I just love that ink pad!!  A little goes a long way.


On this third one, I started by using black ink with the tree template, and then used Design Adhesive flourishes in the corners with Plum Crazy foils.  You can see the shimmer somewhat - but it's really hard to see in photographs JUST how shimmery the foils really are!!  I added the skeleton and the Halloween card - inked with Lavender chalk ink - and the "spooky" word sticker.  I went around the edges of the sticker and sign with Espresso pigment ink.


Finally, the last sign.  I started by using the damask template, and sprayed using Wine Berry and Silver Foil Smooch Spritz.  Then I applied some Glue Gloss on the house, and again applied the Designer Foils, a little at a time.  While it didn't work perfectly - it sort of has a spooky, haunted look to it, which is fitting with the theme!  I finished it with a greeting.


For now, the signs are gracing our entry-way table, along with a few other Halloween decorations...though I had to fight my children off to get them to leave them be long enough for me to snap photos!  I have no doubt they will be missing soon, and there will be 3 little monsters running through the house sporting spooky signs!


Now on with the blog hop!!

Sunday, February 27, 2011

Compendium of Curiosities #33 and Simon Says Stamp & Show


The challenge this week for the Compendium of Curiosities Challenge over at Studio L3 is Altered Metal Using Alcohol Inks, and the challenge over at Simon Says Stamp & Show is to show some Stripes...so I created this 6x6 layout demonstrating BOTH.  (And it wasn't just a happy accident for once - this time it was actually intentional!!)  

While I can't give the details on how I did the actual metal technique, I can tell you what I did prior to altering the metal.  I had a plain sheet of aluminum, which I first embossed using the notebook texture fade - to get the "stripes" look. Then I die-cut it with the Tattered Florals die.  


There are stripes all over the place - on the metal, on the cardstock sticker strip, on the piece of patterned paper itself, on the little cardstock note...I love how subtle some of them are.

The stamp set I used on the layout is called "Art & Soul," by Unity Stamps.  It's designed by Marah Johnson, and IT IS GORGEOUS!!!!  I cannot say enough how unbelievably gorgeous it is!  Every stamp I used here is from the set - from the flourishes, to the bird and butterfly, to the quote.  I even stamped the bird in chalk ink on a sheet of PolyShrink and created the tiny bird charm you see - isn't it just adorable?!  I'll be doing a full review of Unity Stamps soon on Craft Test Dummies, so keep a look out for it!


Have a great week - and be sure to "nurture YOUR creative spirit"!!

Tuesday, November 02, 2010

The Art-Full Horizons Jolly Jumpstart Blog Hop - Day 2


Welcome to the Art-Full Horizons 
Jolly Jumpstart
 Blog Hop!


Check out all of the fabulous holiday-themed projects, gift ideas, and more from our wonderful Blog Hop Contributors from around the world!!
  1. Art-Full Horizons http://art-fullhorizons.blogspot.com
  2. Tammy Inman http://tammyi.com
  3. Nan Paturzo http://scrappynan.blogspot.com
  4. Robyn Weatherspoon http://herebygrace.typepad.com/
  5. Mykle Parker http://scrapbohemia.blogspot.com
  6. Sherry Mendoza http://sherryscreations.typepad.com/
  7. Robin Redd http://robinredd.typepad.com/west_coast_scrapper/
  8. April Meeker www.suaviloquy.blogspot.com
  9. Erin Bassett www.erinbassett.com
  10. Jennifer Clark http://jenspartyof5.blogspot.com
  11. Jennifer Edwardson http://frommypapercraftstudio.blogspot.com/
Here's how it works:
  1. Hop through each of the blogs listed above to get fabulous holiday inspiration. If you are starting at a blog in the middle of the Hop, please start back at the Art-Full Horizons blog.  You should be arriving here from Erin's blog.
  2. Leave a comment on each blog hop post in the list above between now and November 7, 2010.
  3. Enter to win our giveaway by doing any of the following. For each thing you do, you will be entered into the drawing one more time:
  • Leave a comment on the Art-Full Horizons blog hop post between now and November 7, 2010.
  • Join the Art-full Horizons email list (fill out the form in the left hand column on the A-H blog).
  • Become a follower of the Art-full Horizons blog! Just click the "Follow" button in the lower right column on the A-H blog.
  • "Like" the Art-Full Horizons Facebook Page.
  • Join the Art-Full Horizons Facebook Group.
  • Share about this Blog Hop on your own blog, posting a link to the Art-full Horizons blog.
  • Share about this Blog Hop on Facebook, posting a link to the Art-full Horizons blog.
  • Share about this Blog Hop on a message board or forum, posting a link to the Art-full Horizons blog.
  • U.S. entries only please

To let us know you've done these things, please return to the first Art-full Horizons Jolly Jumpstart Blog Hop post and leave a comment for each thing you did, i.e. one comment for posting on each blog, another comment for posting on facebook, and another comment for joining our email newsletter. Please note: if you post it all in one comment, it will only count as one entry, so be sure to post EACH ENTRY as a separate comment.

On November 8, 2010 we'll choose the winners using the Random Integer Generator from random.org. U.S. entries only please.

*****************************************

Today, here on Party of Five, I'm sharing with you a Christmas tag I made using a fun masking technique described in Tim Holtz's book, Compendium of Curiosities.  If you haven't picked up a copy, I highly recommend it - LOTS of fun inspiration!!


Products used:
  • Masks - homemade; snowman using Tim Holtz Sizzix die; snowflakes using Cricut
  • Distress inks - Pine Needles, Weathered Wood, Peeled Paint, Shabby Shutters, Vintage Photo
  • Stamps - Donna Salazar, Tim Holtz, Inkadinkadoo
  • Zutter Distrezz-it-All
  • Quote - Musical Memories by Donna Salazar
  • Flower - made from vintage Christmas music songbook; large scalloped circle Sizzix die
  • Glimmer mist - Chalkboard Evergreen
  • Distress Stickles - Rock Candy
  • Tim Holtz fragment, image from vintage Christmas music
  • Glossy Accents - as adhesive
  • Fibers - Basic Grey
  • Pearls - unknown brand; colored using alcohol inks Lettuce and Stream mixed
  • Shipping tag, safety pin, charm from craft supply


I hope you are being wonderfully inspired by all of the holiday projects in the Jolly Jumpstart Blog Hop!!  Remember, you have until November 7 to complete all of your opportunities to enter to win!

Also, remember that I will be having a surprise giveaway to TWO winners right here on Party of Five!!

How do you enter?  Several ways!  You will get one entry for each comment you leave (one per blog post).  You will get another entry by becoming a follower of my blog (if you are already following, just let me know) and leaving a comment letting me know you are following.  You can get another entry by posting about this project on YOUR blog, and leaving me a comment with a link to your blog.  Make sure you check back on November 8 to see if YOU are a winner!!***

Thank you for participating!  Comments are now disabled, and winners will be announced soon!!

Sunday, October 17, 2010

Halloween Fright

I really haven't been much into Halloween in the past, but for some reason, this year I've had more fun playing with all the fun Halloween papers, accessories, tools, and color themes!!  And even though I don't typically like the whole "scary" aspect of the holiday, and for my kids, I definitely keep it more fun and lighthearted, for my projects, I have not been drawn to the more whimsical papers and colors...but the darker, spookier colors instead.  With that said, I present my Halloween Fright wall hanging.


I am linking this to the Compendium of Curiosities Challenge #17 - Fragment Charms, as well as this week's Simon Says Stamp and Show challenge, "Show Some Metal."  


This started with an 8x8 sheet of patterned paper from a Recollections Halloween pad from Michaels.  I ran the paper through my Zutter Distrezz-it-All just mildly, and inked the edges with Spiced Marmalade distress ink.  I took a sheet of white cardstock and embossed it using Tim Holtz's Halloween Fright texture fade.  I then used distress inks to add color, and covered portions of it in Rock Candy crackle paint.  I decided I wanted to place this piece behind the crow on the patterned paper, so I used a craft knife to carefully cut around the crow.  I then used an embossing pen to cover the crow, and heat embossed it with black embossing powder. I used Lettuce alcohol ink to color a pearl sticker accent for the crow's eye.


For the Compendium of Curiosities Challenge this week, I had to make a Fragment charm - which is the clock.  I can't share the details of how I made it, per the rules.  :)  I attached a couple jump rings, and then a swivel clasp - showing some metal - which was the challenge for Simon Says Stamp and Show.  I attached the swivel clasp to the header on the layout with a brad.  The brad was originally bright sparkly purple and silver - which would NOT have fit in - so I covered it with some Pitch Black acrylic dabber paint, and it had the perfect effect.


The title piece started as a blank white piece of watercolor paper.  I used a technique called "block inking."  I first applied Spiced Marmalade distress ink all over an acrylic stamping block, and then went around the edges with a darkish purple dye-based ink (I don't have a purple distress ink yet).  I then spritzed the block a few times with water, and then placed it down on the paper.  I pushed it down until the paper was completely saturated under the block, and then carefully lifted straight up.  I then used a cloth to blot the excess puddles of ink off the paper, and used my heat gun to dry the paper.  I then used my Distrezz-it-All to distress the edges of the paper, and used distress inks to add color to the edges all around, then glued the header to the background paper.  I stamped "Happy Halloween," using a dark purple dye-based ink - with a stamp I had cut on my Cricut.  

I took two small skulls from the minis set of grunge board, and wanted to paint them with metallic dabbers; however, neither the gold, silver, or copper seemed to fit with the bronze colored swivel clasp.  So I mixed some copper and black on my craft mat, and got almost a perfect match, then used my finger to apply the paint to the grunge pieces.  I attached both to their respective places with the Tim Holtz Tiny Attacher (seriously - BEST little stapler EVER!).


I added a piece of velvety bat trim (Recollections from Michaels), and made a rosette out of a piece of Donna Salazar's Crafty Chronicle using the Martha Stewart scoring board.  (If you've never seen Donna's Crafty Chronicle - you seriously NEED to!  It's like a newspaper, but not...it's all crafty articles and tutorials, on acid-free newsprint paper, intended to be read and then used for flowers and such!  She even has a new one out just for Christmas, called Musical Memories!  So fun!)   I spritzed the rosette with Tiger Lily Glimmer Mist and some homemade purple glimmer mist, then cut out a couple nesting circles of purple and orange cardstock for the center.  Finally, I stapled the second painted grunge board skull to the center, and used hot glue to attach the rosette to the entire piece.


To finish it off, I used the Tiny Attacher to add a few "stitches" along a couple sides.  I decided the piece should be a wall hanging, so I backed it with a pieces of cardboard, and added a piece of wire and tied a few pieces of coordinating tulle and ribbon and fibers around the wire.

Saturday, October 09, 2010

CCC #16 - Wrinkle Free Distress


This is my first week joining the Compendium of Curiosities Challenge (CCC), hosted by Linda of Studio L3.  Each week (or in this case, two weeks, as many of the participants have just spent the last week on a cruise with Tim Holtz himself!), Linda posts a challenge using one of the techniques presented by Tim in his newest idea book.  You should DEFINITELY check out Linda's blog - her artwork is amaZING!!!

So, to start off, I knew I wanted to do a tag - but I don't currently have any size 8 tags.  I do, however, have grunge paper.  Many of my friends, who are not Tim Holtz addicts like I am, may not know quite what grunge paper is, exactly.  It's not really paper, and it's definitely not chipboard.  It's hard to describe - but it's sort of got this leathery feel (and smell!) to it, and it's very flexible!  It inks, paints, cuts, distresses, etc., just like you can do with paper.  It is VERY cool stuff!  So, knowing the dimensions of a size 8 shipping tag, I made my own from grunge paper - complete with cardstock hole reinforcements.  :)

Here are a few photos to show you the thickness and flexibility of grungepaper.


You can see that even after folding down the corner, once I release it, there is no crease mark at all, thanks to the qualities of the grunge paper.

So, onto the tag itself.  While I cannot tell you about the actual challenge technique (out of respect for Tim and  his book and copyright issues), I can tell you about the rest of the tag.  :)  I used my Zutter Distrezz-it-All to distress the edges of the tag, and then used Walnut Stain distress ink to ink the edges.  I stamped a Donna Downey-Unity stamp quote onto the upper right side, using brown Staz-on ink - I love this quote!!  I threaded multiple earth-toned fibers through the hole at the top of the tag.


At the bottom of the tag, I laid a piece of natural-colored magic mesh (remember that stuff???) that has been in my stash FOREVER!!  Then I took a piece of thin brown paper (it actually came from a box of goodies I received - it was packing material paper), and spritzed it with homemade red and green glimmer mists, and Tattered Angels tiger lily Glimmer Mist.  Then I put down a line of Beacon 3 in 1 craft glue, and gathered the paper into pleats while adhering it to the bottom of my tag.  I took a piece of mustard-colored cardstock the width of my tag, used several colors of distress inks on it, and added some distress stickles to it, before gluing it over the top of where the pleated paper was glued to the tag.  I then used deckle scissors to cut off the misted paper to the length I wanted it.  Finally, I cut a 1"x12" piece of cardstock from Tim's Lost & Found paper pad, and used my Martha Stewart scoring board to score it every 1/4".  I then folded it accordian-style, cut off one piece, used my Tiny Attacher to join the ends together, and pressed the center down to form a rosette, using a hot glue gun to attach the rosette to a circle of cardstock on the back.  I cut another piece of cardstock for the front, used distress inks on it, added a smaller piece of patterned cardstock, with distress stickles on it, and glued those onto the front of the rosette.  I used Walnut Stain distress ink around the edges of the rosette and brushed it lightly on top of some of the peaks of the rosette, then used hot glue to attach it to the tag.  You can see the vintage sparkle on the cardtock above the ruffle, and the shimmer from the mists on the ruffle itself.


I used to wonder what the draw was in decorating "shipping tags."  Oh my.  Whatever was I thinking?!  LOL!!  I am SOOOO hooked!  There is SUCH gratification in creating a work of art in a relatively short period of time, and the tag is just such a wonderful medium to work with in doing so!  

And wow, these rosettes are TOTALLY addictive!  Don't be surprised in the least if they seem to show up on anything and everything that I make in the near - and not-so-near - future!!  ;)


Wednesday, October 06, 2010

Boo! A fun Halloween tag


This tag has actually been in progress for a couple weeks now...I just didn't know what I was going to do with it!  Does that ever happen to you?  I started off with a color palette that I loved...green, purple, and orange...for Halloween.  I had some Glimmer Mist in "Tiger Lily," which I don't think exists any more, but is my favorite orange, and I had some homemade shimmery mist in purple and green.  But FIRST, I wanted to try something else out.  I had this roll of white Martha Stewart spider web felt I got on clearance last year after Halloween.  I wondered if I could use it in my Sizzix Big Kick to emboss this tag - and as it turns out, I WAS able to...by putting the felt on top of the multi-use platform, then my tag, then the rubber embossing mat, then the black plate...and a couple pieces of cardstock under the whole thing to shim it.  

So after I embossed it, I rubbed my Spiced Marmalade distress ink pad over the embossed spider web (you can see it diagonal across the tag.  Then I spritzed the glimmer mists on the tag - some purple on the top, some orange in the middle, and some green on the bottom.  Next, I ran all the edges of the tag through my Zutter Distrezz-it-All, and then inked the edges with Walnut Stain distress ink.  (I would have used Black Soot if I had it, but that's a color I don't have yet.)  Then, I used a homemade spider mask I had cut on my Cricut using the Tim Holtz masks, and inked over it with some Walnut Stain distress ink in a couple places on the orange spider web.  I just love how you can still see the shimmer of the glimmer mists even under the distress ink, and how all the colors blend together so well!!  Then, I glued on a piece of black felt spider web (yes, Martha DOES have black out this year, but this is actually white that I dyed black with black ink).  


I used my newest fun tool - the Martha Stewart scoring board - and made a rosette using a 1"x12" piece of Tim Holtz's Lost & Found cardstock.  I punched a coordinating circle for the center, stamped a Cricut-cut bat on it, and covered the whole center circle with Spiced Marmalade Distress Stickles.  I am totally in love with distress stickles!!  I glued the rosette onto the tag, and stamped another Cricut-cut stamp, "Boo," above it.


Finally, my finishing touches.  I threaded some black organdy ribbon and orange satin ribbon through the hole at the top of the tag.  I then took a small safety pin and used black Staz-on ink to color it a bit so it wasn't so shiny silver.  Then I added a few black and silver beads (from an old necklace) to the safety pin using jewelry pliers.  I love that special touch they give the tag!!


I still haven't decided what my kids are going to be for Halloween this year...but at least this little tag is getting me in the mood!!  Have you started any Halloween decorating or crafts?  What about you?  Any costumes in the works?

Tuesday, September 14, 2010

Fall Banner


Every year about this time, I start missing "home," - the midwest, that is - or anywhere, really, that has four seasons a year.  I grew up in the midwest, and fall has always been my very favorite time of year.  I never did like the hot, humid summers...but come mid- to late-September, the temperatures started to drop, the evenings began to cool, we could start wearing jeans and sweaters again...and soon the leaves would start to turn.  I loved the crispness of the mornings, the crunch of the fallen leaves under my feet, and the warm scents of cinnamon, cloves and ginger in the kitchen as my mom began to bake fall treats.  

Living in a southern California desert for over a decade now, I have never forgotten what fall feels like - even though we never really get to experience its glory here.  Each year, when this time rolls around again, I start chomping at the bit to bring out my fall decorations and make the inside of my house feel like fall - even if I can't do anything about the outdoors.  And this year, I decided I wanted to make a banner to go along with my ever-growing stash of decorations.  So this past weekend, one of my crafty friends (who also grew up in a  4-season climate, though doesn't miss it *quite* as much as me) came and spent an entire day getting inky and glue-y and crafty together, and we each made a fall banner...each of which turned out completely different, I might add - totally reflecting our personalities.  :)  

One of my FAVORITE parts of this was that I learned how to make not one, but TWO different kinds of paper flowers - which you can see on both end pieces of the banner...the rolled flowers, and the roses.  Aren't they gorgeous??!!  I LOVE them and will be making LOTS of them, I just know!  Also loved using Glimmer Mist on the burlap - SO cool!  And loved, as usual, using my Distrezz-it-All (on the cardboard backings of all the banner pieces)...giving the banner a grungier look.  Oh yeah - and my newest tool - my hot-set jewel-setter - SOOOO cool!!  That is FUN!  So easy to add gorgeous crystals to any project!!  I finally finished adding my final ribbon touches to mine tonight, and had a really hard time getting good pictures of it (right now, it's just hanging from some wall hangers above my blinds on my slider - it won't be staying there).  I REALLY need a DSLR with a wide-angle lens!!!  


Wednesday, August 25, 2010

Inspiration Wednesday 8/25/10


Once again, it's almost "Inspiration Thursday..." but I'm working on it, really, I am!!  :)  Today's page was a bit of a challenge for me.  I actually STARTED it last Saturday, when I was stuck on bedrest, and was playing with my watercolor crayons and watercolor pen/brush thing-a-ma-jig - in bed.  I had painted one half of the page orange and the other half pink, and planned to build on it for this weeks IW page.

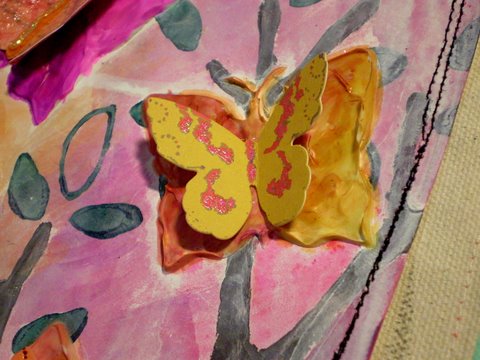
Then on Monday of this week, once I got off bedrest (another story for another day), I decided I wanted to try doing some modeling compound on the page, so did a little more work.  I used Donna Downey's HUGE foam tree stamp and first stamped the trunk and branches using some Folk Art brown of some shade; dried that, then stamped the leaves using Golden fluid acrylics Phtalo Green.  After that was all dried, I used Golden  Molding Paste with the leftovers from some butterflies I had recently cut on a Cricut machine (I kept them for this purpose) and created 3 butterflies on the page - a large, medium, and small one.  I knew they would need time to dry, so I left them to dry for a couple days (it doesn't actually take that long).

Finally, today, Wednesday, the day I look forward to every week...Inspiration Wednesday.  I couldn't wait for my kids to go down for a nap.  I watched Donna's video in awe...I always love her work.  It's always inspiring.  It also made me long for fall, for some reason, and I suddenly hated the extra-bright colors on my page even more than I already had been when I woke up this morning.  So I took some Golden fluid acrylic Nickel Azo Gold to darken the orange some, and a mixture of Golden fluid acrylic Quinacridone Magenta and heavy body acrylic Ultramarine Violet, and carefully spread those over the page, making sure not to accidentally paint my butterflies before I was ready to.  I painted right over those green leaves that were just way to springy and summery for my fall-wishing self.  And still, it was all too bright.  So out came the Golden Titanium White airbrush paint - time for some drippage!!  Finally - things got toned down!!  I still wasn't sure I was going to love the outcome, but at least we were getting somewhere.  I think the next thing I did was actually to run the top of the page through my new toy, the Zutter Distrezz-it-All.  And then I added a couple lines of stitching with my sewing machine along the right side of the page, just because it felt right.


Then, finally, I was ready to paint the butterflies.  I debated over whether to use paint - and if so, what kind?  But in the end, I decided to try something new - why not?  I wasn't loving anything else really so far, so why not try something else new?  So I got out my blending pens which almost never get used, and my new Ranger alcohol inks to see if they could be used together.  I didn't actually Google it.  I just went for it.  And it seemed to work.  I actually really like how they turned out, and how I was able to mix colors.  I used Wild Plum and Butterscotch, in case anyone is wondering.  Cool thing I learned?  When the ink dried out in my little palette, I added a little denatured alcohol to it, and I was able to pick it right back up with the blending pen!!  After each of the butterflies was painted, I added a Cricut-cut paper butterfly on top - using Beacon 3-in-1 craft glue - love that stuff!!  On this top butterfly, I covered the paper one with Tim Holtz's Rock Candy crackle paint - LOVE - and when that was dry, down the center, I added some orange flocking and a line of clear Stickles. (Don't mind my inky finger - they seem to look like that a LOT these days!)  The second butterfly (the middle sized one) is above, and I just added a store-bought paper butterfly to it.


This one below is the smallest of the three molding paste butterflies, and again, I added a store-bought ephemera butterfly to it.  Loving the pink and orange.  You can see the incredible build-up and texture of the molding paste.


This next pictures shows the stitching, as well as the edge of a tag I added to the lower right part of the page.  The tag also came from my ephemera box.  I ran the edge of the tag through the Distrezz-it-All (LOVE that thing!), and stitched another paper butterfly onto the tag (also covered in Rock Candy crackle paint). I also used distressing ink around the edges of the butterfly and the tag.  


After how much I struggled with coming to LOVE this page, (which I finally did come to LOVE), and truly experimenting with new things...I couldn't think of a better quote stamp to put on this page!!  This is another Donna Downey stamp, and is in the "She Said" stamp set.  (A fabulous set if you are going to buy just ONE of her sets, though they are ALL fantastic!!)  I wanted this quote to really pop, so I used my VersaMark embossing ink pad and black embossing powder - but I also tried something totally new.  First I added a strip of some totally random black pipe tape or something to the page (really, I have no idea what kind of tape it is!).  Then, I wanted to make sure the word "BELIEVE" was on a piece of masking tape - it took a little extra work, but wasn't too hard (if you want details, let me know, and I'll explain how to do it).


A look at the entire tag.  I have a lot going on in my life right now, and a lot of it is new...so the "change is good" quote is fitting.  I have, because of my fumble fingers, pretty much quit trying to tie ribbons through holes, so I am totally loving the Tim Holtz Tiny Attacher (no, I am not getting paid by either Donna or Tim, though you would think I am by how much I mention their products, eh?!).  Seriously - this little tool is THE. BEST. TINY. STAPLER. EVER.  When someone else said that, I thought, "Come on, how good could it be?"  That good.  Really.  Get one.  You will not regret it!!  So now I use my Tiny Attacher to staple my ribbons to my tags - SO much easier than fighting to tie ribbons through holes!!  I attached the tag to my page by sewing it right to the page!!  (I was in a sewing mood today, I guess.)


The next two pictures give you a better look at the "white" mini-pom-pom fringe I glued to the bottom of the page.  I love how it turned out.  It really did start out white.  That was before I dunked it in a little bowl with some water and a few drops of Wild Plum alcohol ink, followed by some time in front of my blow-dryer (did I mention my heat gun died mid-way through this page?).  Then I spritzed it a couple times with Tiger Lily Glimmer Mist and blow-dryed it again (trust me - SO not as effective as a heat gun - I think it was still slightly damp when I glued it onto the page).  


I learned my lesson today.  Never make up your mind until your art is COMPLETELY finished!!  I was convinced I was NOT going to like this page!  And now I think it's one of my favorite so far!!  :)

LinkWithin

Related Posts Plugin for WordPress, Blogger...